Address Verification
Ensuring that your users have accurate address details is a key factor to making sure that any mail or
packages sent out are received at the correct address.
In this guide, we will be going over a quick setup for getting PostGrid's address verification set up and how to use it to the best effect.
Getting Your API Key
Verify with PostGrid is straightforward to get started with and the first thing we will need is our API key.
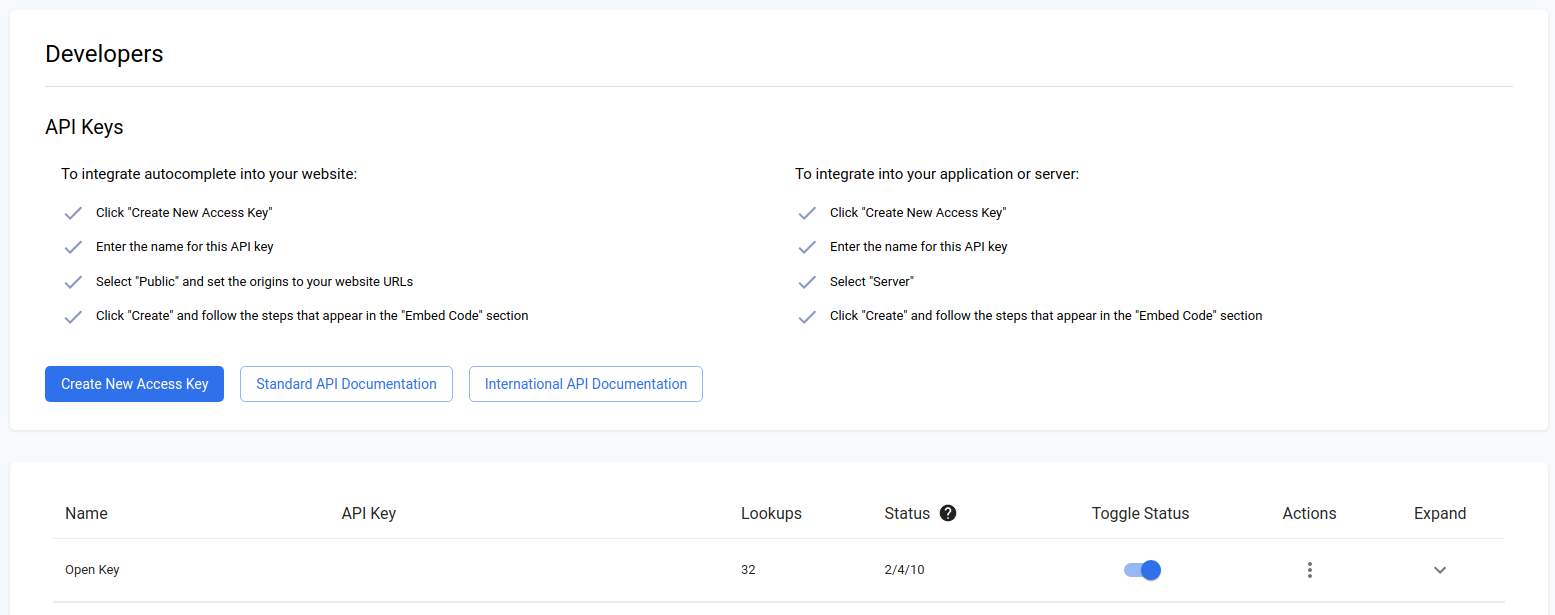
To access this, you will first want to head over to your dashboard and navigate to the developers sections. From here, you may either grab an existing key or create a new one.

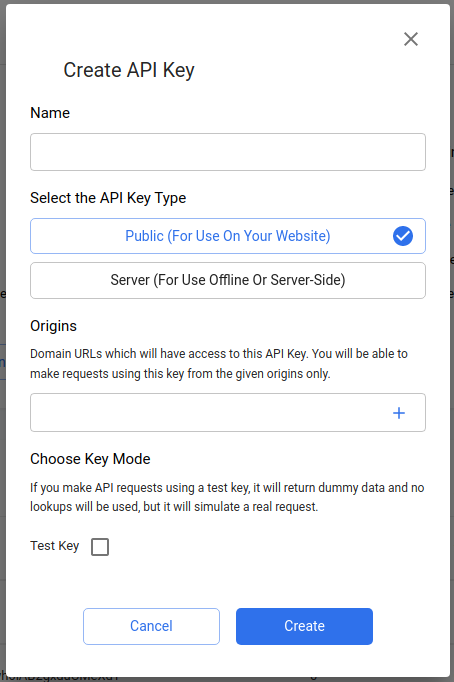
Creating a new access key, we see a few options and importantly whether or not this API key will be for public use or to be used on your own server.
In cases where you want to run validation on the front end of your web application, this is where you would be looking to use a public key which can only be used on specified origins.
Since we will be setting this up in a local environment for applications on verifying an existing database of user data, we will create a server key which can be used anywhere (and you definitely wouldn't want that on your webpage!).
Also, you may create a test key which does not consume any lookups but only returns dummy data. Test keys will be prefixed by 'test' instead of 'live' as well.
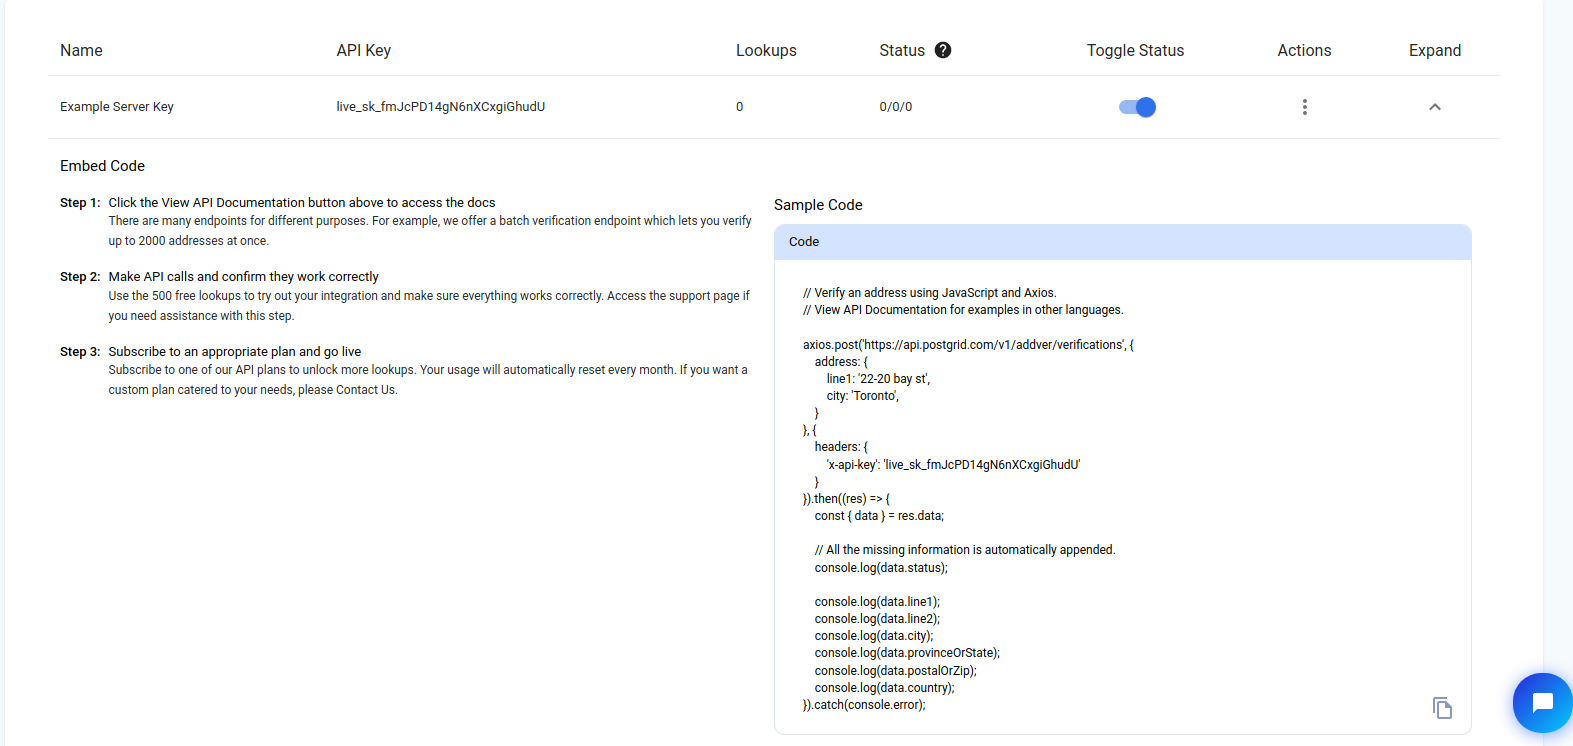
Since we only get dummy data back, I'll be using a live key for this quick start guide.

Once we have our key, we find a quick a brief JavaScript example using the Axios library.

Setup
For this example, we will be working with the Node library node-fetch to make API requests just as we would in a browser.
This guide will also be generally applicable to other libraries and programming languages with generic support such as Python, though it will focus on JavScript implementation.
Let's start by setting up a simple index.js file with our singular dependency, an async logging function to log results of async function, and some constants which we will be using throughout.
import fetch from 'node-fetch';

const POSTGRID_STANDARD_URL = 'https://api.postgrid.com/v1/addver';
const POSTGRID_INTL_URL = 'https://api.postgrid.com/v1/intl_addver';

const API_KEY = ''; // Your API key here

/**
 * @param {Promise<any>} x
 */
async function logAwait(x) {
    try {
        console.log(await x);
    } catch (e) {
        console.error(e);
    }
}
and run npm install node-fetch to add our dependency. To run our code, we will simply use node index.js to execute what we have set up.
Note on JSDoc
Also, as you can see from the function logAwait, we will be adding annotations to our code to explain what you can expect from each of the parameters being used.
For more information, be sure to have a look at JSDoc.
If you are familiar with TypeScript, these annotations can be seen as a way to add typing to a JS file without using TypeScript syntax.
These annotations will also allow us easy access to autocomplete within our code.
US and Canadian Addresses
For the first section, let's try out verifying some addresses using our standard API.
This end point covers addresses in both the US and in Canada and comes at a different cost to our international product.
Verifying an Address
For our first verify function, let's set up a function for verifying an address broken down into its components (line 1, city, state/province, etc.).
Following the API docs, we find that we will need to setup a POST request to /verifications, where we can use the example to fill in how our data should be structured.
Note that we may also supply the address as a string such as '145 Mulberry St, New York, NY 10013'.
/**
 * @param {{
 * line1:string;
 * line2?:string;
 * city?:string;
 * provinceOrState?:string;
 * postalOrZip?:string;
 * country?:string;
 * } | string} address
 */
async function verifyAddress(address) {
    const requestOptions = {
        method: 'POST',
        headers: {
            'x-api-key': API_KEY,
            'Content-Type': 'application/json',
        },
        body: JSON.stringify({ address }),
    };

    const response = await fetch(
        POSTGRID_STANDARD_URL + '/verifications',
        requestOptions
    );

    return await response.json();
}
With this function, let's add an example and log the output by running node index.js. Keep in mind that providing the country code will give the best results.
const testAddress = {
    line1: '145 Mulberry St',
    city: 'New York',
    provinceOrState: 'NY',
    country: 'US',
};

logAwait(verifyAddress(testAddress));
which gives us back the following result:
{
    "status": "success",
    "message": "Address verification processed.",
    "data": {
        "city": "NEW YORK",
        "country": "us",
        "countryName": "UNITED STATES",
        "errors": {
            "line1": [
                "Missing Value: Suite identifier"
            ]
        },
        "line1": "145 MULBERRY ST",
        "postalOrZip": "10013",
        "provinceOrState": "NY",
        "status": "failed",
        "zipPlus4": "4766"
    }
}
The first detail to look at is the status at the bottom. Here's a look at the possibilities.
failed- the address is undeliverable as it is and no clear corrections could be made.corrected- address matches one found in USPS or Canada Post database but needed a correction. The resulting address is deliverable.verified- address is an exact match as is and can be delivered to.
In our example, the address was undeliverable. Fortunately, we also find an errors object which tells us that the only correction we will need to make is to determine which unit number is needed.
Also note how that ZIP code and the additional 4 digits were still able to be added, so if we had specified the unit number, then this address would have been marked as corrected.
As mentioned above, we can also supply the address as a freeform string.
Let's try out and example with a Canadian address.
const testStringAddress = '47 Dietz Ave S, Waterloo, ON';

logAwait(verifyAddress(testStringAddress));
This gives the following result:
{
    "status": "success",
    "message": "Address verification processed.",
    "data": {
        "city": "WATERLOO",
        "country": "ca",
        "countryName": "CANADA",
        "errors": {
            "postalOrZip": [
                "Missing Value: Postal Code"
            ]
        },
        "line1": "47 DIETZ AVE S",
        "postalOrZip": "N2L 2J8",
        "provinceOrState": "ON",
        "status": "corrected"
    }
}
Extra Details
While the information produced by verifying an address are nice, we can upgrade our output using query parameters.
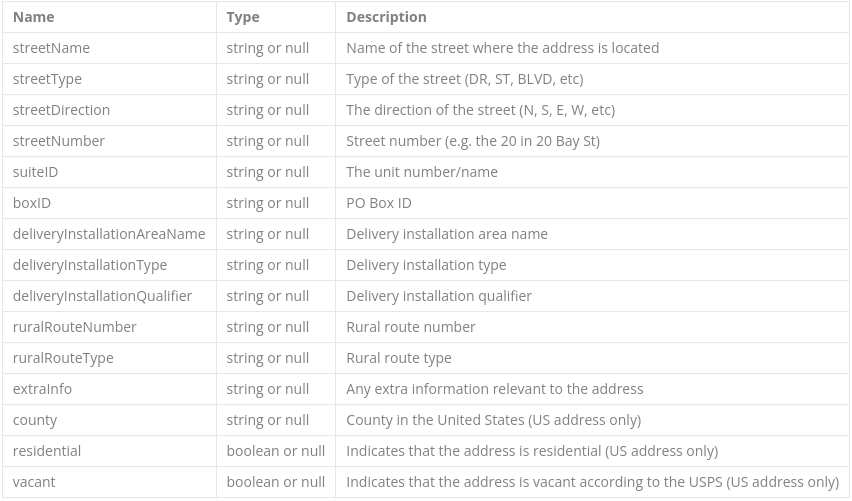
To get extra details, all we need to do is add the parameter includeDetails=true to our URL in our API call.
Here's a look at the extra details that could be provided, which can be found in our API documentation.

Also, we can get our data back using proper case with the query parameter properCase=true.
Let's upgrade our existing function to consume these parameters as boolean inputs.
async function verifyAddress(address, includeDetails, properCase) {
    const requestOptions = {
        method: 'POST',
        headers: {
            'x-api-key': API_KEY,
            'Content-Type': 'application/json',
        },
        body: JSON.stringify({ address }),
    };

    const url = `${POSTGRID_STANDARD_URL}/verifications?includeDetails=${includeDetails}&properCase=${properCase}`;

    const response = await fetch(url, requestOptions);

    return await response.json();
}
Let's try this out with an example, modifying our first failed address to include a unit number.
const testAddress = {
    line1: '145 Mulberry St Ph D',
    city: 'New York',
    provinceOrState: 'NY',
    country: 'US',
};

logAwait(verifyAddress(testAddress, true, true));
We now see the following output.
{
    "status": "success",
    "message": "Address verification processed.",
    "data": {
        "city": "New York",
        "country": "us",
        "countryName": "UNITED STATES",
        "details": {
            "streetName": "Mulberry",
            "streetType": "St",
            "streetNumber": "145",
            "suiteID": "D",
            "suiteKey": "Ph",
            "county": "New York",
            "residential": "True"
        },
        "errors": {},
        "line1": "145 Mulberry St Ph D",
        "postalOrZip": "10013",
        "provinceOrState": "NY",
        "status": "corrected",
        "zipPlus4": "5230"
    }
}
Geocoding
In addition to the above parameters, you may also supply the parameter geocode=true to receive geocoding data on latitude and longitude of a particular address.
Check out the geocoding section in our docs for more info.
This will also come as an additional lookup, so a total of two lookups per API call with geocoding enabled.
To get access to this feature, be sure to reach out to us at [email protected].
Verifying Batches of Addresses
In addition to validating singular addresses, PostGrid also supports verifying addresses in batches of up to 2000 at a time.
This can help verify existing databases of addresses and allow you to verify many more addresses without exceeding any rate limits.
Fortunately, we are already familiar with verifying addresses so we can make a similar function for handling batches.
Note that batches can contain a mix between structured and freeform addresses.
/**
 * @param {({
 * line1:string;
 * line2?:string;
 * city?:string;
 * provinceOrState?:string;
 * postalOrZip?:string;
 * country?:string;
 * } | string)[]} addresses
 * @param {boolean} includeDetails
 * @param {boolean} properCase
 */
async function verifyAddresses(addresses, includeDetails, properCase) {
    const requestOptions = {
        method: 'POST',
        headers: {
            'x-api-key': API_KEY,
            'Content-Type': 'application/json',
        },
        body: JSON.stringify({ addresses }),
    };

    const url = `${POSTGRID_STANDARD_URL}/verifications/batch?includeDetails=${includeDetails}&properCase=${properCase}`;

    const response = await fetch(url, requestOptions);

    return await response.json();
}
Note the change to the endpoint as well, since this is a POST request to /verifications/batch.
The output of this function will simply be an array of the results if we had verified them individually, preserving the order as well.
const testStringAddress = '47 Dietz Ave S, Waterloo, ON';

const testAddress = {
    line1: '145 Mulberry St Ph D',
    city: 'New York',
    provinceOrState: 'NY',
    country: 'US',
};

logAwait(verifyAddresses([testAddress, testStringAddress], false, false));
This test case gives us the following result.
{
    "status": "success",
    "message": "Verified address batch successfully.",
    "data": {
        "results": [
            {
                "verifiedAddress": {
                    "line1": "145 MULBERRY ST PH D",
                    "city": "NEW YORK",
                    "postalOrZip": "10013",
                    "provinceOrState": "NY",
                    "country": "us",
                    "countryName": "UNITED STATES",
                    "zipPlus4": "5230",
                    "status": "corrected",
                    "errors": {}
                }
            },
            {
                "verifiedAddress": {
                    "line1": "47 DIETZ AVE S",
                    "city": "WATERLOO",
                    "postalOrZip": "N2L 2J8",
                    "provinceOrState": "ON",
                    "country": "ca",
                    "countryName": "CANADA",
                    "status": "corrected",
                    "errors": {
                        "postalOrZip": [
                            "Missing Value: Postal Code"
                        ]
                    }
                }
            }
        ]
    }
}
International Address Verification
With a basic understanding of the API for the standard product, let's now see how this transforms into the very similar international product.
Since the endpoints are so similar, let's just upgrade our existing functions and try them out to see the new output. To enable this, everything works exactly as before but you will want to use the international address URL instead.
Also, the output will be more enriched by default with a different set of details.
Using the international URL, let's test out an address.
/**
 * @param {{
 * line1:string;
 * line2?:string;
 * city?:string;
 * provinceOrState?:string;
 * postalOrZip?:string;
 * country?:string;
 * } | string} address
 * @param {boolean} includeDetails
 * @param {boolean} properCase
 * @param {boolean} international
 */
async function verifyAddress(
    address,
    includeDetails,
    properCase,
    international
) {
    const requestOptions = {
        method: 'POST',
        headers: {
            'x-api-key': API_KEY,
            'Content-Type': 'application/json',
        },
        body: JSON.stringify({ address }),
    };

    const url = `${
        international ? POSTGRID_INTL_URL : POSTGRID_STANDARD_URL
    }/verifications?includeDetails=${includeDetails}&properCase=${properCase}`;

    const response = await fetch(url, requestOptions);

    return await response.json();
}

const testAddress = {
    line1: '10 Downing St',
    city: 'London',
    country: 'GB',
};

// includeDetails = true
// properCase = false
// international = true
logAwait(verifyAddress(testAddress, true, false, true));
Running the above code in our index.js file now gives us the following.
{
    "status": "success",
    "message": "International address verified successfully.",
    "data": {
        "city": "London",
        "country": "GB",
        "details": {
            "premise": "10"
        },
        "formattedAddress": "10 Downing Street,London,SW1A 2AA",
        "line1": "10 Downing Street",
        "line2": "London",
        "line3": "SW1A 2AA",
        "postalOrZip": "SW1A 2AA",
        "provinceOrState": "London",
        "summary": {
            "verificationStatus": "partially_verified",
            "postProcessedVerificationMatchLevel": "premise_or_building",
            "preProcessedVerificationMatchLevel": "premise_or_building",
            "parsingStatus": "identified_and_parsed",
            "lexiconIdentificationMatchLevel": "premise_or_building",
            "contextIdentificationMatchLevel": "premise_or_building",
            "postCodeStatus": "postal_code_primary_added",
            "matchScore": 100
        }
    }
}
One other point to note for the international product is that geocoding is now accessed by providing the query parameter geoData=true instead.
Conclusion
With this quick start guide, you are now ready to dig in and set up your own applications to start verifying entire databases or adding an additional layer of verification to incoming addresses.
For further questions, be sure to check our our standard API docs here and our international API docs here.
For anything else, be sure to email us at [email protected].
Updated 5 months ago
