QR Code & PURL Trackers
Trackers allow you to track user interactions in your orders with the use of personalized URLs and QR codes
Tracking user interactions is simple by integrating Trackers into your orders. Trackers can be incorporated into orders in the form of QR codes or personalized URLs (PURL) to monitor interactions. Information such as unique and total visit count, the interacting device, IP address and associated order can be found on visits to a Tracker.
The Tracker integration flow is composed of the following steps:
- Create a Tracker with a
redirectURLTemplateand aurlExpireAfterDays - Include The Tracker in a template using the Tracker id. eg.:
{{tracker_abcdefgh}}or{{tracker_abcdefgh.qrcode}} - Send mail using that template (no need to pass the trackers as merge variables here)
- Get notified when a recipient scans the generated QR code or access the PURL related to that specific mail
It is important to note a few things about the Tracker behavior:
- One Tracker may be used to generate unique QR codes and PURLs per mail. Therefore, if you were to send a batch of letters using a template with the same Tracker id, the QR code/PURL generated would be unique per letter.
- The QR codes and PURLS are unique per mail. However, the redirect URL Template is the same, meaning the domain name that the user gets redirected to is the same for all recipients, with the exception of paths and parameters that can be personalized. eg.:
https://postgrid.com?name={{to.firstName}} - The
urlExpireAfterDaysparameter refers to the number of days each QR code and PURL will be active for after being generated upon mail creation. If theurlExpireAfterDaysfor a Tracker were set to 30 days, and you create one letter with a QR code today, then that QR code will expire 30 days after today. Though if you were to create another letter with a QR code tomorrow, then that other QR code will expire 30 days from tomorrow.
1. Create a Tracker
The main two parts of a Tracker are:
- The redirect URL template, that will take the user to desired site.
- The number of days for the PURL or QR code to expire after it had been generated
Redirect URL Template
When creating a Tracker, a redirectURLTemplate must be specified. This URL template serves as the URL which the Trackers will redirect the recipient to. If we wanted to redirect to the PostGrid website, a redirectURLTemplate of https://postgrid.com must be specified. This is great if you need to redirect to a general page but, if further personalization is required, merge variables can be added to customize the URL's paths or parameters.
Any valid merge variables which are in the redirectURLTemplate will be filled in during the generation of the PURL. This means that you can personalize URLs based on each order. The table below showcases a couple of different examples of merge variables in a redirectURLTemplate and the resulting URL.
| URL Template | Resulting URL |
|---|---|
https://postgrid.com?name={{to.firstName}} | https://postgrid.com?name=Calvin |
https://postgrid.com?id={{to.metadata.id}}&favoriteDance={{to.metadata.favoriteDance}} | https://postgrid.com?id=abc123&favoriteDance=ballet |
Any merge variables which are accessible in an order will also be accessible in the PURL for the Tracker when generating the order. This will allow you to access custom information for a more personalized customer experience.
Note: the redirect URL is limited by its domain, it is not possible to customize domains, only URL paths and parameters as illustrated above.
For more details on how to create a Tracker, check out our API documentation or our dashboard tracker guide.
2. Including Trackers in Templates
To generate a PURL , a Tracker id must be included in a template as if it was a merge variable :
{{tracker_abcdefghijklmnopqrstuvwxyz}}
To generate a QR code, a Tracker id with the addition of a .qrcode must be included as if it was a merge variable in an image source link:
<img src="{{tracker_abcdefghijklmnopqrstuvwxyz.qrcode}}" />
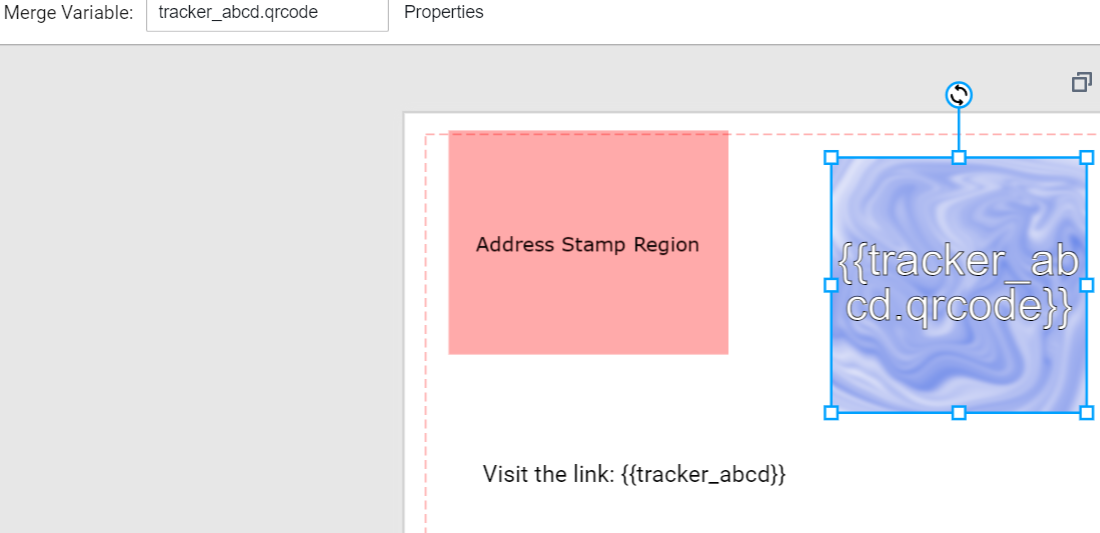
The image below presents and example of including a QR code and a PURL in a Template using our dashboard template tool:
Another example of including both in a HTML template can be seen below:
<html>
<!-- By using the Tracker's ID, a short URL will be generated in its place. -->
<p>Visit our website at {{tracker_abcdefghijklmnopqrstuvwxyz}}</p>
<!--
We can also use the Tracker's ID but access a `qrcode` field to generate a QR code.
Here, a new data QR code data URL will be generated in its place.
-->
<p>Don't feel like typing out the URL? Scan the QR code below!</p>
<img src="{{tracker_abcdefghijklmnopqrstuvwxyz.qrcode}}" />
</html>In this example you can see that we use the Tracker's ID as a merge variable, when used this way a short URL based on the Tracker's redirectURLTemplate will be generated in place of the merge variable. If .qrcode is appended to the merge variable, a data URL for a generated QR code which links to the Tracker's PURL.
For more details on how to include a tracker in a template, check out our API documentation or our dashboard tracker guide .
3. Create Mail Using a Template With a Tracker
For either a single mail or a batch send, simply include the template with the tracker as you normally would with any mail creation. It is important to note that even if a batch of mail is sent, the QR codes/PURLs will still be unique per mail.
If you are using the mail creation form on the dashboard, the trackers might show as if they were merge variables. However, it is not necessary to add values to those fields as our system will generate the trackers from the template, you may leave them empty and it will not interfere with QR code/PURL generation.
4. Get Notified Upon PURL and QR code Access
Tracker Visits Information
When a recipient access the QR code/PURL a new tracker_visit object is created with the following information:
| Name | Type | Description |
|---|---|---|
| id | string | A unique ID prefixed with tracker_visit_ |
| object | string | The object of the response, always tracker_visit |
| tracker | string | The ID of the tracker related to this visit |
| live | boolean | Indicates if the visit was used in a live order or not |
| orderID | string | The ID of the order where the interaction occurred, eg.: letter_abcdefg |
| device | string | The type of device associated with the visit, eg.: Windows 10 |
| ipAddress | string | The IP address associated with the visit |
| createdAt | Date | The creation date of the Tracker Visit |
| updatedAt | Date | The date at which the Tracker Visit was last updated |
Additionally the tracker object visitCount and uniqueVisitCount will be updated accordingly.
To find out which contact the tracker_visit information is related to, find the orderID and the recipient data is going to be listed.
How to Get Tracker Visits Information
There are currently three paths to retrieve tracking information:
- Utilizing our webbook with the
tracker.visitedtrigger, for more information on using our webhooks you can visit our webhook guide. - Visiting the Trackers section in the dashboard where you can check tracker visits and download a csv file with them.
- Using our List Tracker Visits API endpoint
https://api.postgrid.com/print-mail/v1/trackers/:id/visits, for more information about our API you can visit our API documentation.
Updated 10 months ago