Audience Setup
Before you start sending mails, you need to specify the sender and recipient addresses. PostGrid simplifies this process by allowing you to create contacts directly from the dashboard.
Creating Individual Contacts
To create contacts, navigate to the Contacts tab located on the left side of the navigation bar.
On this page, you can find existing contacts and click on them to get more information. You can also use the search bar at the top to search for contacts using any known information, such as names, company names, or addresses. Let's click on 'Create Contact' in the top-right to create a new contact so that you can send mailings.
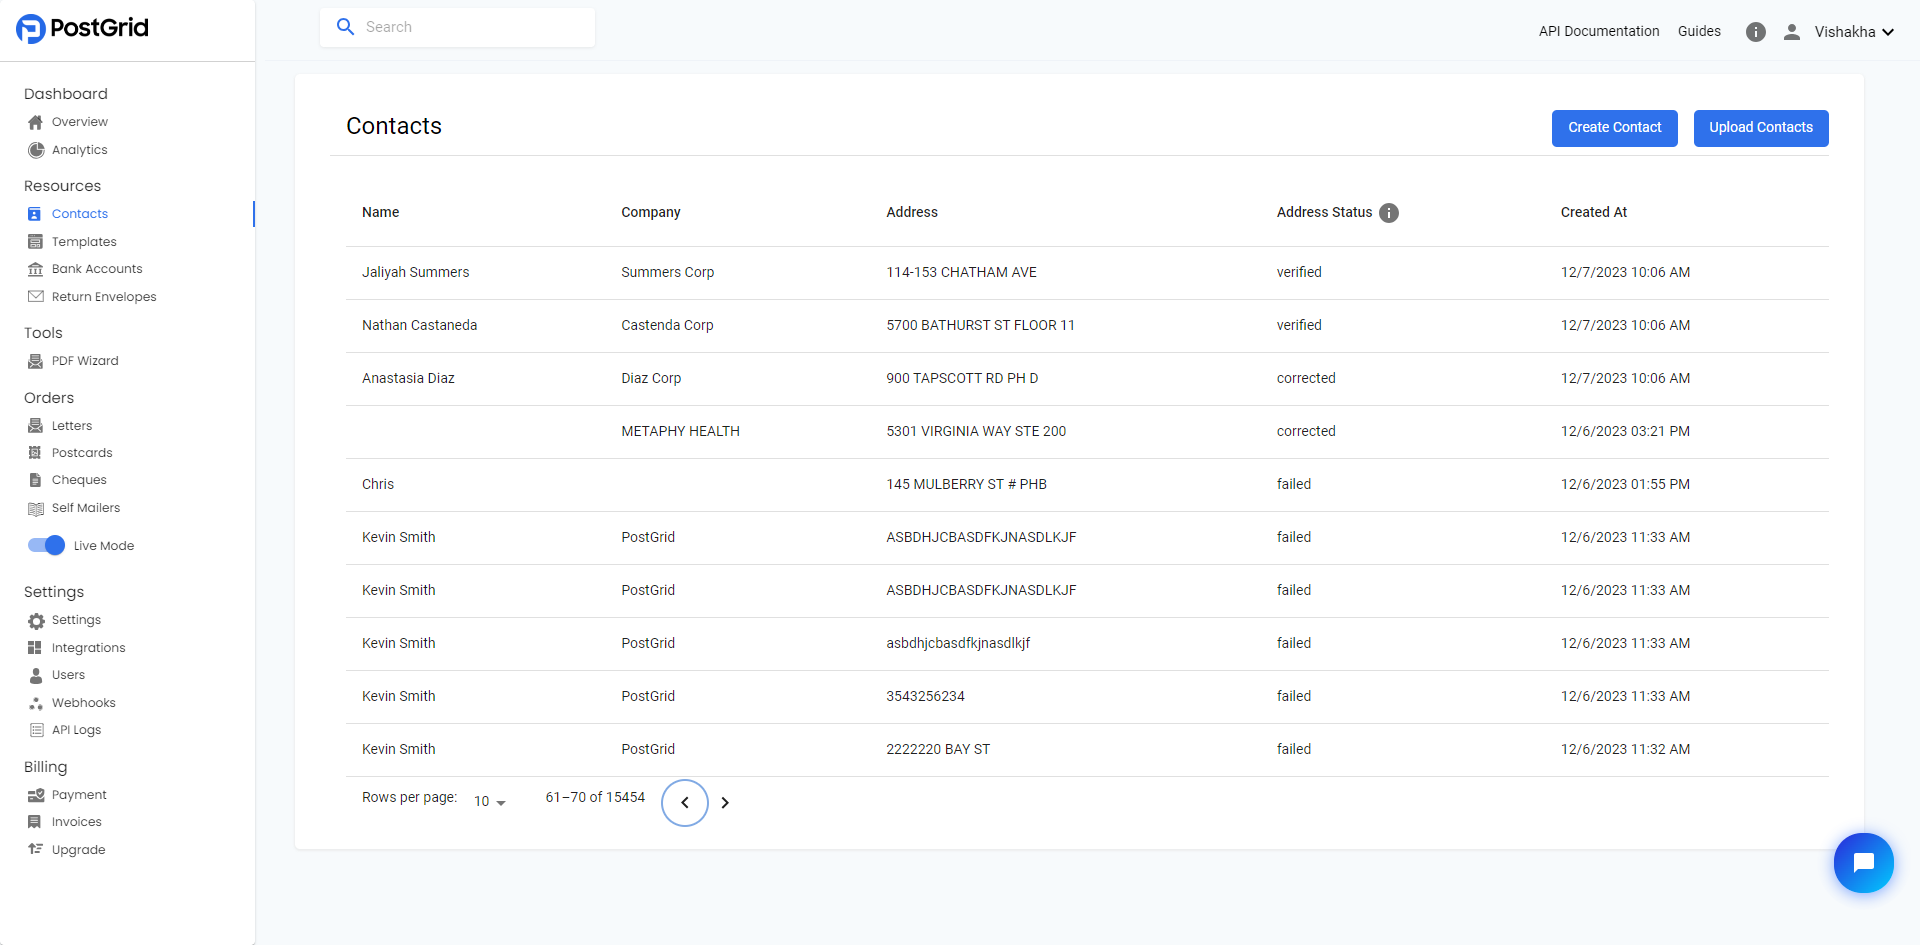
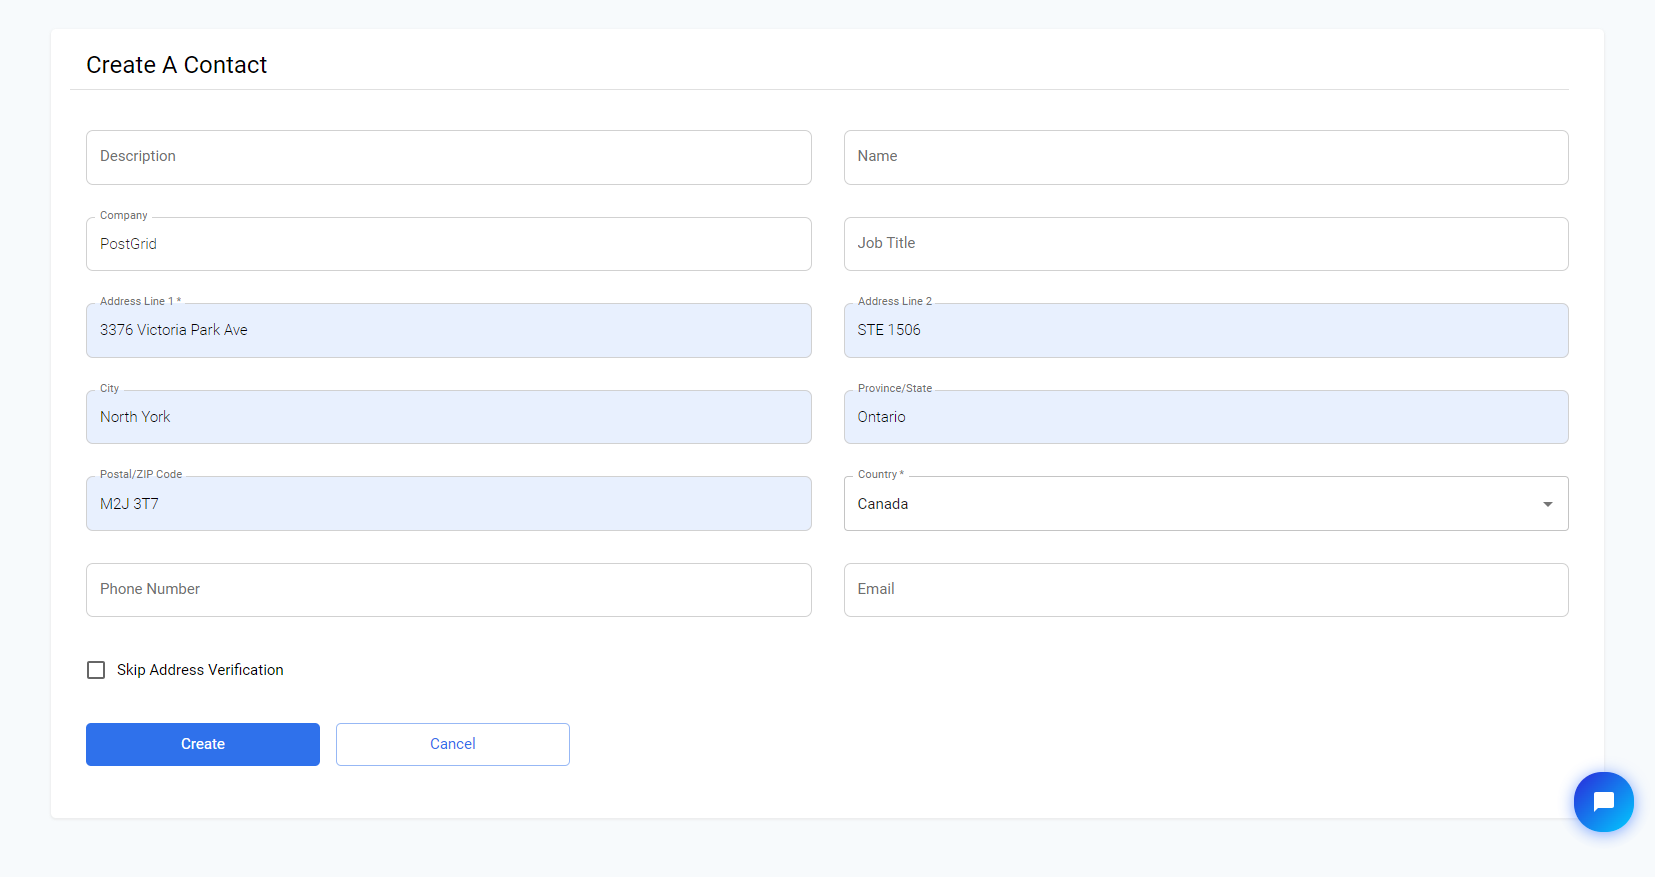
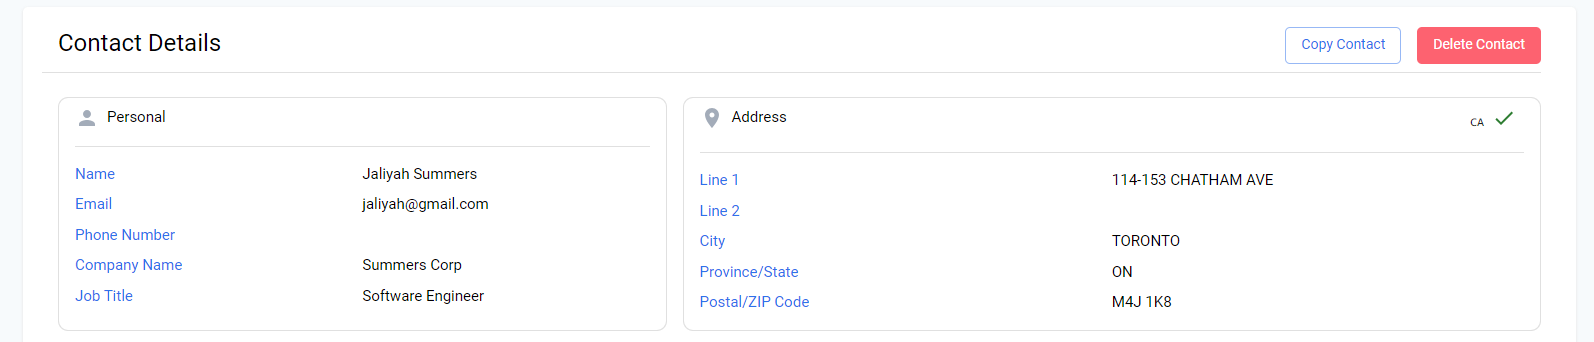
Once you have filled in the required details, click the create button. This will redirect you to the contacts list page, where your newly created contact will be listed at the top. To make changes to contact information, delete a contact, or check if their address is verified, click on the contact in the list page. You will then be redirected to a page with these options.
Note for Line 2Please add the suite identifiers as a prefix along with the suite number in Line 2. The possible suite identifiers include "#", "APT", "STE", "ST", etc. Also, add a space between the suite identifier and suite number.
Creating Multiple Contacts
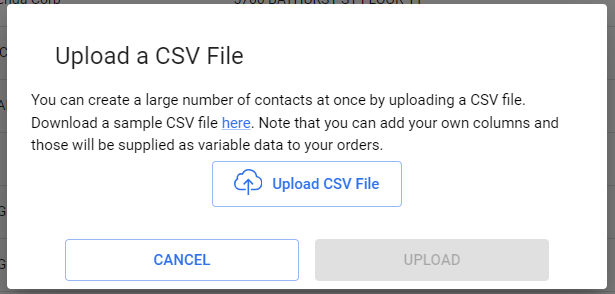
If you have multiple contacts that you would like to upload at once, you can use the 'Upload Contacts' option found on the contacts page. Here, you can select a CSV file with your contacts separated by lines. For proper formatting of your contact information, please refer to the example found here.
Key Points
- You can either add the First Name and the Last Name or the Company Name or both based on your preference and the merge variables you are using in the template.
- Please leave optional columns blank if you are not using them.
- Kindly make sure the country code is in the accepted ISO31661 Alpha2 code format (https://www.iso.org/obp/ui/#search)
- Merge variables can be added after the Country Code column. Please make sure the naming for merge variables used in the template matches the column header in the CSV.
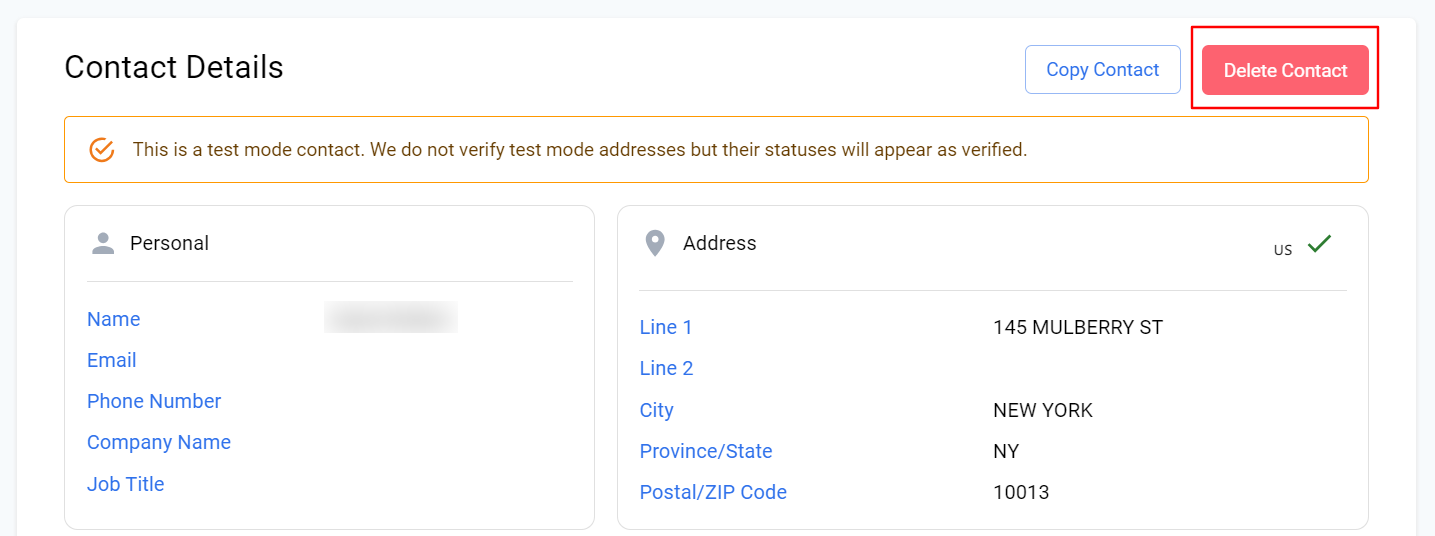
Note: One important aspect to differentiate in contacts is whether they are created in live mode or test mode. A contact created in test mode will have their address marked as verified, even though it has not actually been verified. On the other hand, when you create contacts in live mode, PostGrid will verify the address and accurately determine whether local postage can deliver to that address.
Address Standardization and Verification
PostGrid cleanses all newly created addresses to optimize for maximum deliverability.
- All North American addresses will be automatically standardized, cleansed, and verified through our CASS-Certified Address Verification System before the order is created, either through the API or the dashboard.
This feature is offered at no additional cost with our Print and Mail services.
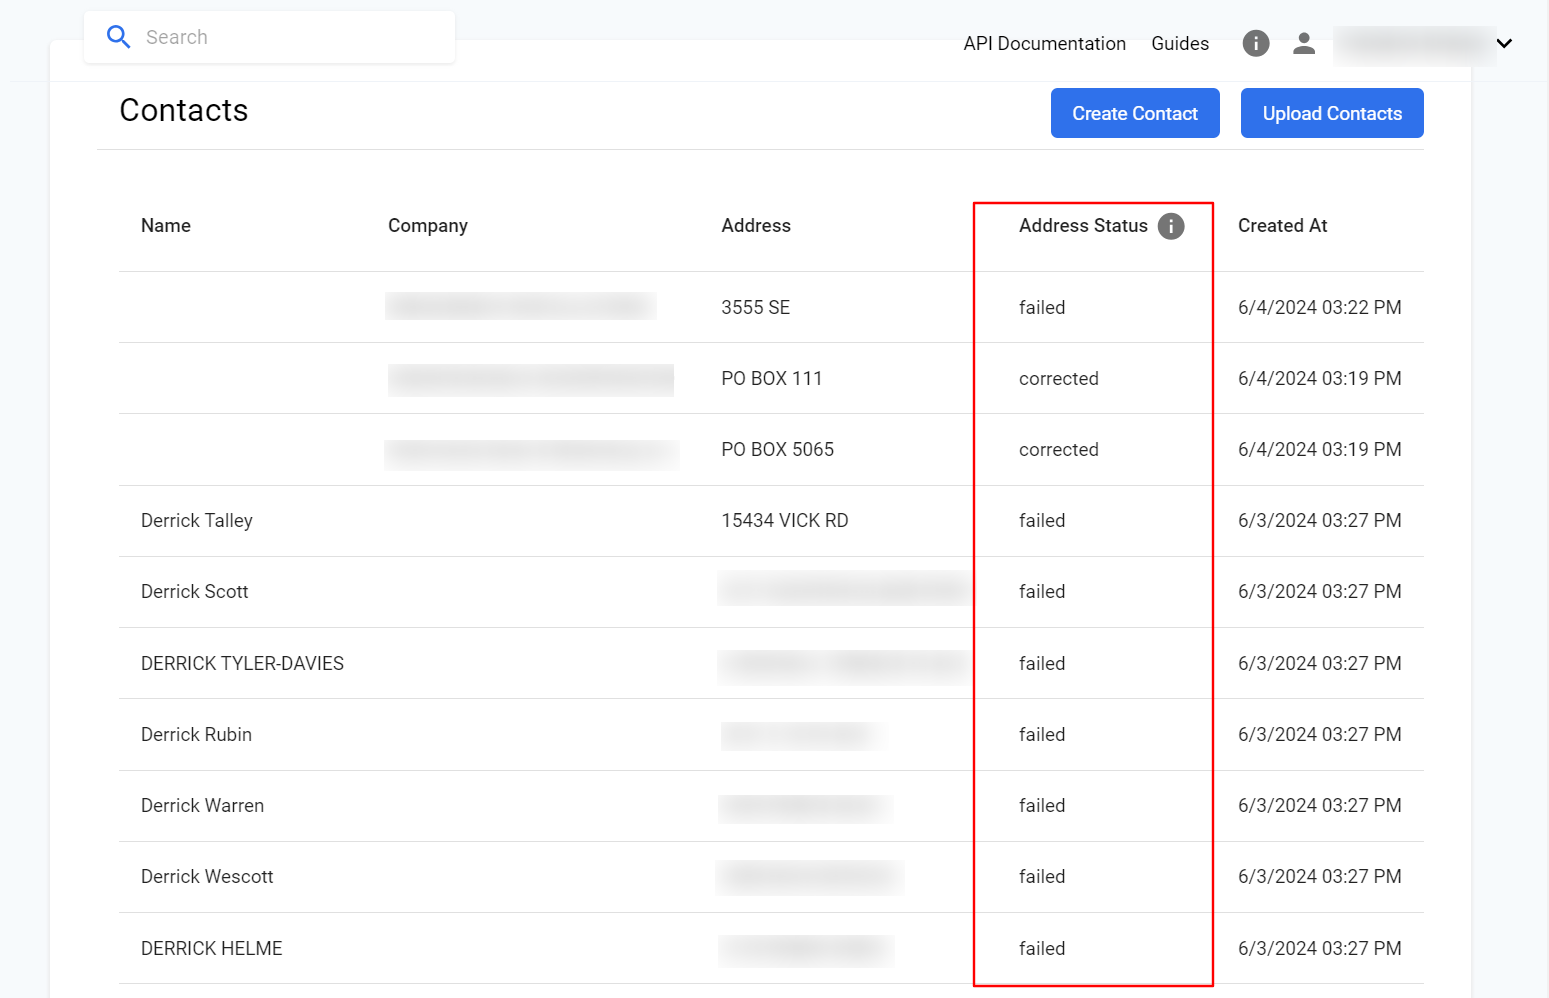
Please note, Address Verification only happens for the contacts and orders created in LIVE mode. To check the status of address verification, refer to the "Address Status" field on the Contacts page.
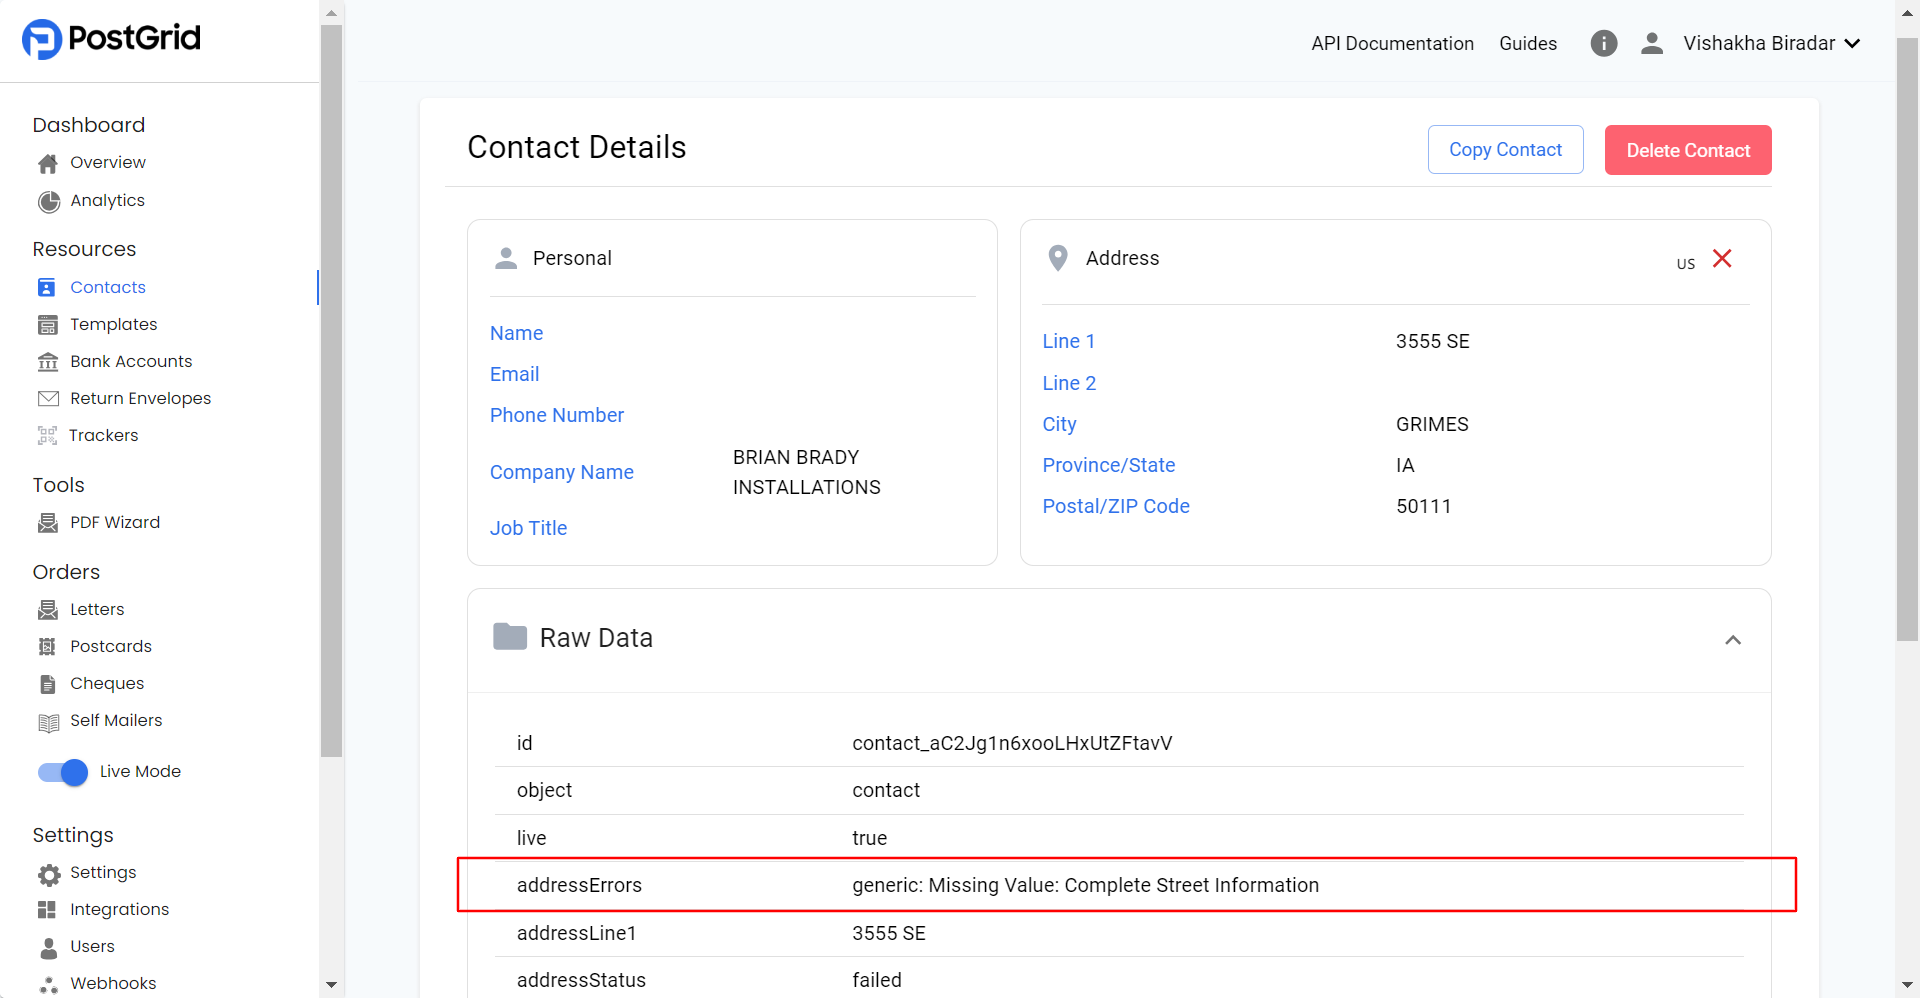
For more details about address verification, click on the contact and check the raw data section.
Address Strictness
For all the mailings you send out, we verify the recipient address for every order. This ensures that your mail reaches the correct audience and reduces the probability of mail returns. Please note that this service is currently only available for users sending mailings to the United States of America and Canada.
To take advantage of this service, simply select the appropriate option under Address Strictness on the Settings page.
- Verified: If you choose the 'verified' option, we will only send mailings to recipient addresses that we are able to find a match for in the USPS database (for US) or Canada Post database (for Canada), and that are deemed deliverable.
- Corrected: If you choose the 'corrected' option, we will send mailings to recipient addresses that are verified, as well as addresses that we can find an approximate match for in the USPS database (for US) or Canada Post database (for Canada). These addresses will be corrected according to the required standards of the respective carrier.
- Corrected to Street: If you choose the 'corrected to street' option, we will send mailings to all addresses accepted under the 'corrected' option, plus addresses where we matched the street-level (primary) address but could not confirm the secondary unit information — for example, a missing apartment/suite number (USPS DPV indicator D) or an unconfirmed secondary unit (USPS DPV indicator S). The primary delivery address is valid, but mail may not reach the intended recipient if the secondary unit is required and incorrect or absent.
- Failed: If you choose the 'failed' option, we will send mailings to all recipient addresses, regardless of their verification status.
Note that the address strictness applies to both Sender and Recipient Address.
Skipping Address Verification
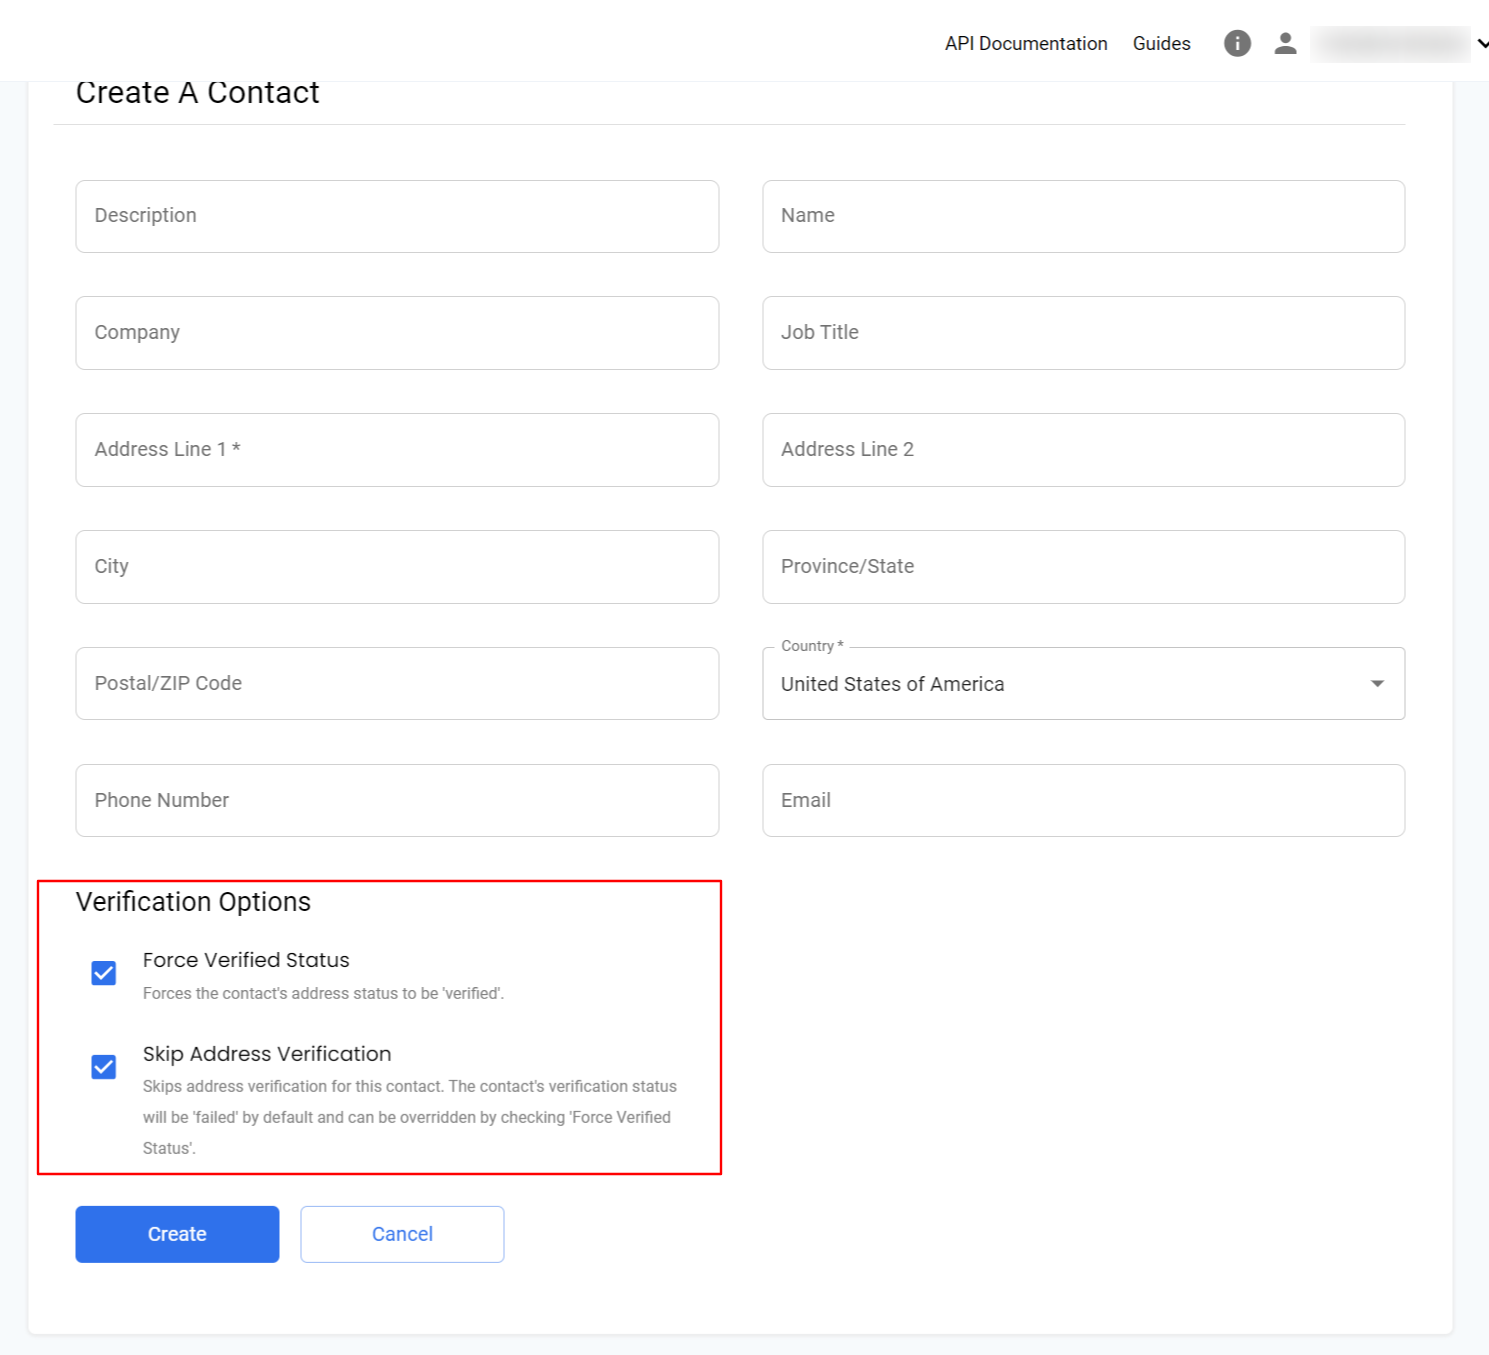
If you want to skip Address Verification for your sender address, you can do so while creating a new contact.
There are two options available:
- Force Verified Status: This option forces the contact's address status to be 'verified'.
- Skip Address Verification: This option skips address verification for this contact. The contact's verification status will be 'failed' by default and can be overridden by checking 'Force Verified Status'.
To avoid order cancellations due to sender address issues, we recommend selecting the ‘Force Verified Status’ option.
US mail addresses are processed through CASS and NCOAAll mail requests for US addresses are processed through CASS and NCOA, as these are USPS requirements. Consequently, the final mailing address may differ from those seen in your API requests and Dashboard.
Coding Accuracy Support System (CASS)
Coding Accuracy Support System (CASS) is a USPS certification for vendors that help clients with address standardization and validation. This certification allows address verification services to pass a test and prove that they are capable of providing top-notch solutions to clients. Also, they get better access to the USPS authoritative databases and NCOA files.
PostGrid’s address verification API and software are CASS-certified, allowing you to update, standardize, and validate your mailing lists by comparing them with the official Post Office records.
National Change of Address (NCOA)
NCOALink is a USPS product to record all Change-of-Address (COA) requests.
The Post Office stores hundreds of millions of permanent COA records in its NCOA datafile, including-
- Names of individuals, families, and businesses, and
- Their old and new delivery addresses.
Adding Merge Variables to the CSV
To specify merge variables, use curly braces like {{variableName}}. You can also access the following predefined merge variables in your template.
| Name | Type | Description |
|---|---|---|
| to | Contact | The recipient info e.g. {{to.firstName}}, {{to.companyName}} |
| from | Contact | The sender info e.g. {{from.firstName}}, {{from.companyName}} |
Acceptable Default Merge Variable Values for Contacts
The following values are default values for contacts that can be used in the {{to.variable}} format.
Recipient Merge Variables
| Template Format | CSV Header Name |
|---|---|
{{to.addressLine1}} | Address Line 1 |
{{to.addressLine2}} | Address Line 2 |
{{to.provinceOrState}} | Province or State |
{{to.city}} | City |
{{to.postalOrZip}} | Postal or Zip |
{{to.country}} | Country |
{{to.firstName}} | First Name |
{{to.lastName}} | Last Name |
{{to.email}} | |
{{to.phoneNumber}} | Phone Number |
{{to.companyName}} | Company Name |
{{to.jobTitle}} | Job Title |
Sender Merge Variables
| Template Format | CSV Header Name |
|---|---|
{{from.addressLine1}} | Address Line 1 |
{{from.addressLine2}} | Address Line 2 |
{{from.provinceOrState}} | Province or State |
{{from.city}} | City |
{{from.postalOrZip}} | Postal or Zip |
{{from.country}} | Country |
{{from.firstName}} | First Name |
{{from.lastName}} | Last Name |
{{from.email}} | |
{{from.phoneNumber}} | Phone Number |
{{from.companyName}} | Company Name |
{{from.jobTitle}} | Job Title |
Non-default Merge Variables
To add any other dynamic variables to the template, ensure that the CSV has the exact same value (case sensitive) as mentioned in your HTML templates.
| Template Format | CSV Header Name |
|---|---|
{{to.metadata.Revenue}} | Revenue |
{{to.metadata.amount}} | amount |
{{to.metadata.Renewaldate}} | Renewaldate |
Adding and Deleting Addresses
You cannot edit any existing addresses via the dashboard or API request. However, you can delete the current address and add a new one with the updated information. To delete the contact, click on the contact and then click on 'Delete'.
Address Verification Errors
Below is a comprehensive guide for diagnosing and resolving address verification errors.
Table 1 describes the primary errors:
| Primary Error | Description |
|---|---|
| Alternate | Changed the Input value to an alternate value |
| Would not fit | The address does not fit within the required address field |
| Incorrect Value | The address has incorrect information |
| Missing Value | The input address is missing required information |
| Typo in Value | Typing error in the input address |
| Verbosity | The address is unnecessarily lengthy, redundant, or overly detailed, making it harder for the system to read and understand |
Table 2 describes the error details associated with the primary errors:
| Error Detail | Description |
|---|---|
| Addressee and/or Additional Delivery Information | The name of the recipient and any extra delivery instructions |
| Complete Street Information | The complete street address, including house or building number, street name, and type |
| Civic number | The numeric portion of the street address, representing the house or building number |
| Civic number suffix | Any additional characters or letters that accompany the civic number |
| Street name | The designated name of the street |
| Street type | The classification of the street, such as Avenue, Road, or Boulevard |
| Street direction | The cardinal direction (N, S, E, W) associated with the street name |
| Suite keyword | The term used to indicate the presence of a suite, such as "Apt", "Unit", or "Ste" |
| Suite identifier | The number or letter that specifies a particular suite, unit, or apartment within a building |
| Delivery Information | General information pertaining to how and where the delivery should be made |
| Complete Route Service Information | The full route service details, typically used in rural delivery systems |
| Route Service Keyword | A term indicating the type of route service, such as "RR" for Rural Route |
| Route Service identifier | The numeric or alphanumeric identifier associated with a specific route service |
| Complete PO Box/Bag Information | The entire PO Box or bag address information for mail destined for post office storage |
| PO Box/Bag keyword | The term indicating PO Box or bag for delivery, e.g., "PO Box" |
| PO Box/Bag identifier | The number or code assigned to a specific PO Box or mail bag |
| Complete General Delivery Information | Full details for general delivery; used when a recipient has no fixed address |
| General Delivery keyword | The term used for mail pickup at a post office by someone without a fixed address; Temporary mailing address |
| Complete Delivery Installation Information | Details regarding the post office or delivery facility where mail is processed |
| Delivery Installation Area Name | The name of a village, town, city, or metropolitan area which is served by a postal delivery installation |
| Delivery Installation Type | The classification of the postal installation, such as "Post Office", "Mail Depot", "Lock box address" etc. |
| Delivery Installation Qualifier | Identifies the portion of the area served by the installation. |
| Municipality | The city or town where the recipient is located |
| Province | The provincial designation in the address |
Table 3 lists additional standalone primary errors:
| Primary Error | |
|---|---|
| Rural validated on postal code only | The input address was identified as rural. For such addresses, Canada Post only provides data to verify the postal code's validity, not the specific details of individual houses or streets. |
| Unable to find a match for this address | Address verification failed because the system couldn't find a match for the address in the USPS or Canada Post database. |
| Not enough information | Address verification failed because the provided information is insufficient for the system to find a match in the USPS or Canada Post database. |
Possible Error Combinations
line1: Incorrect Value: Suite identifiergeneric: Missing Value: Complete Street Information; city: Incorrect Value: Municipalityline1: Missing Value: Suite identifiergeneric: Unable to find a match for this addressgeneric: Not enough information.city: Missing Value: Municipality
Updated about 2 months ago