HubSpot
PostGrid's native HubSpot Integration allows you to send letters, postcards and cheques/checks to your customer list one at a time on demand, through workflow automation, or launch a bulk mailing campaign. In this guide, we will walk you through how to perform each step.
Overview
There are two major steps in the process of sending mail with PostGrid through HubSpot.
- Install and setup the account
- Send Mail
- Send a Single Mail to a Contact
- Send Bulk Personalized Mail To Multiple Contacts using Workflows
This section will walk you through finding and installing the PostGrid app, as well as setting up your PostGrid account.
Install PostGrid Application
Install the application by going to the "Marketplace" in your account and searching for PostGrid.
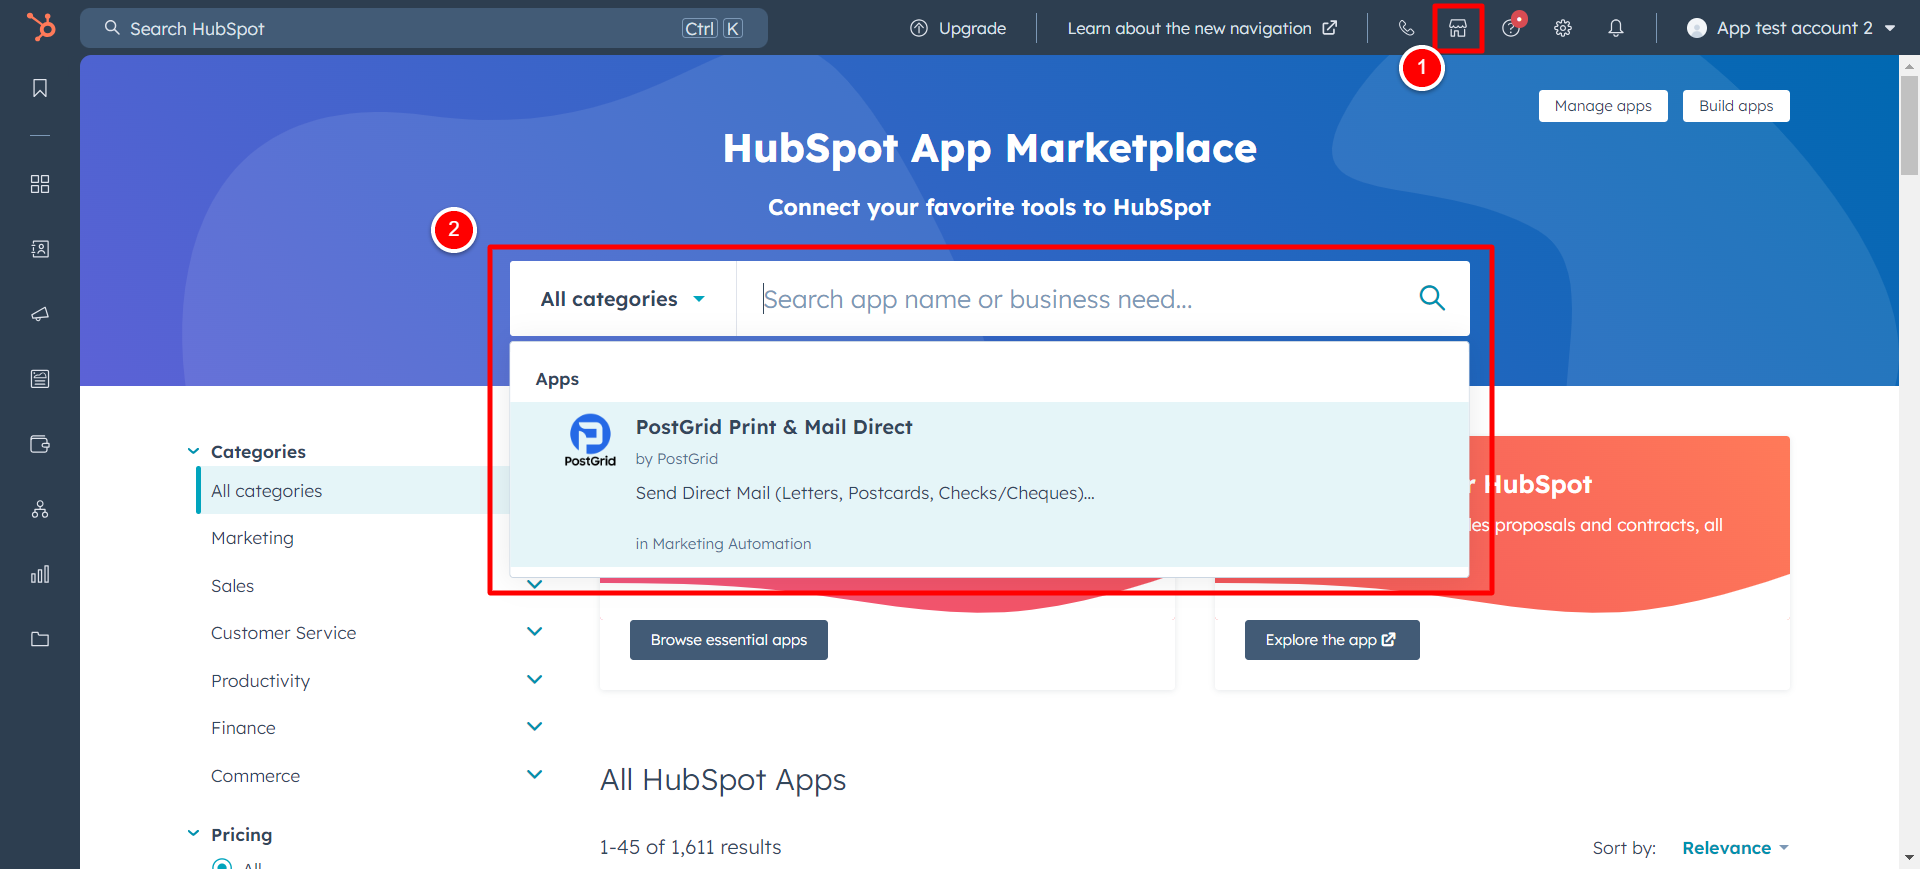
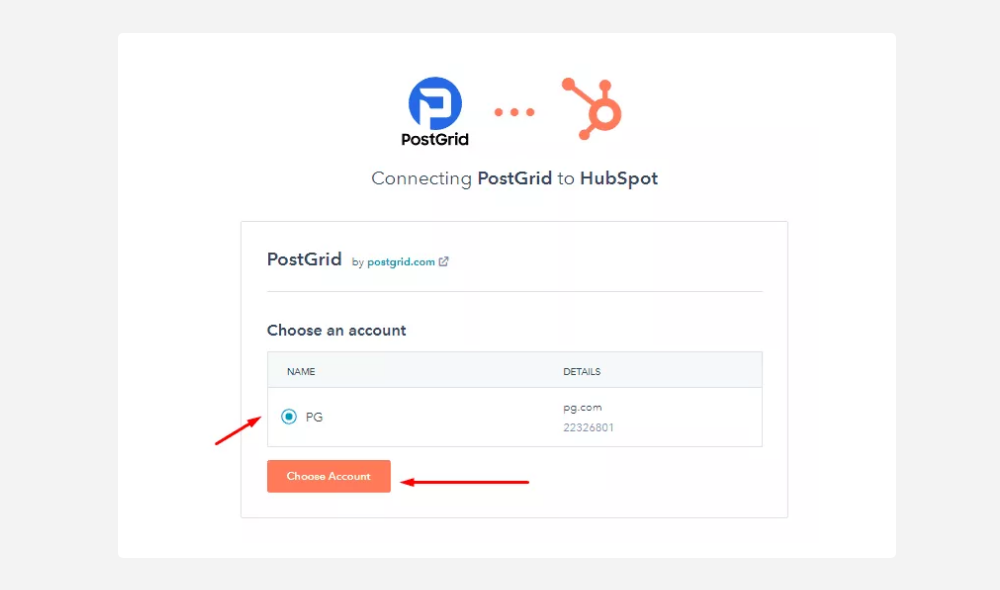
You can install the application by clicking the "Install App" Button. Then, select your company name and click the “Choose Account” button.
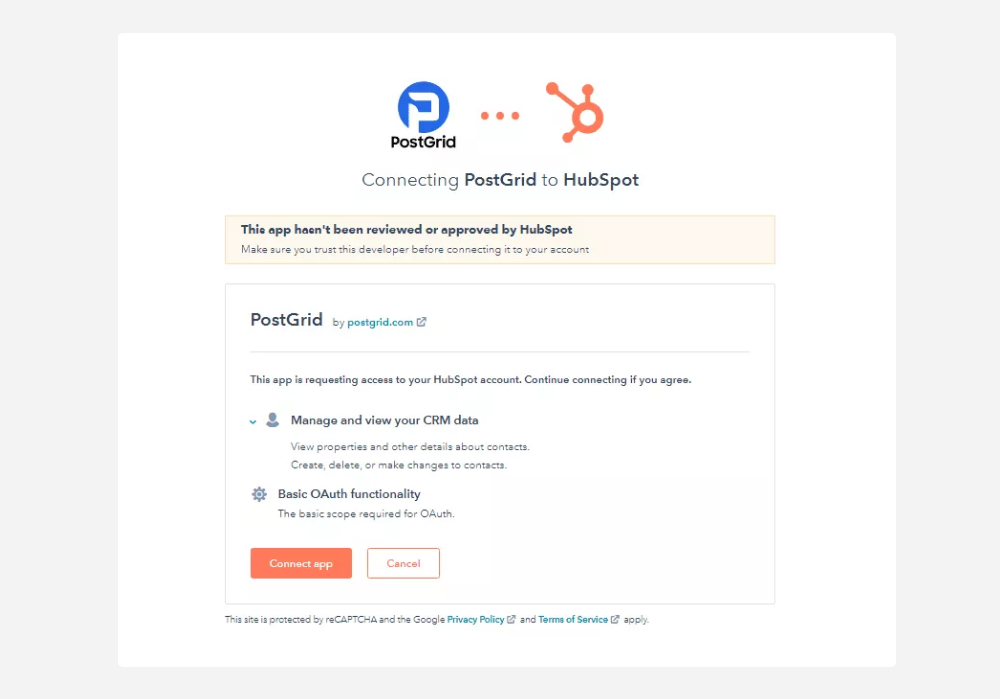
Then, Authorize by clicking the “Connect App” button.
Once you have authorized the PostGrid application, you need to provide your PostGrid API Keys. You can find your API key on your PostGrid dashboard settings page.
For further information on the API key, read here.
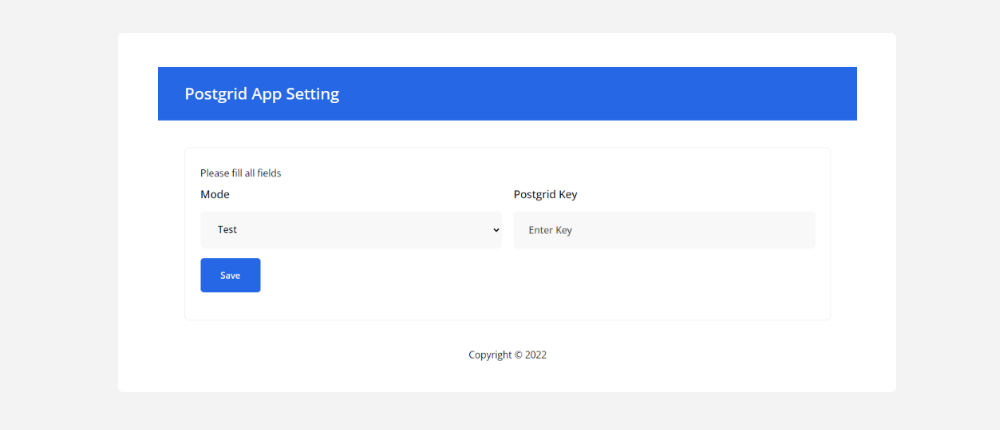
Finish the process by clicking on the "Save" button. You will be redirected to HubSpot.
Send a Single Mail to a Contact
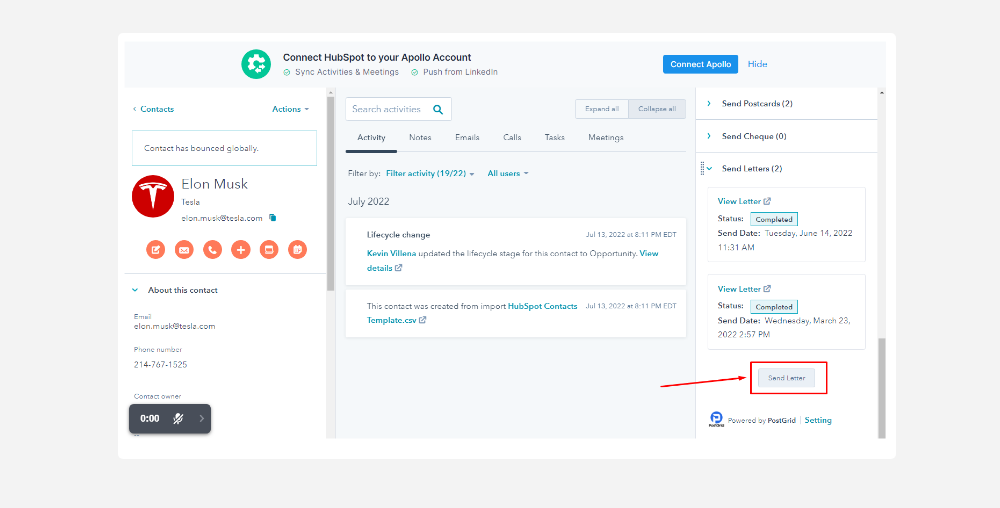
You can send Letters, Postcards, and Checks/Cheques to a Contact. Navigate to the Contact Module in HubSpot.
Send A Letter
Select a contact you want to send a letter to. Scroll to the bottom on the right widget and click the button “Send Letter”
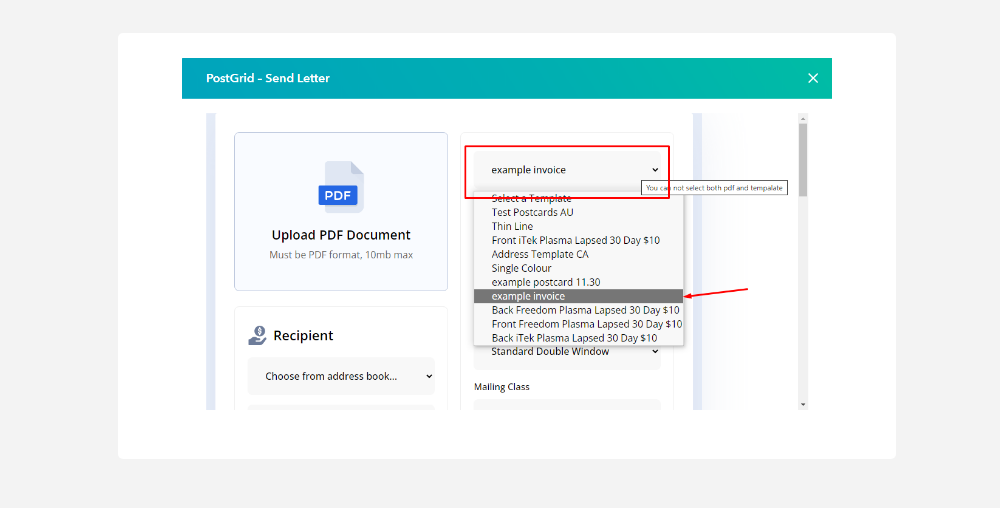
Filling in the template requirements
If you have a PDF Document, you can Upload it or Select a Template (from your template list in PostGrid).
Please read our design guidlines for letters here
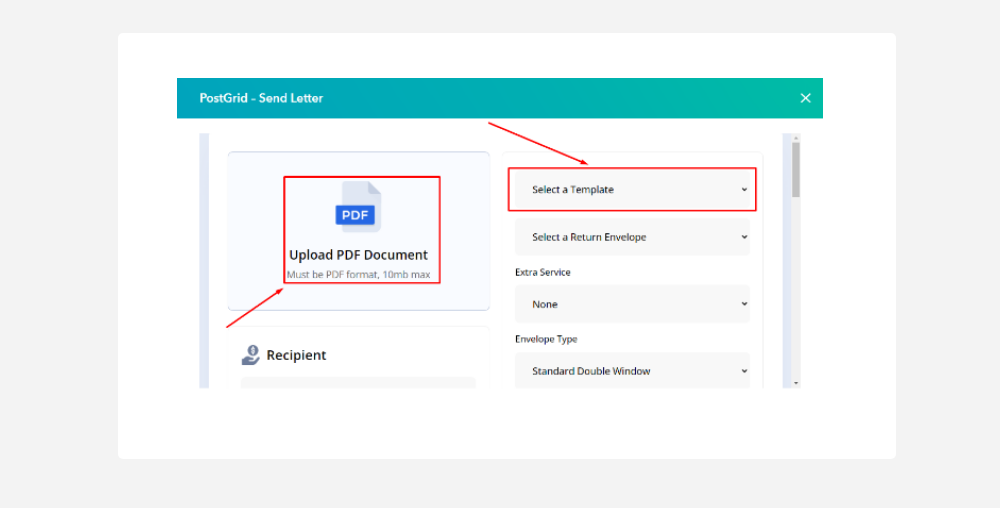
You can choose additional options such as Return Envelope, Extra Service (Certified Mail, Certified Mail with Return Receipt, Registered Mail), and Envelope Type (Standard Double Window, Flat Envelope). For our guide, we will use a simple template with Standard Double Window.
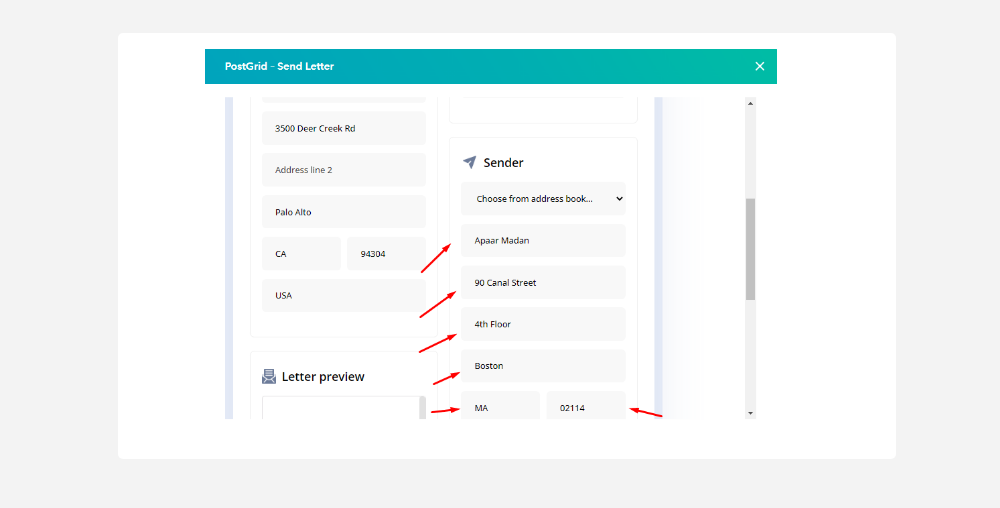
Filling in the Recipient and Sender requirements
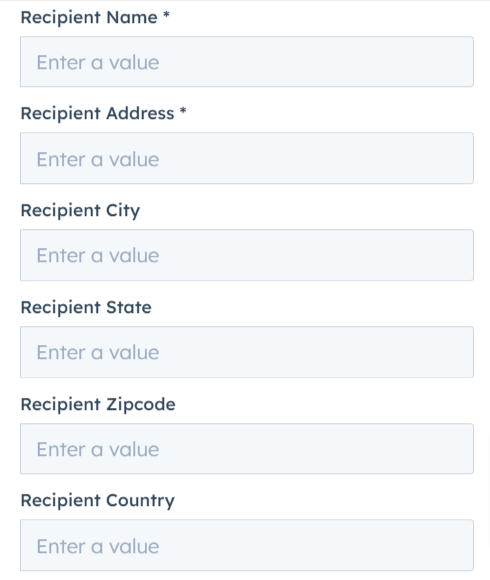
Recipient Details: The recipient details will be filled in from the contact details. If they are missing an address then you will have to put in the address fields (Address, City, State, Zip Code, Country)
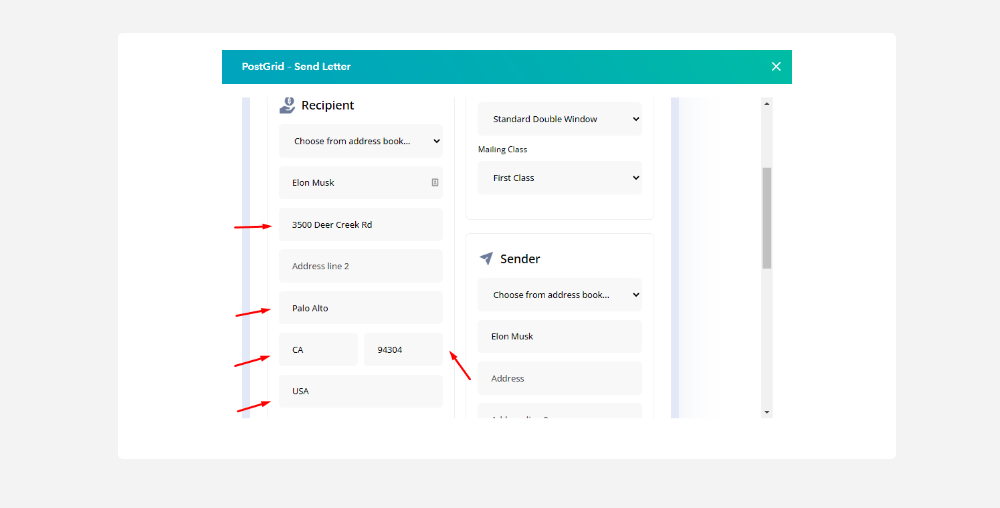
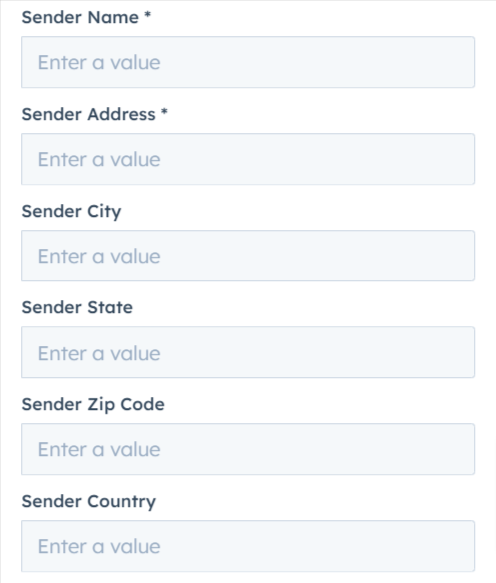
Sender Details: Input the Sender Details. You will have to put Name, Address, City, State, Zip Code, and Country.
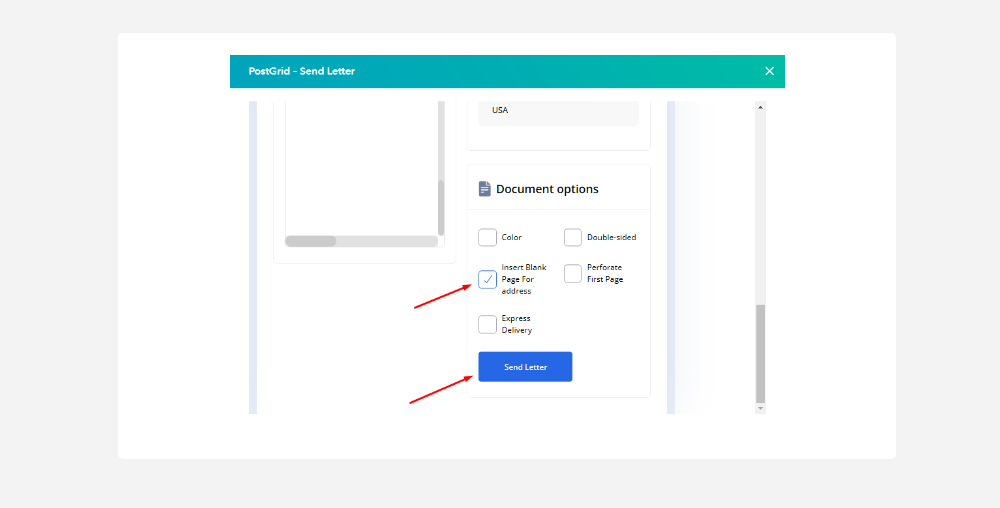
Filling in the mailing requirements
Document Options (Optional): You can add document options such as color, double-sided, insert blank page for address, perforate first page, express delivery, etc. For our demo purpose, we will select Insert blank page, which will insert a blank page where the recipient and sender details will be printed to cover the double-window envelope.
Merge Variables
For custom merge variables in your template follow these mapping criteria:
NOTE: Previously it was required that merge variable names but start with the keyword "metadata". For example it was required to name a custom merge variable {{metadata.variablename}}. This is no longer required, however, it is still supported.
To specify merge variables, use curly braces like {{variablename}}.
Merge variable examples:
{{coupon_code}}{{deal_amount}}{{birthday}}{{renewal_date}}
If you have a custom merge variable like {{custom_variable1}}, {{custom_variable2}}, {{custom_variable3}} in your template, then our system in HubSpot will automatically recognize these variables.
- Select the
{{custom_variable1}}in “Add Option”. - Then map that
{{custom_variable1}}to a contact token in HubSpot. - Follow these steps for the other
{{custom_variable2}}by clicking on the “Add Option” button again and selecting the{{custom_variable2}}from the dropdown and mapping it to the contact token in HubSpot. - Follow these steps for the other
{{custom_variable3}}by clicking on the “Add Option” button again and selecting the{{custom_variable3}}from the dropdown and mapping it to the contact token in HubSpot.
Sending the letter
Click the “Send Letter” button to send a letter now.
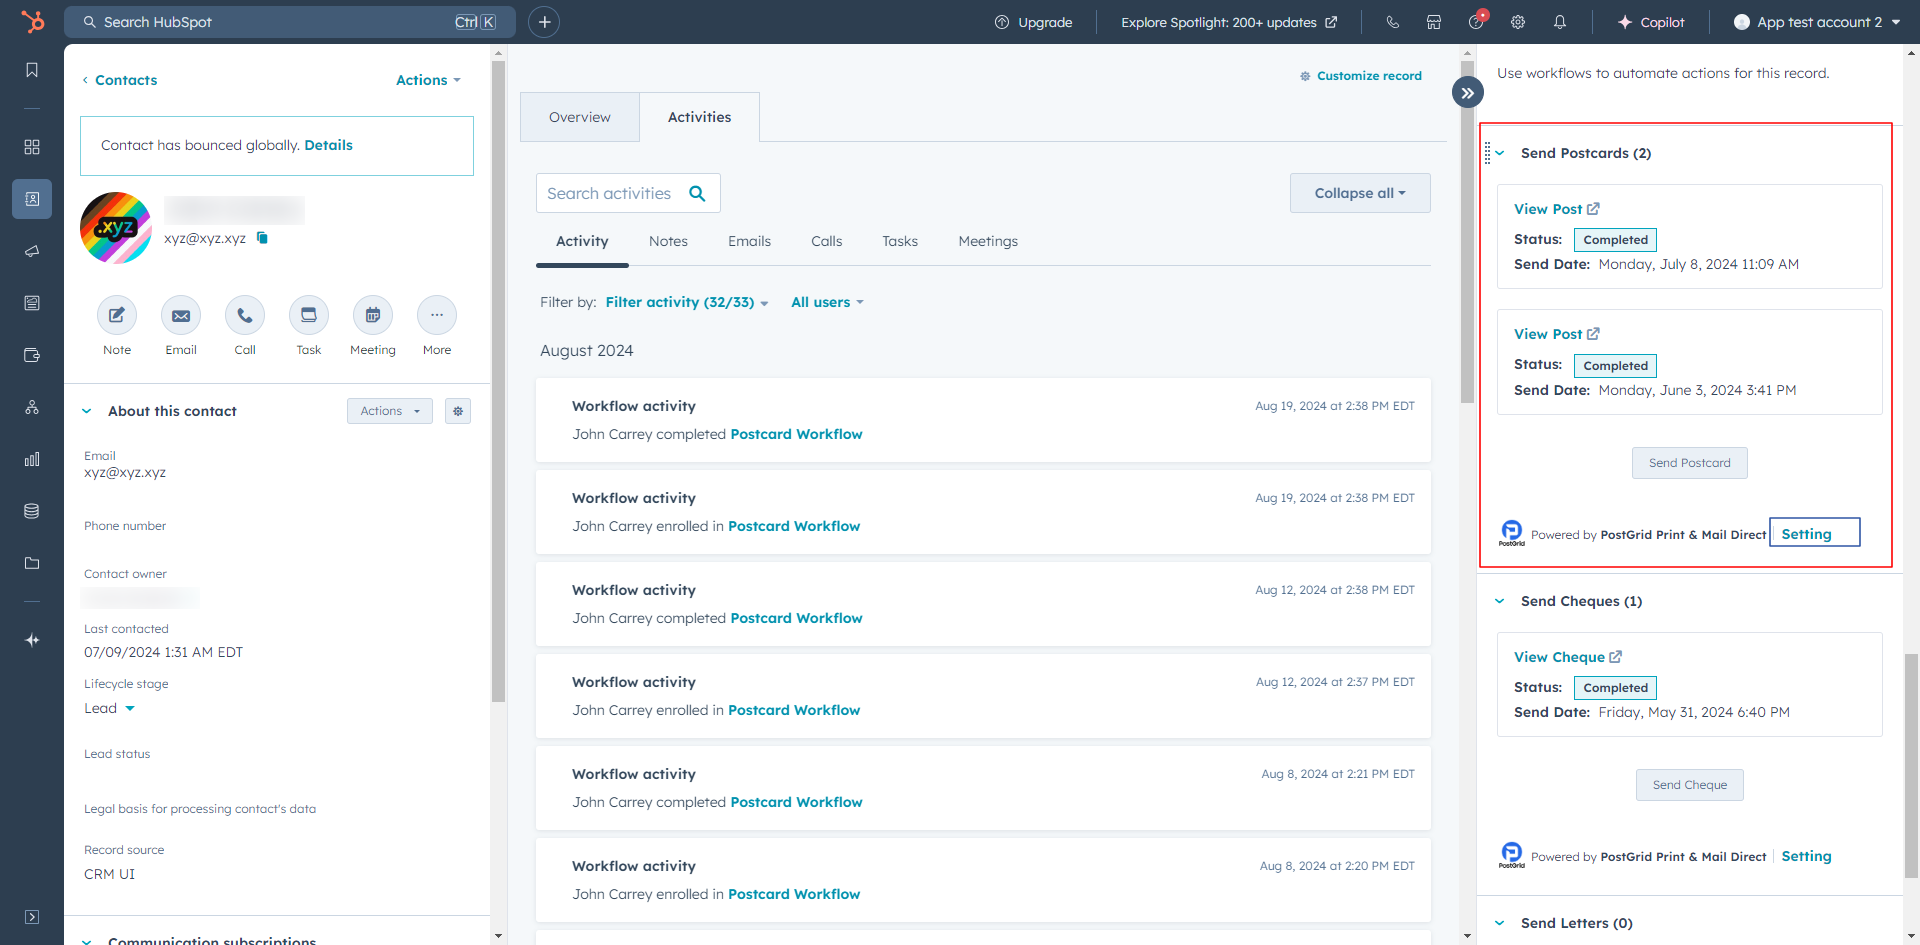
You can see the updated Status at the bottom of the right widget, as shown below.

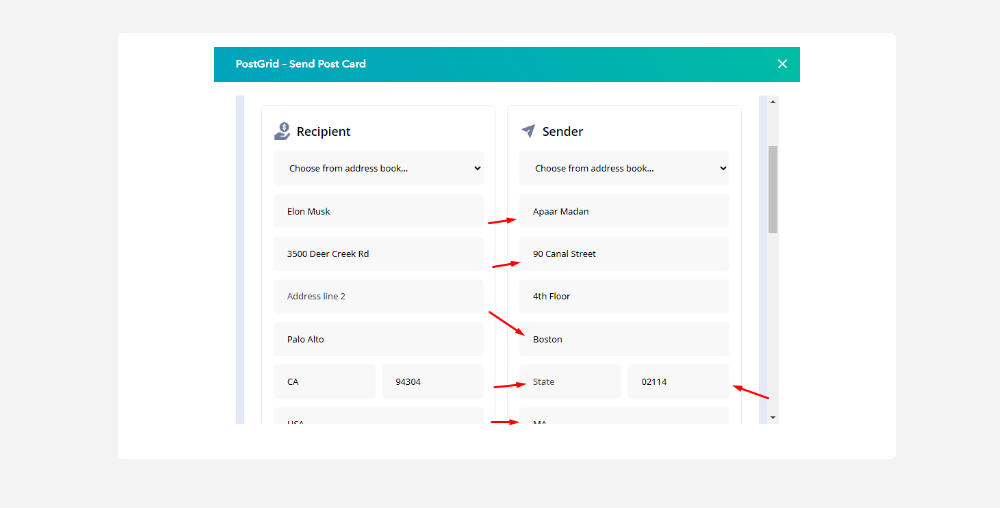
Send A Postcard
Select a contact you want to send a Postcard to. Scroll to the bottom on the right widget and click the button “Send Postcard"
Filling in the mailing requirements
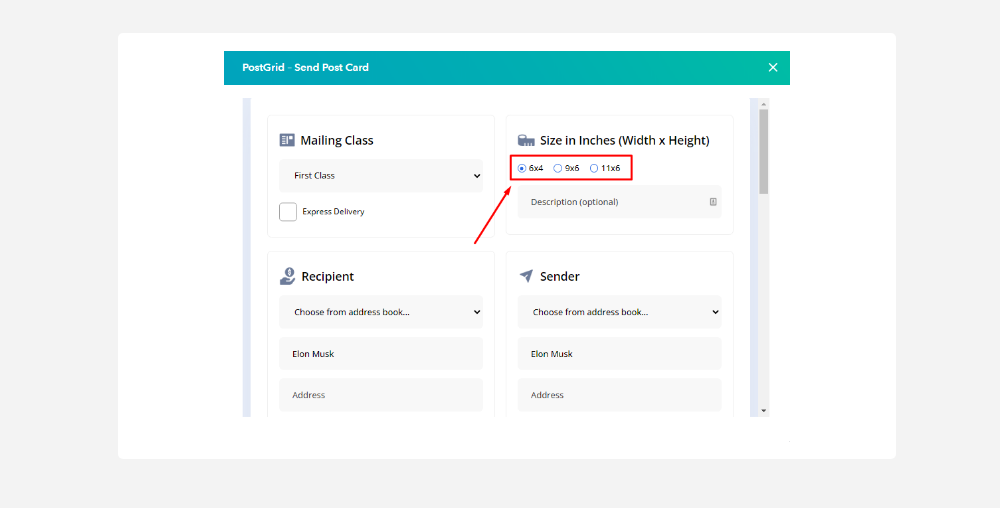
Select Mailing Class: Select the Mailing Class you want to send your Postcard with. You also have the option for Express Delivery.
Select Postcard Sizes: Select the postcard size you want to send.
Filling in the Recipient and Sender requirements
Recipient Details: The recipient details will be filled in from the contact details. If they are missing an address then you will have to put in the address fields (Address, City, State, Zip Code, Country)
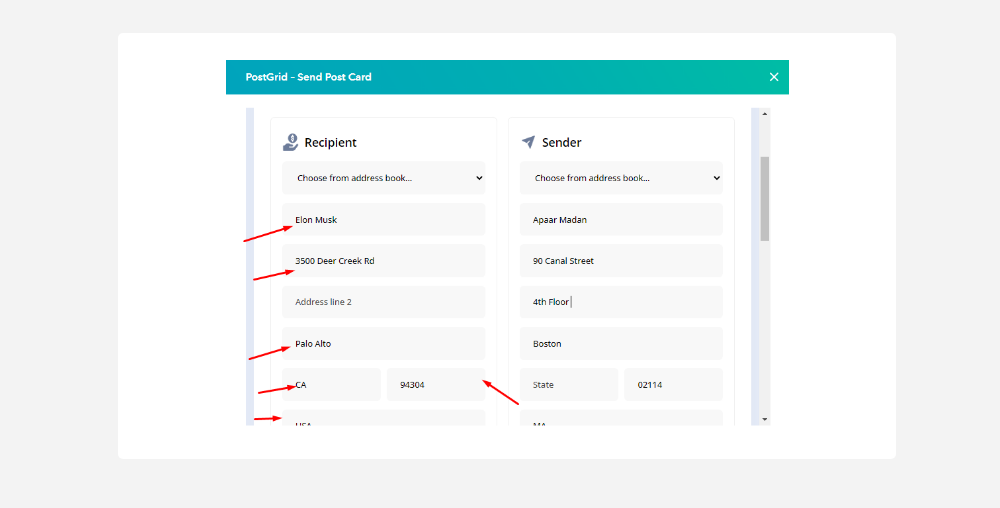
Sender Details: Input the Sender Details. You will have to put your Name, Address, City, State, Zip Code, and Country.
Filling in the template requirements
Choose Template or Upload PDF: You can Choose a Front and Back Postcard Template from your template library from PostGrid or upload a PDF Template.
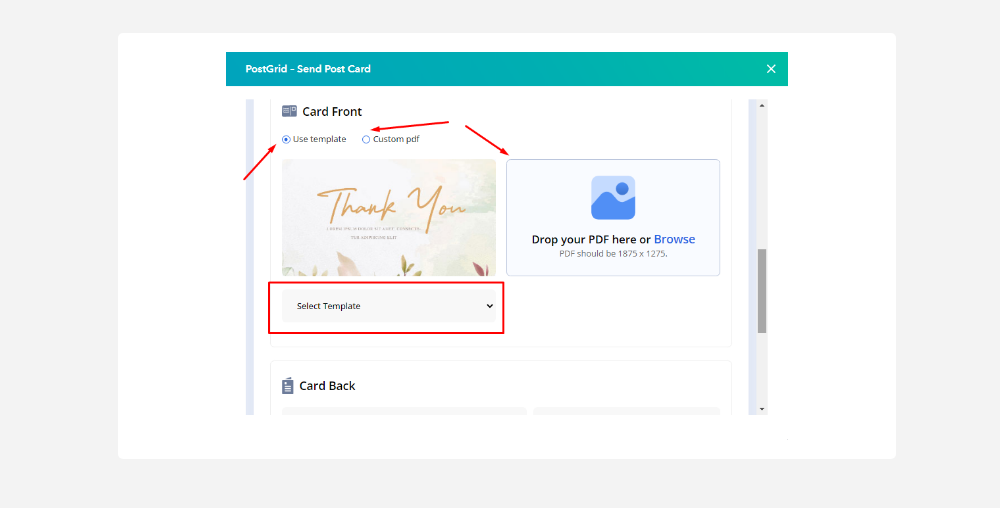
Please read our design guidlines for letters [here]
Merge Variables
Same as sending letters, you may use a custom merge variable in your template. You can learn more about them here
Sending the postcard
Click the “Send Postcard” button to send a postcard now.
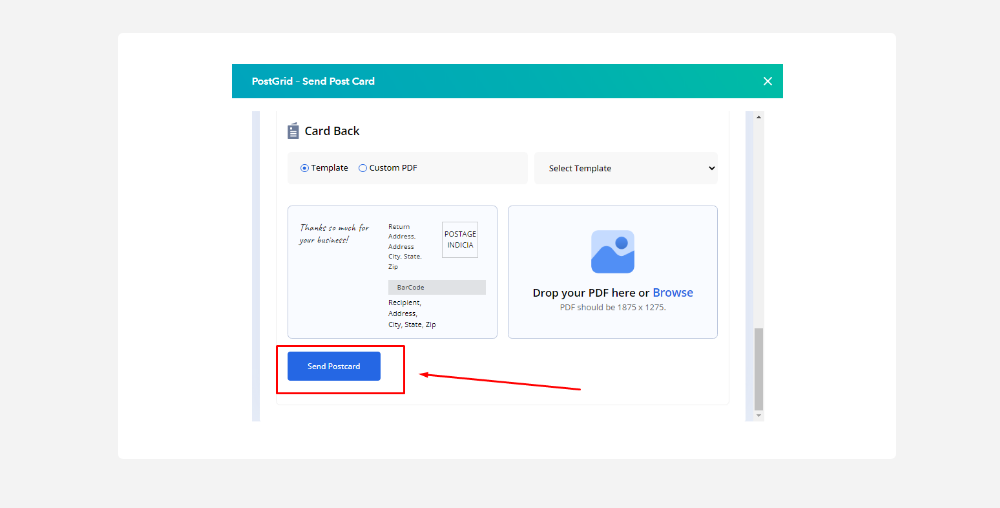
You can see the updated Status at the bottom of the right widget, as shown below
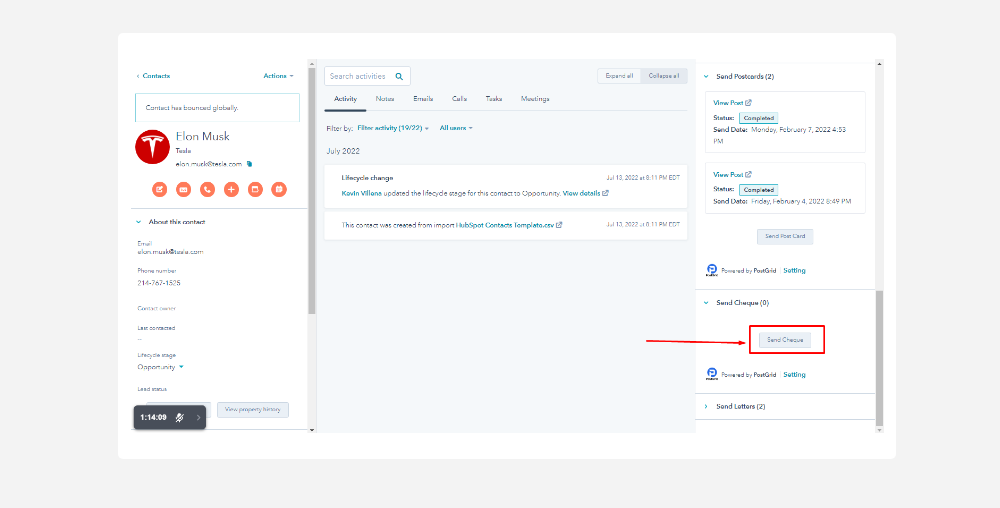
Send A Check/Cheque
Select a contact you want to send a Check/Cheque to. Scroll to the bottom on the right widget and click the button “Send Cheque"
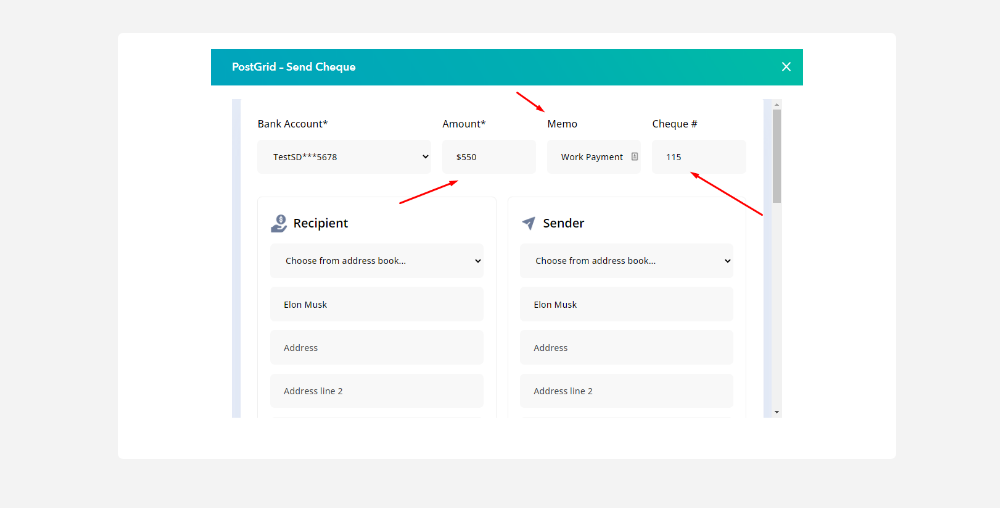
Filling in the Cheque requirements
Select the “Bank Account” you want to send cheques from.
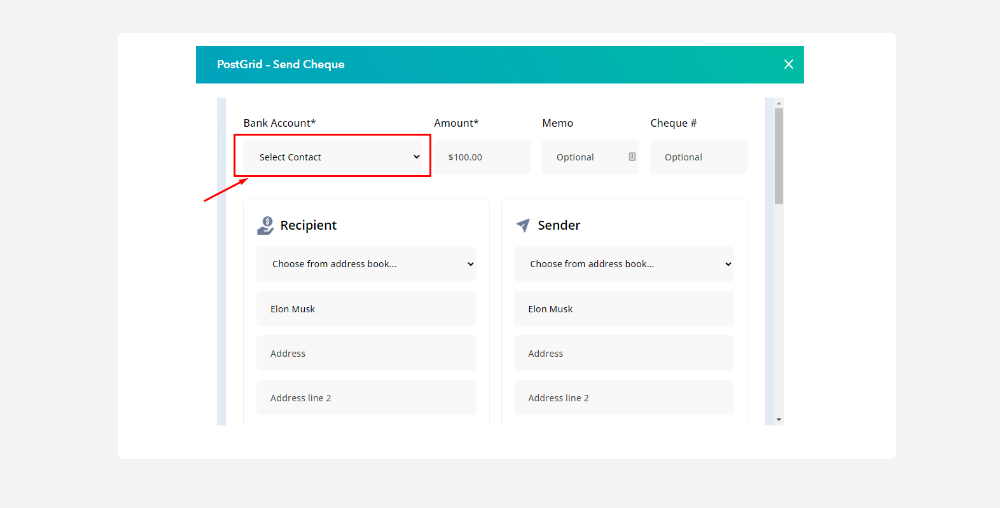
Cheque Amount, Memo, Cheque Number: Put the check amount in dollars ($), memo (optional), and cheque number (optional)
Filling in the Recipient and Sender requirements
Recipient Details: The recipient details will be filled in from the contact details. If they are missing address then you will have to put in the address fields (Address, City, State, Zip Code, Country).
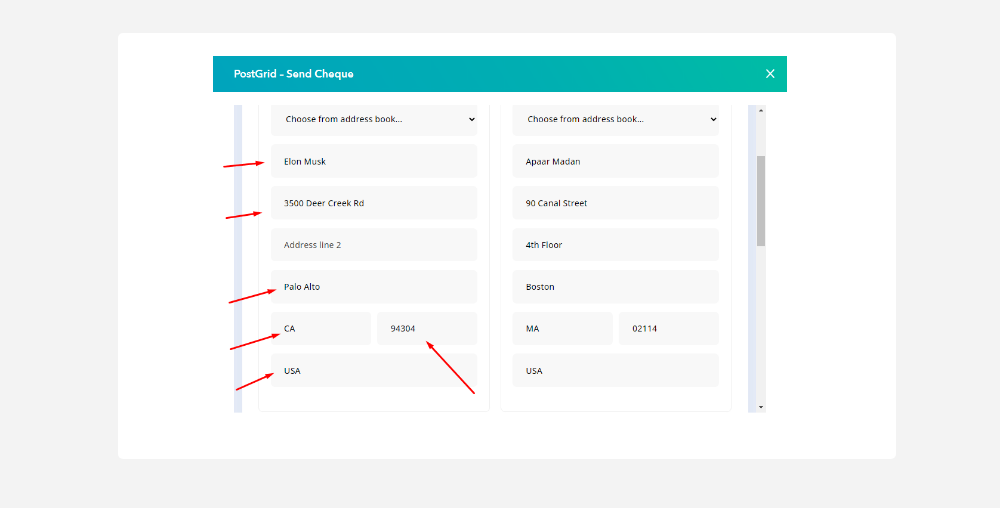
Sender Details: Input the Sender Details. You will have to put Name, Address, City, State, Zip Code, Country.

Filling in the other optional requirements
Custom HTML Message: Input any Custom HTML Message that will go at the top 2/3 of the Cheque.
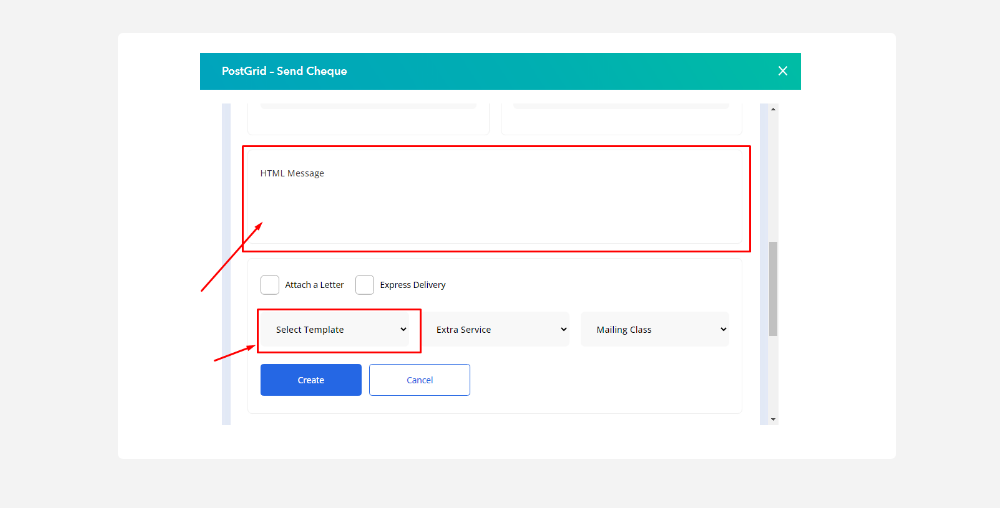
Attach a letter: You can attach additional letters to go alongside your cheque.
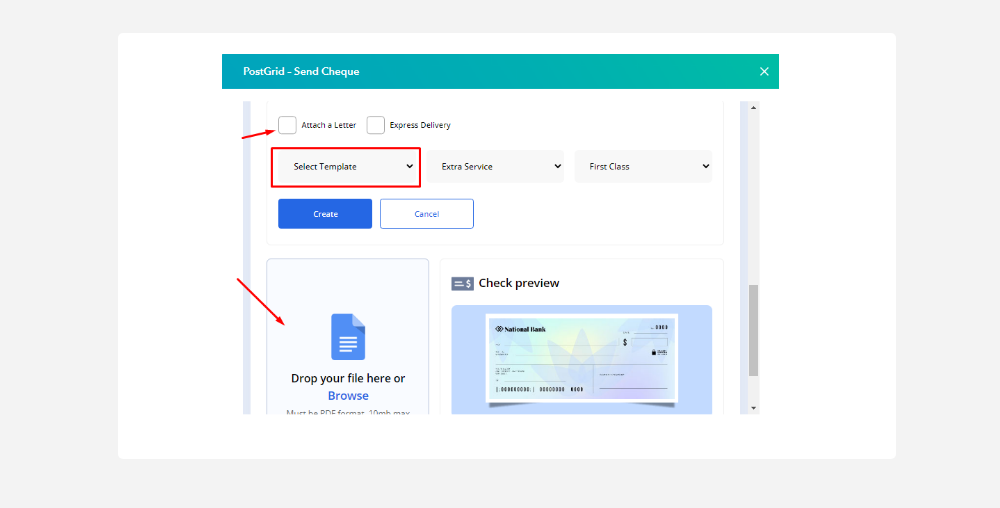
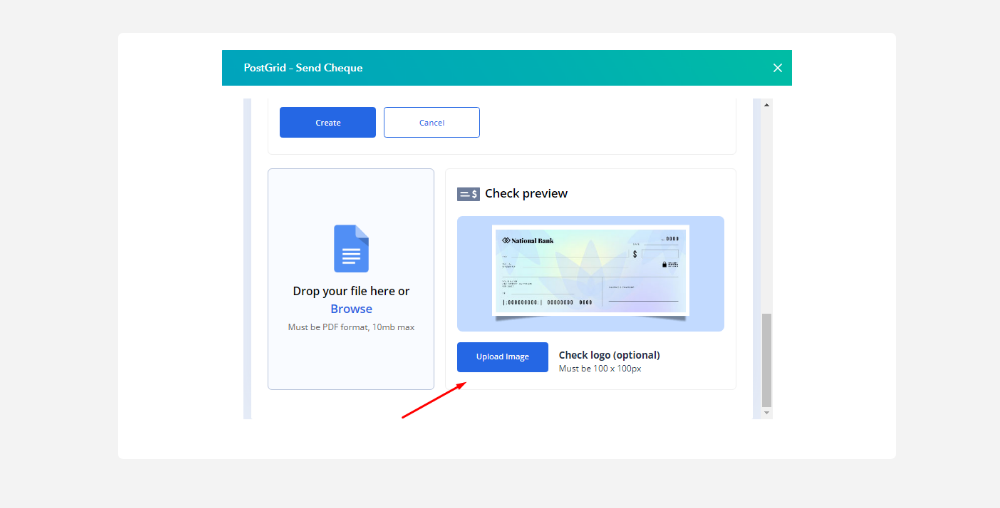
Upload A Custom Cheque Logo: You can upload a custom logo of your company if you want (optional). It must be 100 x 100 px in dimensions.
Same as sending letters, you may use a custom merge variable in your template. You can learn more about them here
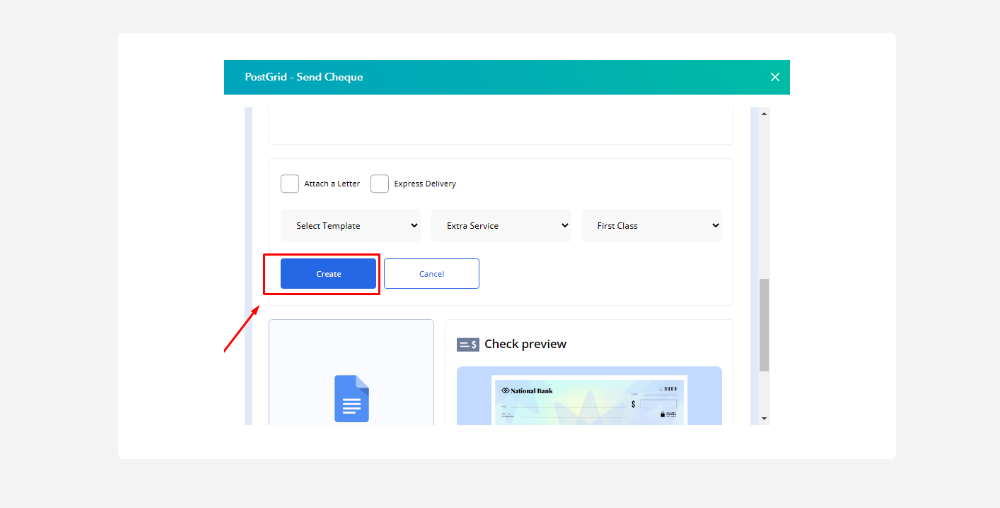
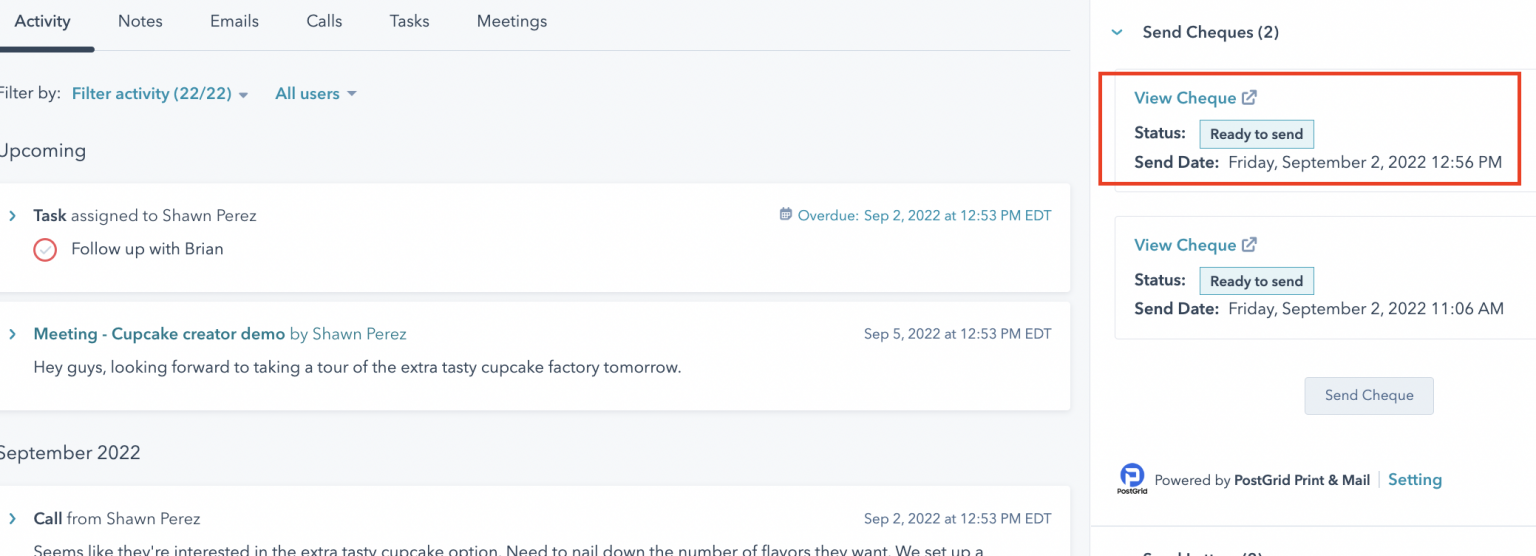
Sending the cheque
Click the “Send cheque” button to send a cheque now.
You can see the updated Status at the bottom of the right widget, as shown belo
Send Bulk Personalized Mail To Multiple Contacts using Workflows
Setup the automation
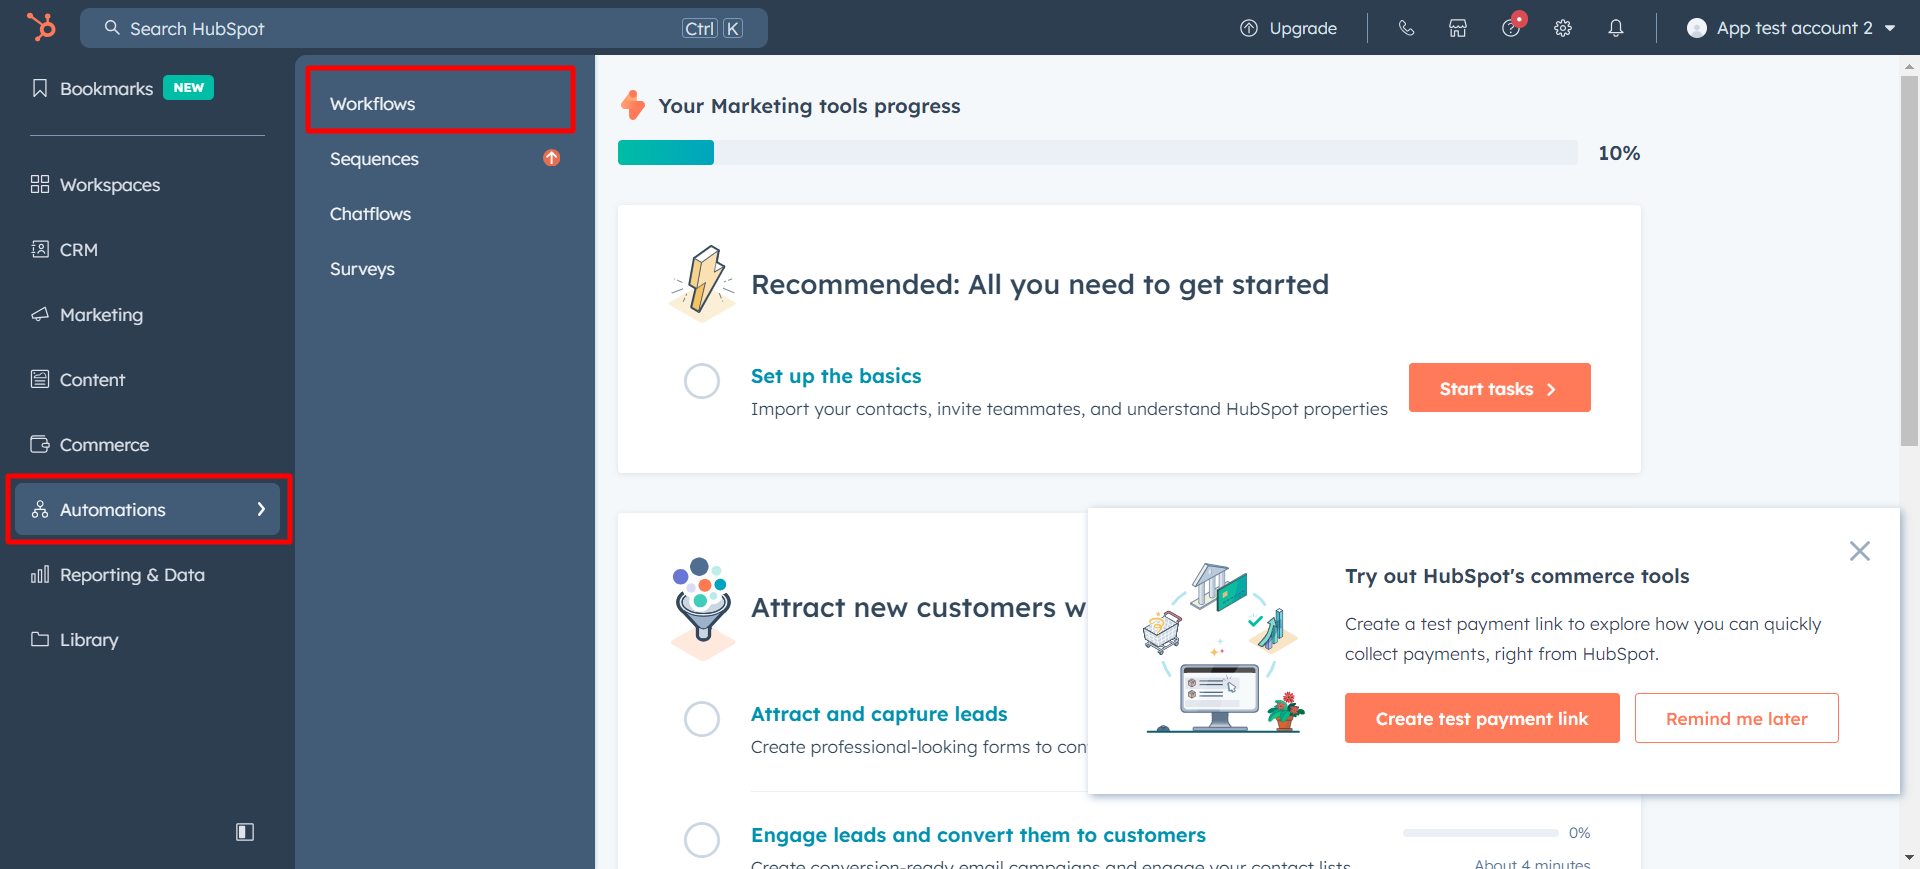
Set up a workflow in HubSpot by navigating to the "Workflows" under the "Automation" menu.
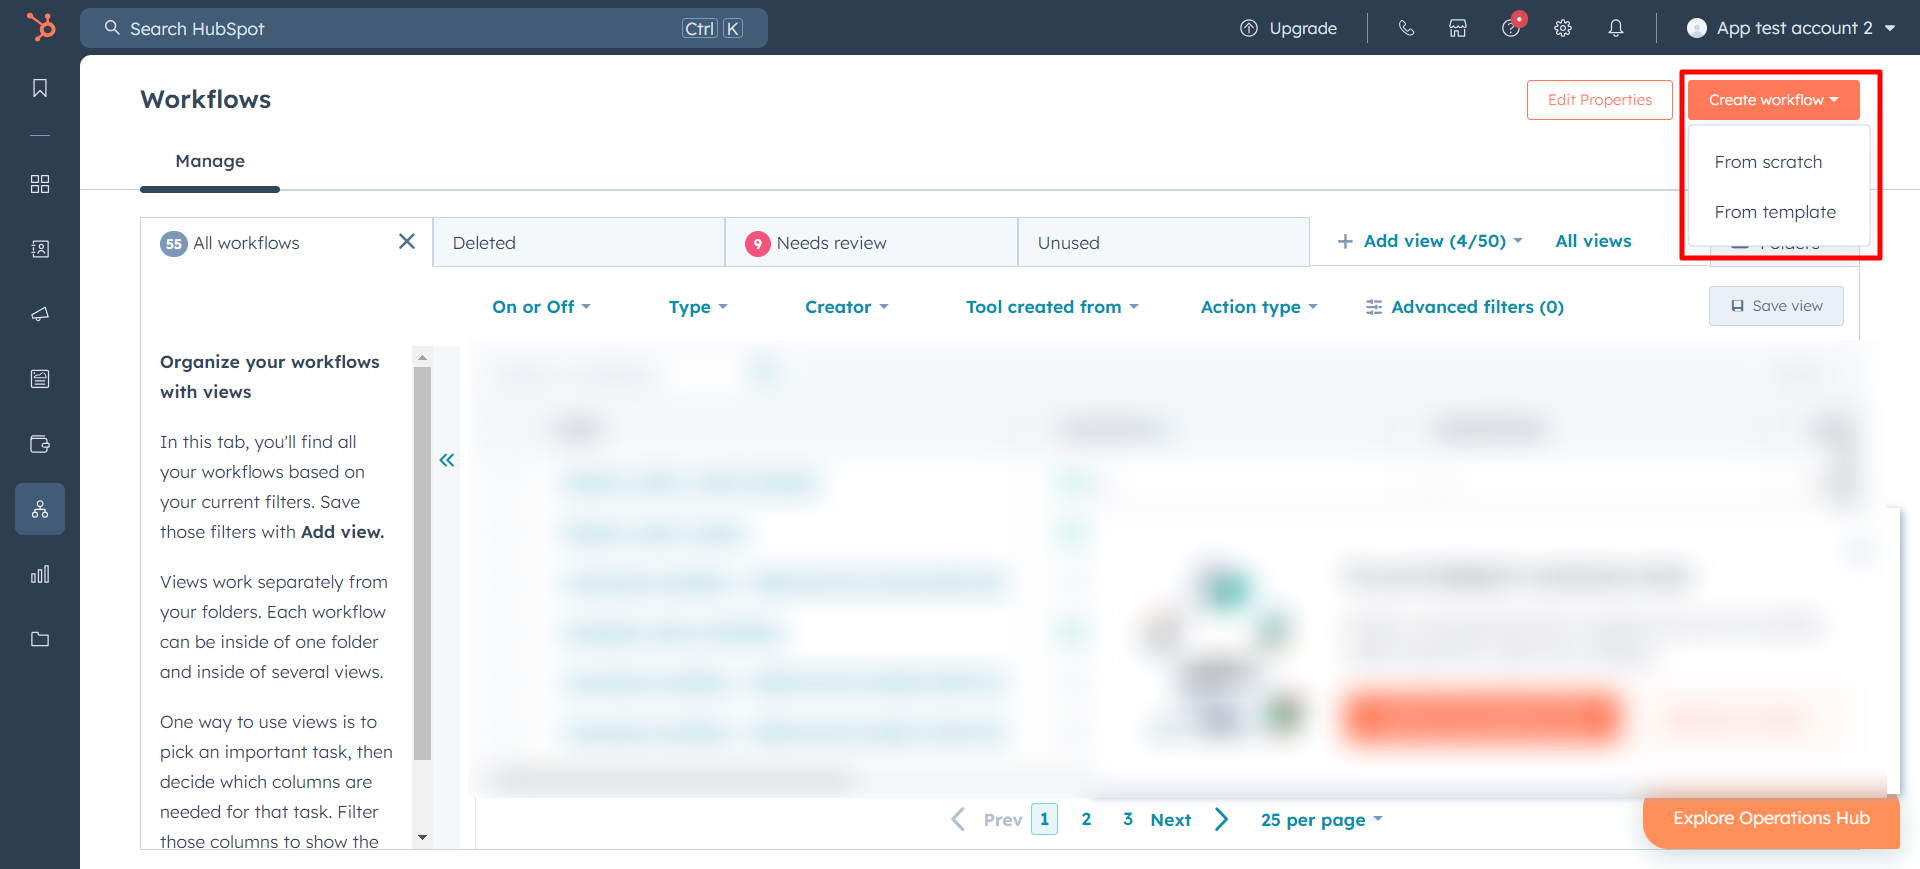
Start creating a workflow from scratch.
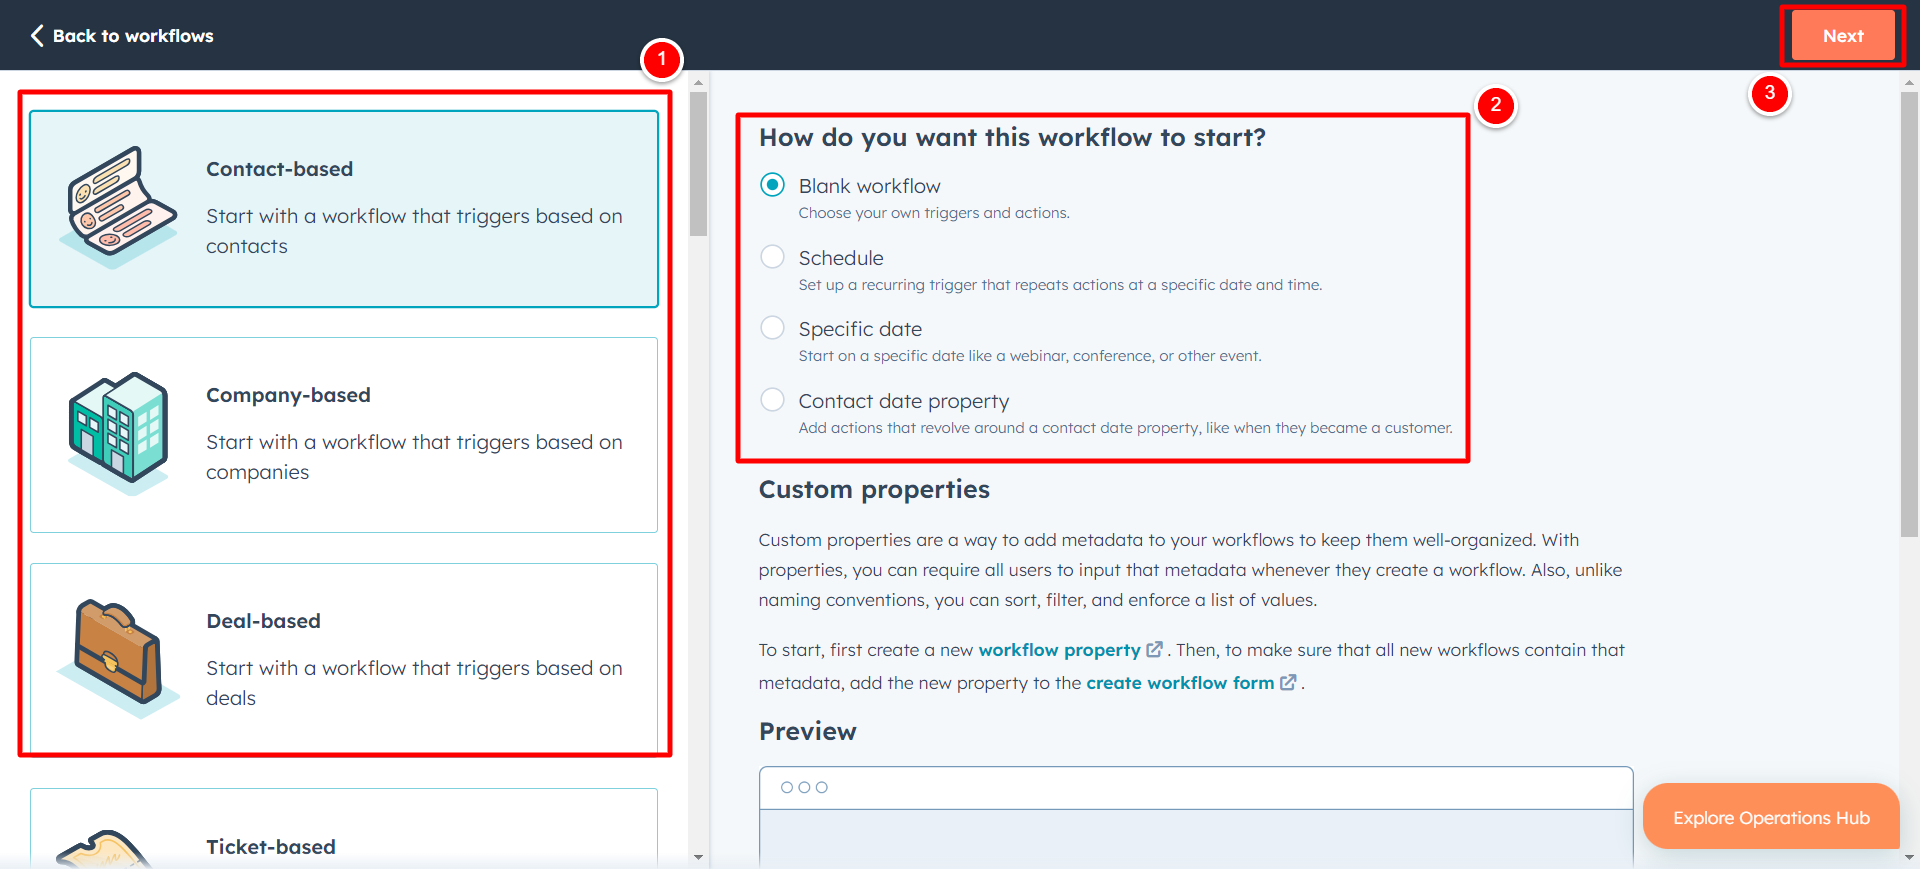
Set up triggers
Choose the Trigger type, and the interval of your trigger event and click on "Next". And set up the trigger.
Set up Action
After you have selected your triggers, add an Action Step by clicking the ‘+' button shown in your Automation Diagram. Navigate to the "Integrated Apps" and locate the "PostGrid Print & Mail Direct"
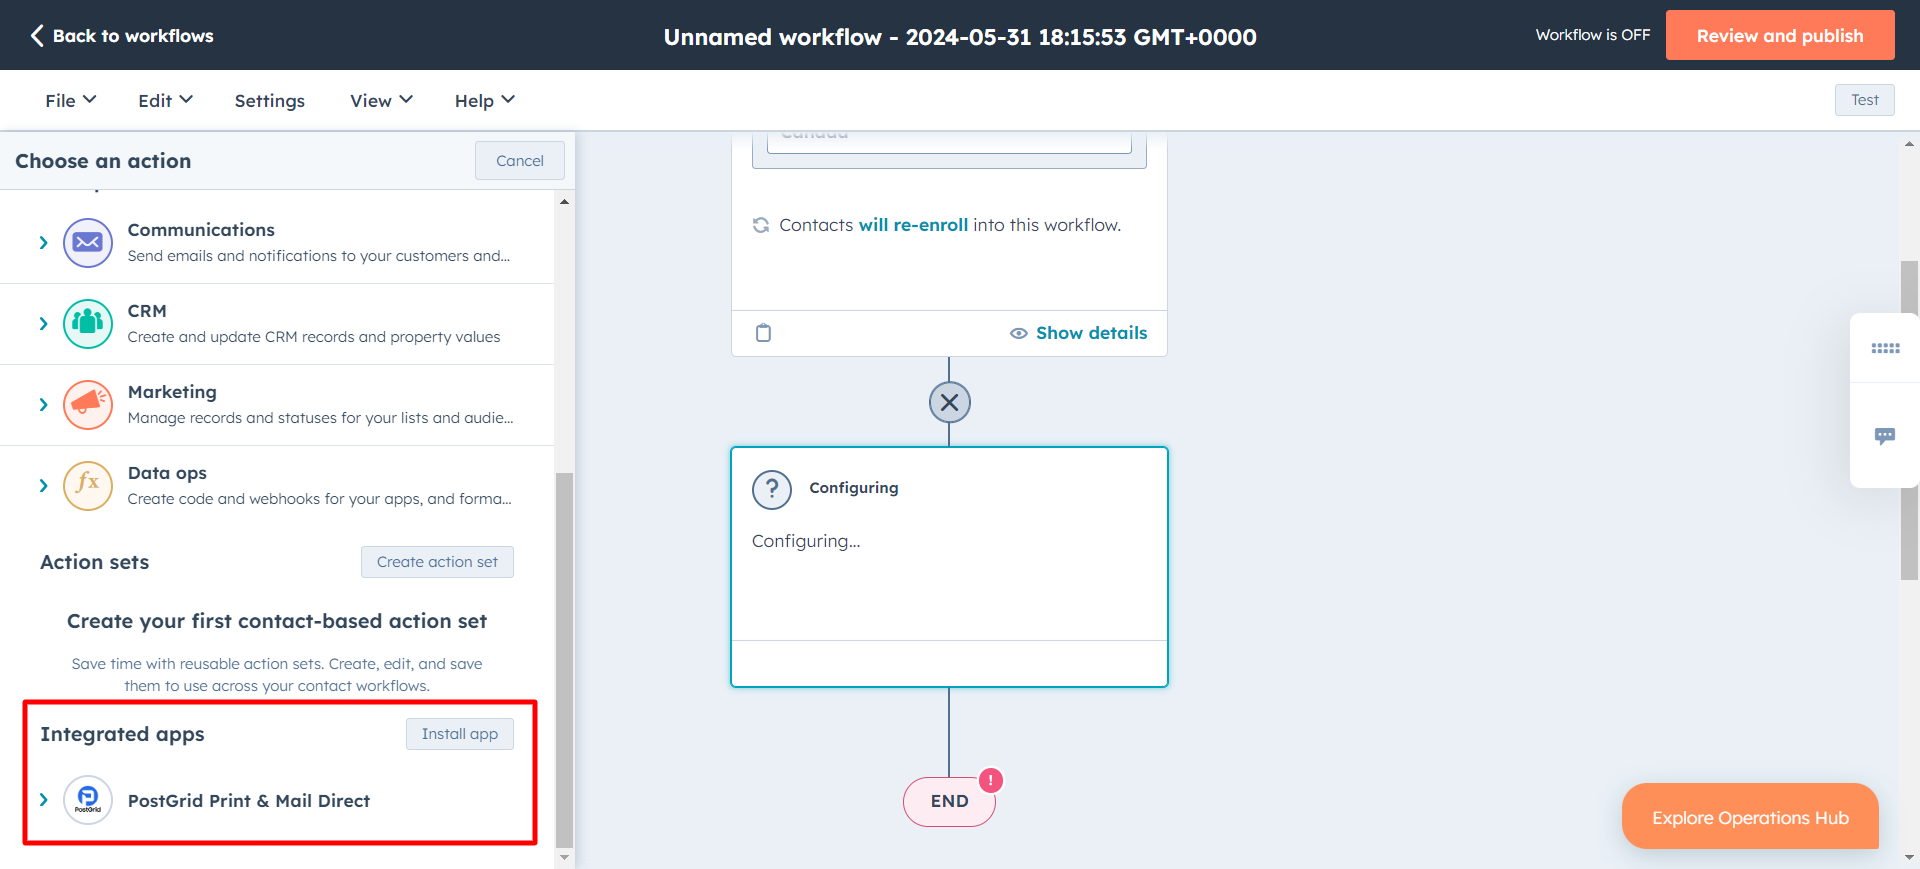 Here, you have multiple choices regarding the type of mail, including letters and postcards you want to send. The list of Apps is as follows.
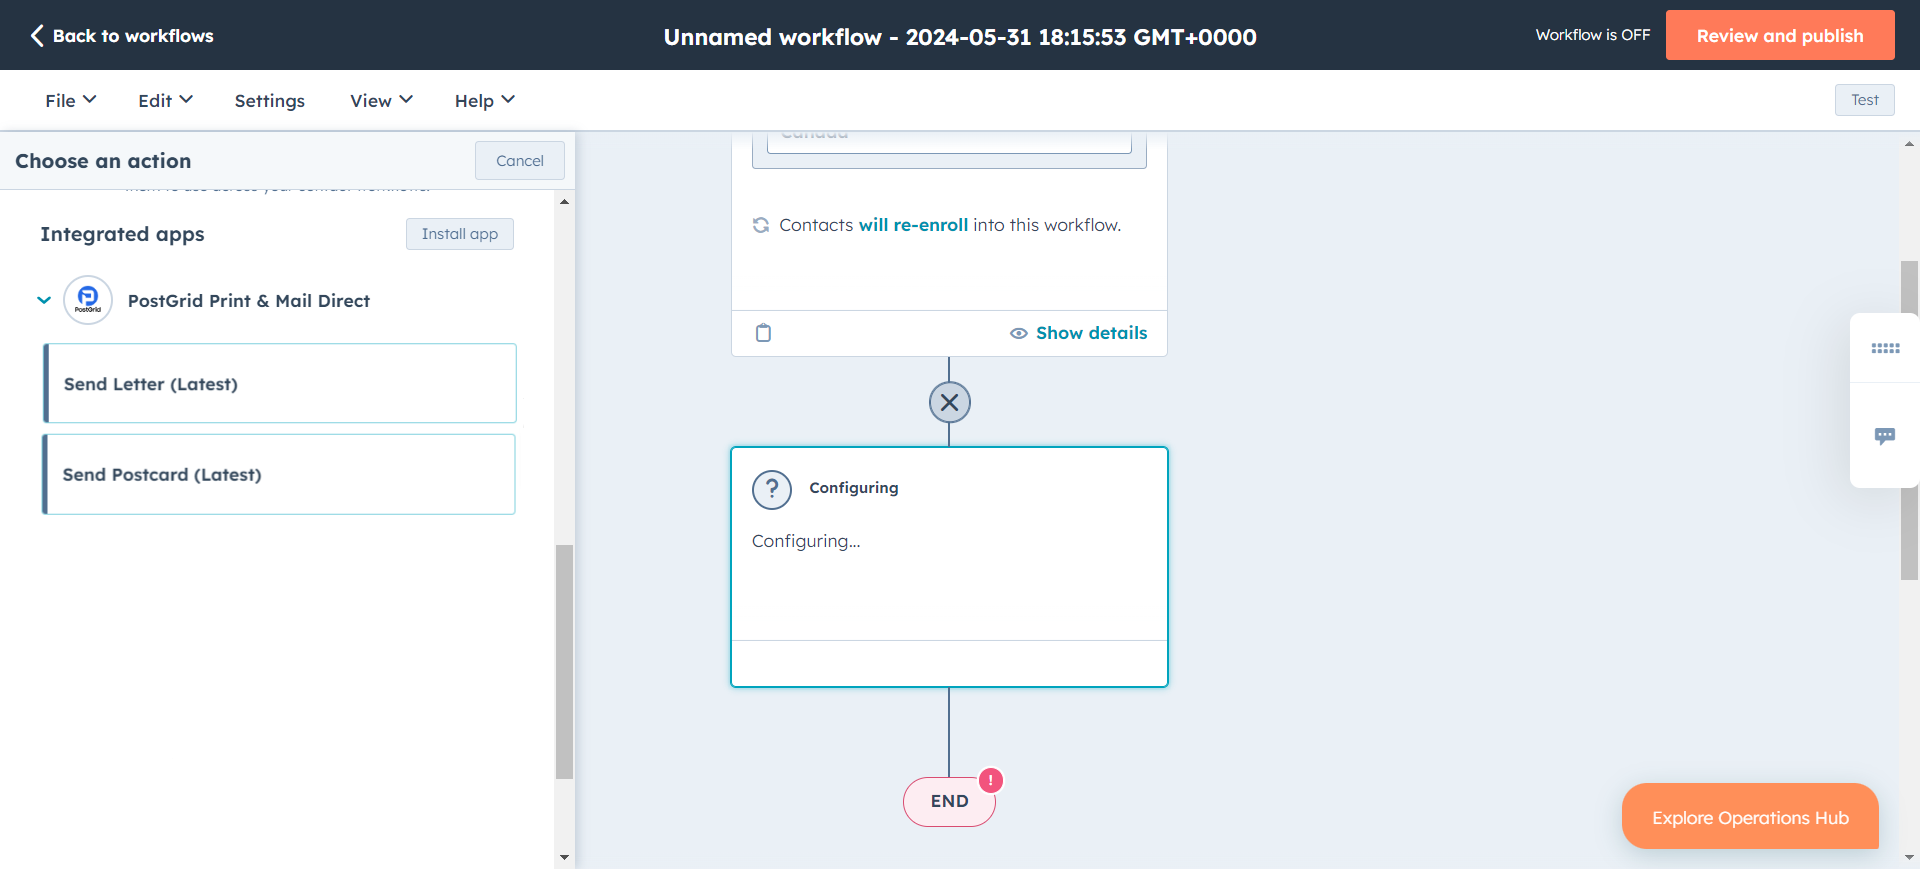
Send Bulk Letters
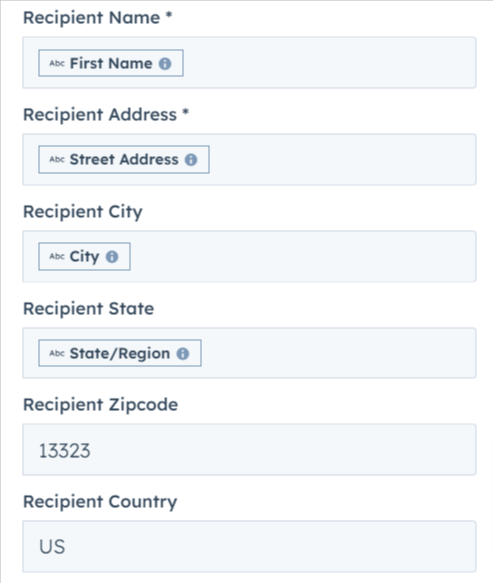
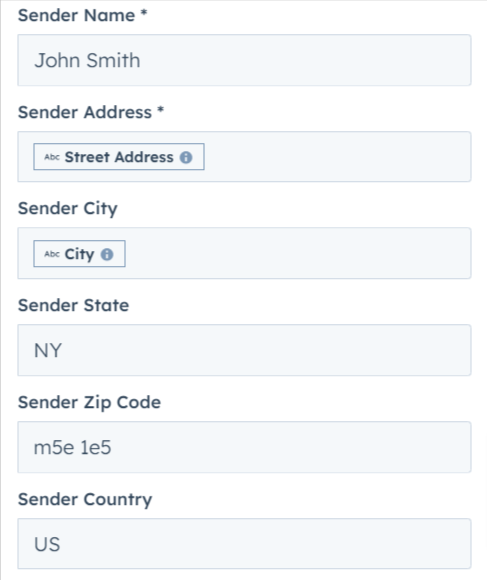
Filling in the Recipient and Sender requirements
Now, you need to define and map the variables one by one. You can manually type the details or select the relevant contact tokens for each field.
Filling in the template requirements
You need to select the type of template you want to use. You can choose one of the templates in your PostGrid dashboard listed here, or share a publicly accessible URL link for the PDF.
To ensure your PDF file is publicly accessible, it must be hosted on a platform that does not require viewers to have an account or specific permission to view the document.

You can learn more here about how to create a template with html and how to use PostGrid template editor
Filling in the mailing requirements
As you follow through with setting up the workflow, you need to define the value of the following criteria for your mailings.
- Express Delivery
- Mailing Class
- Extra Service
- Color
- Double Sided
You can learn more about sending mails through PostGrid, by reading guides for Letter, Postcard, and Self-Mailers
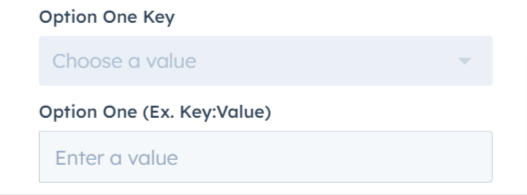
PostGrid offers a highly personalized template editor that allows you to add customized variables to your templates. So here, you can map the variables you've defined in your template to specific fields. There are twenty fields available for merging variable names and values
Same as sending single letters, you may use a custom merge variable in your template. You can learn more about them here
Once you have filled in all the requirements, click "Save," test your workflow, and click on the "Review and publish" button.
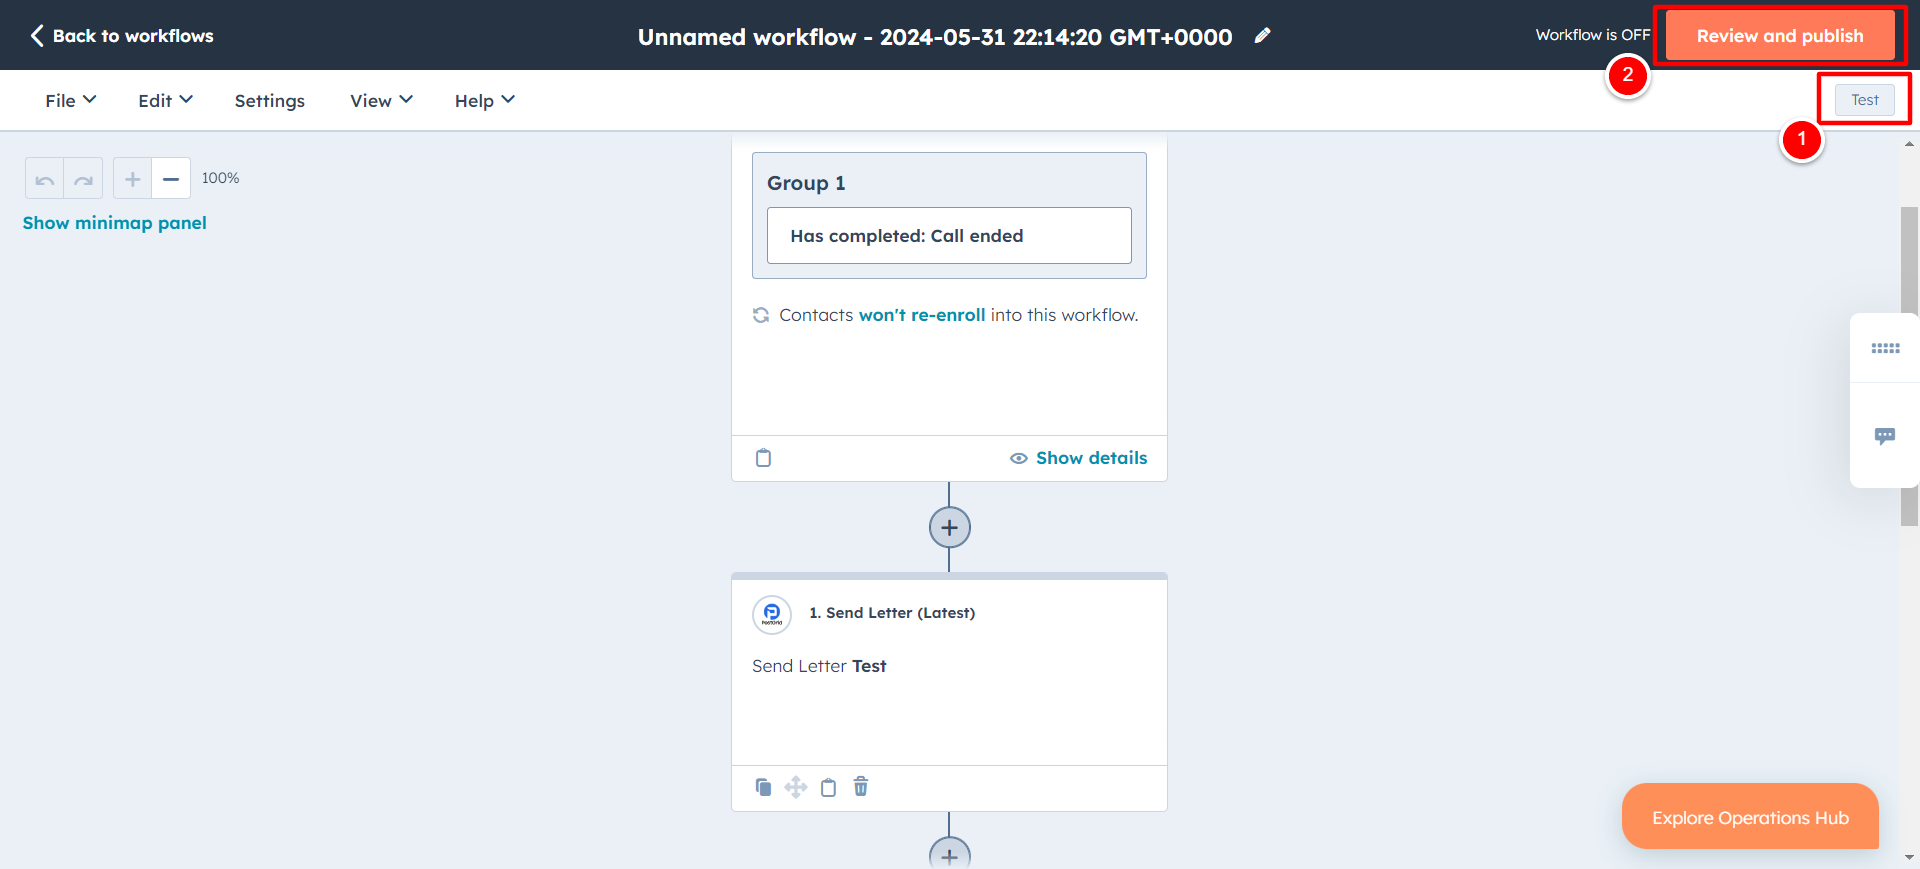
Finally "Turn on" your workflow.
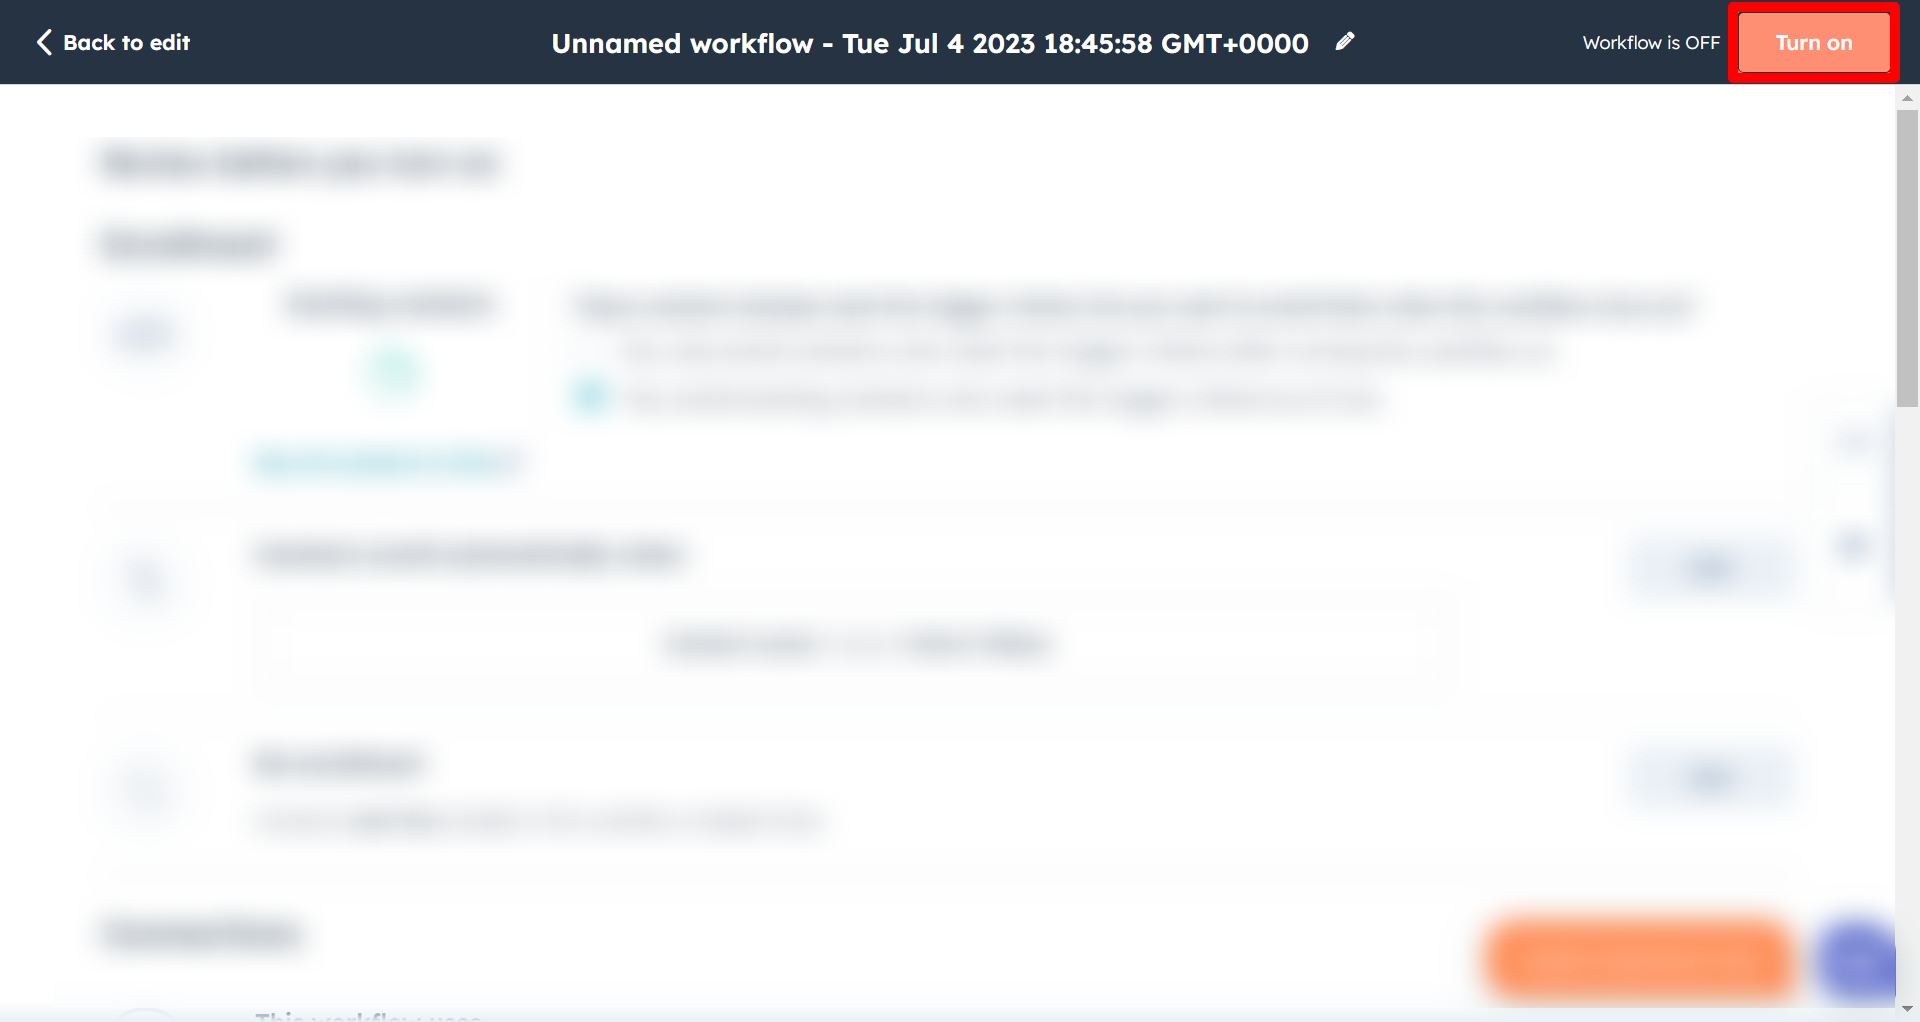
Now, you can access your desired PostGrid Print & Mail service through HubSpot!
Send Bulk Postcards
Filling in the Recipient and Sender requirements
Now, you need to define and map the variables one by one. You can manually type the details or select the relevant contact tokens for each field.
Filling in the template requirements
You need to select the type of template you want to use. You can choose the front and back templates from your PostGrid dashboard listed here, or share a publicly accessible URL link for the PDF.
To ensure your PDF file is publicly accessible, it must be hosted on a platform that does not require viewers to have an account or specific permission to view the document.
You can learn more here about how to create a template with html and how to use PostGrid template editor
Filling in the mailing requirements
As you follow through with setting up the workflow, you need to define the value of the following criteria for your mailings.
- Express Delivery
- Mailing Class
- Size in Inches
You can learn more about sending mails through PostGrid, by reading guides for Letter, Postcard, and Self-Mailers
PostGrid offers a highly personalized template editor that allows you to add customized variables to your templates. So here, you can map the variables you've defined in your template to specific fields. There are twenty fields available for merging variable names and values
Same as sending single letters, you may use a custom merge variable in your template. You can learn more about them here
Once you have filled in all the requirements, click "Save," test your workflow, and click on the "Review and publish" button.
Finally "Turn on" your workflow.
Now, you can access your desired PostGrid Print & Mail service through HubSpot!
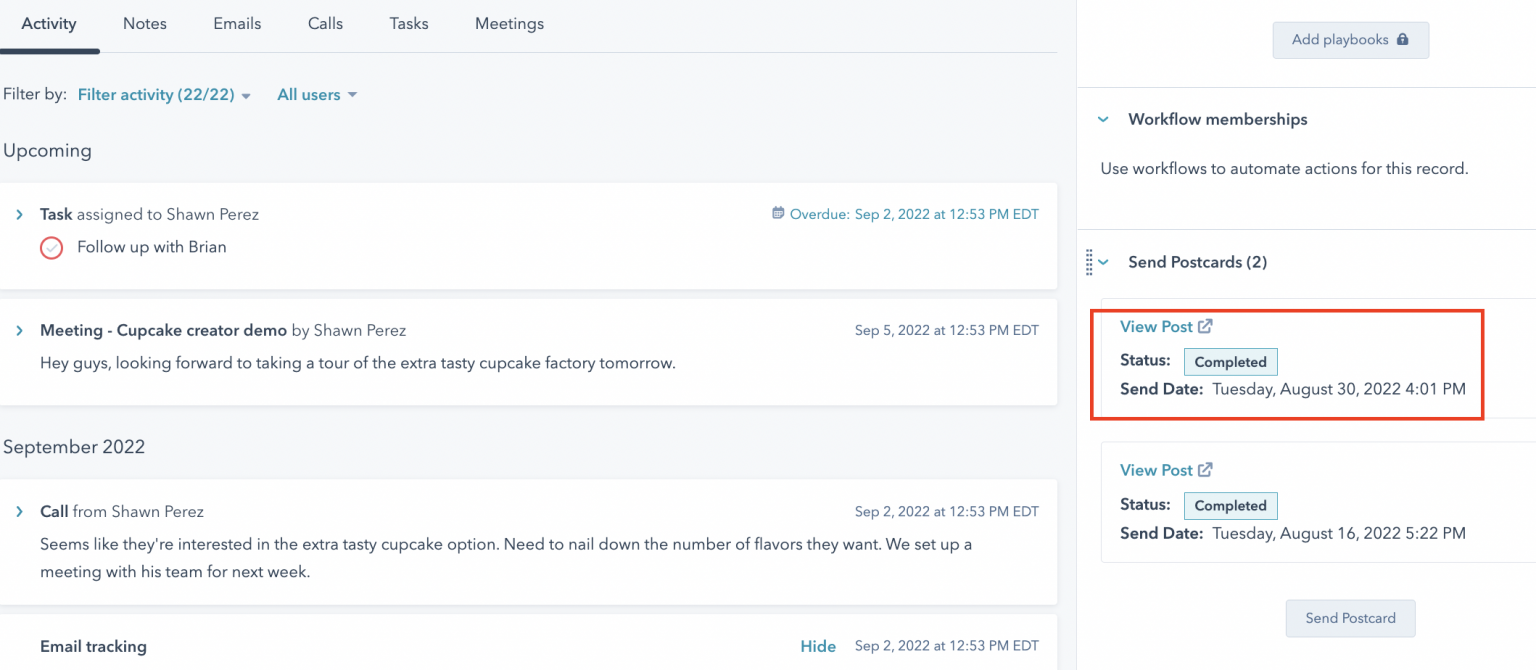
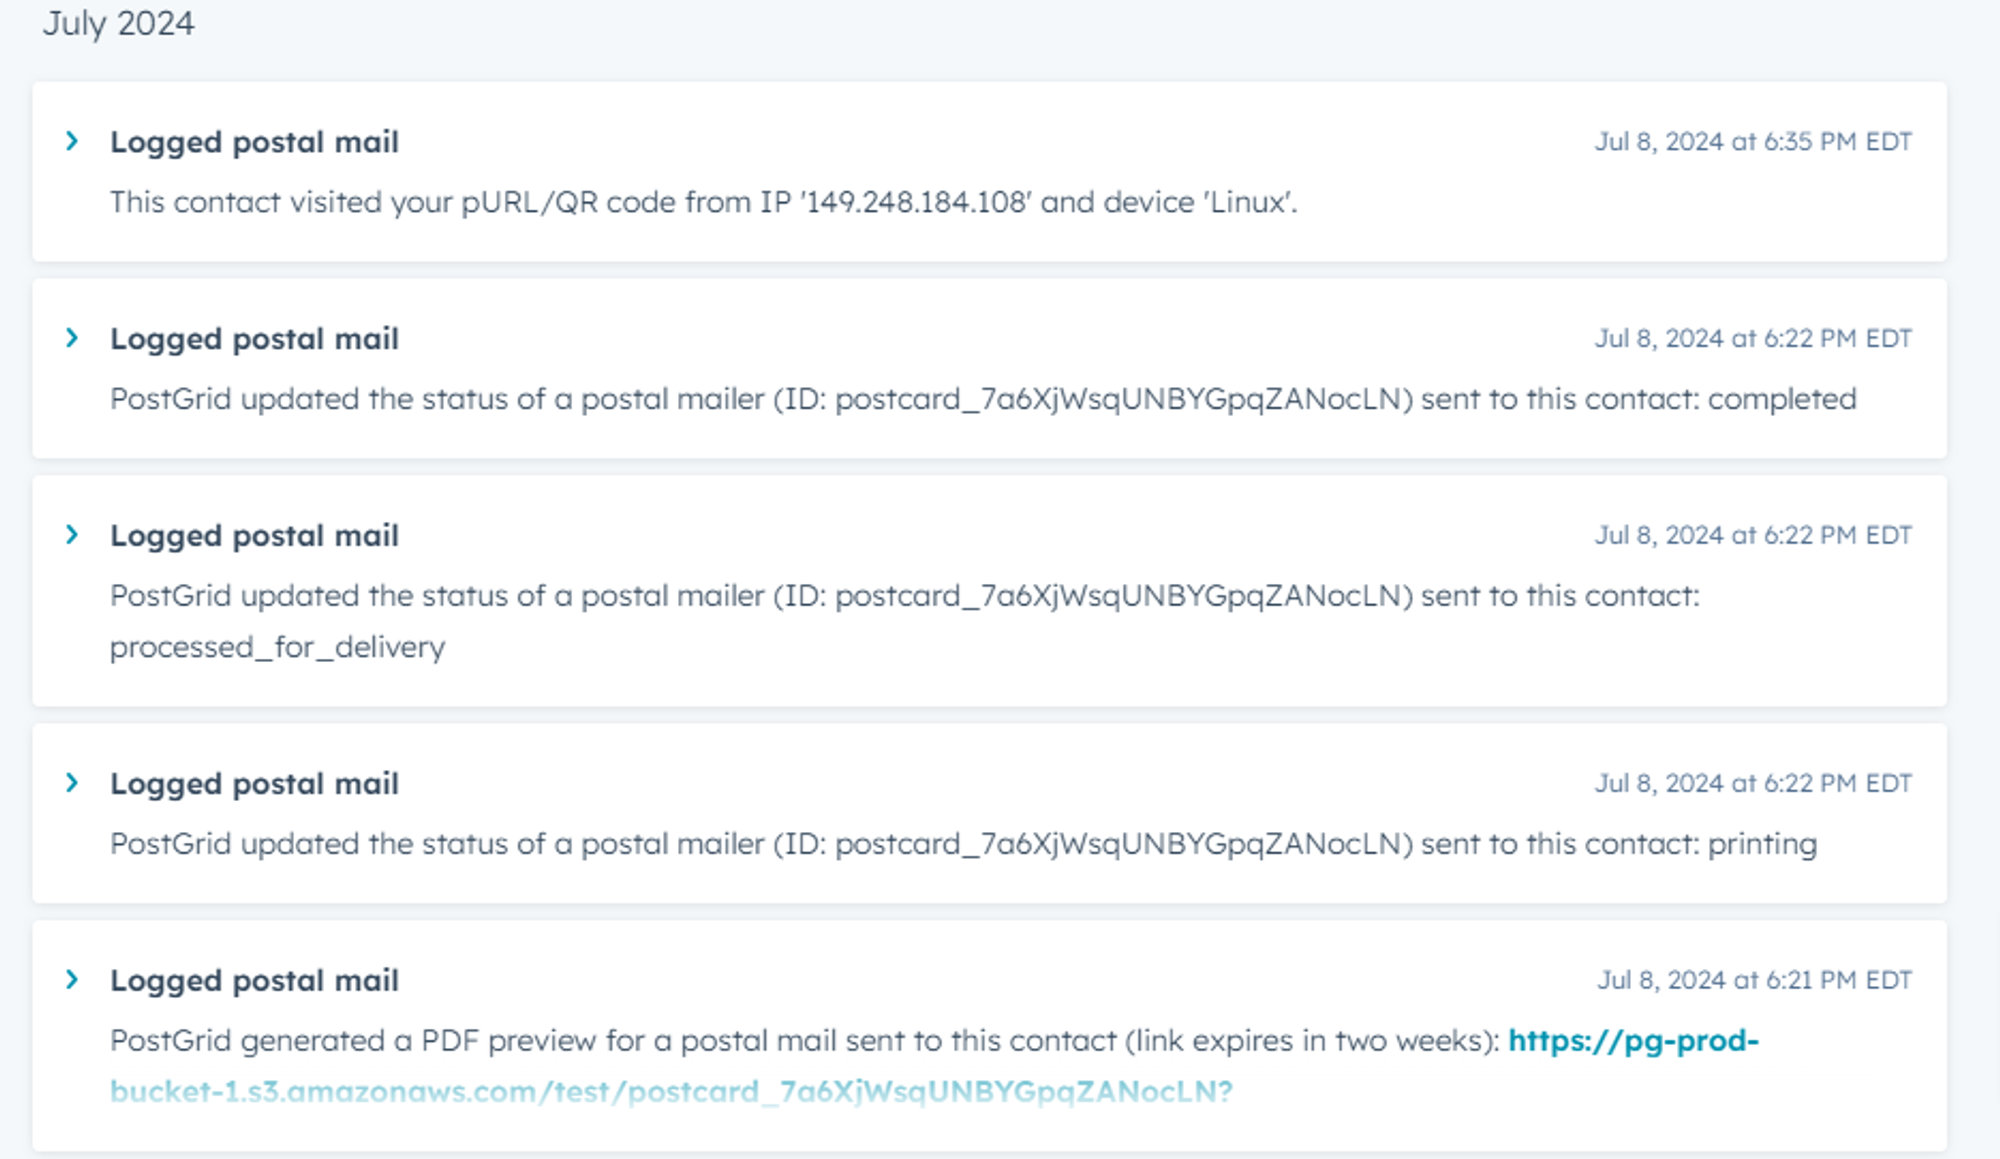
HubSpot Mail Activity Log
You can view order-related activity in the 'Activity' section of each contact. Updates such as changes in tracking status and QR code (Tracker) scans will appear here. These updates will be listed under the title 'Logged Postal Mail'.
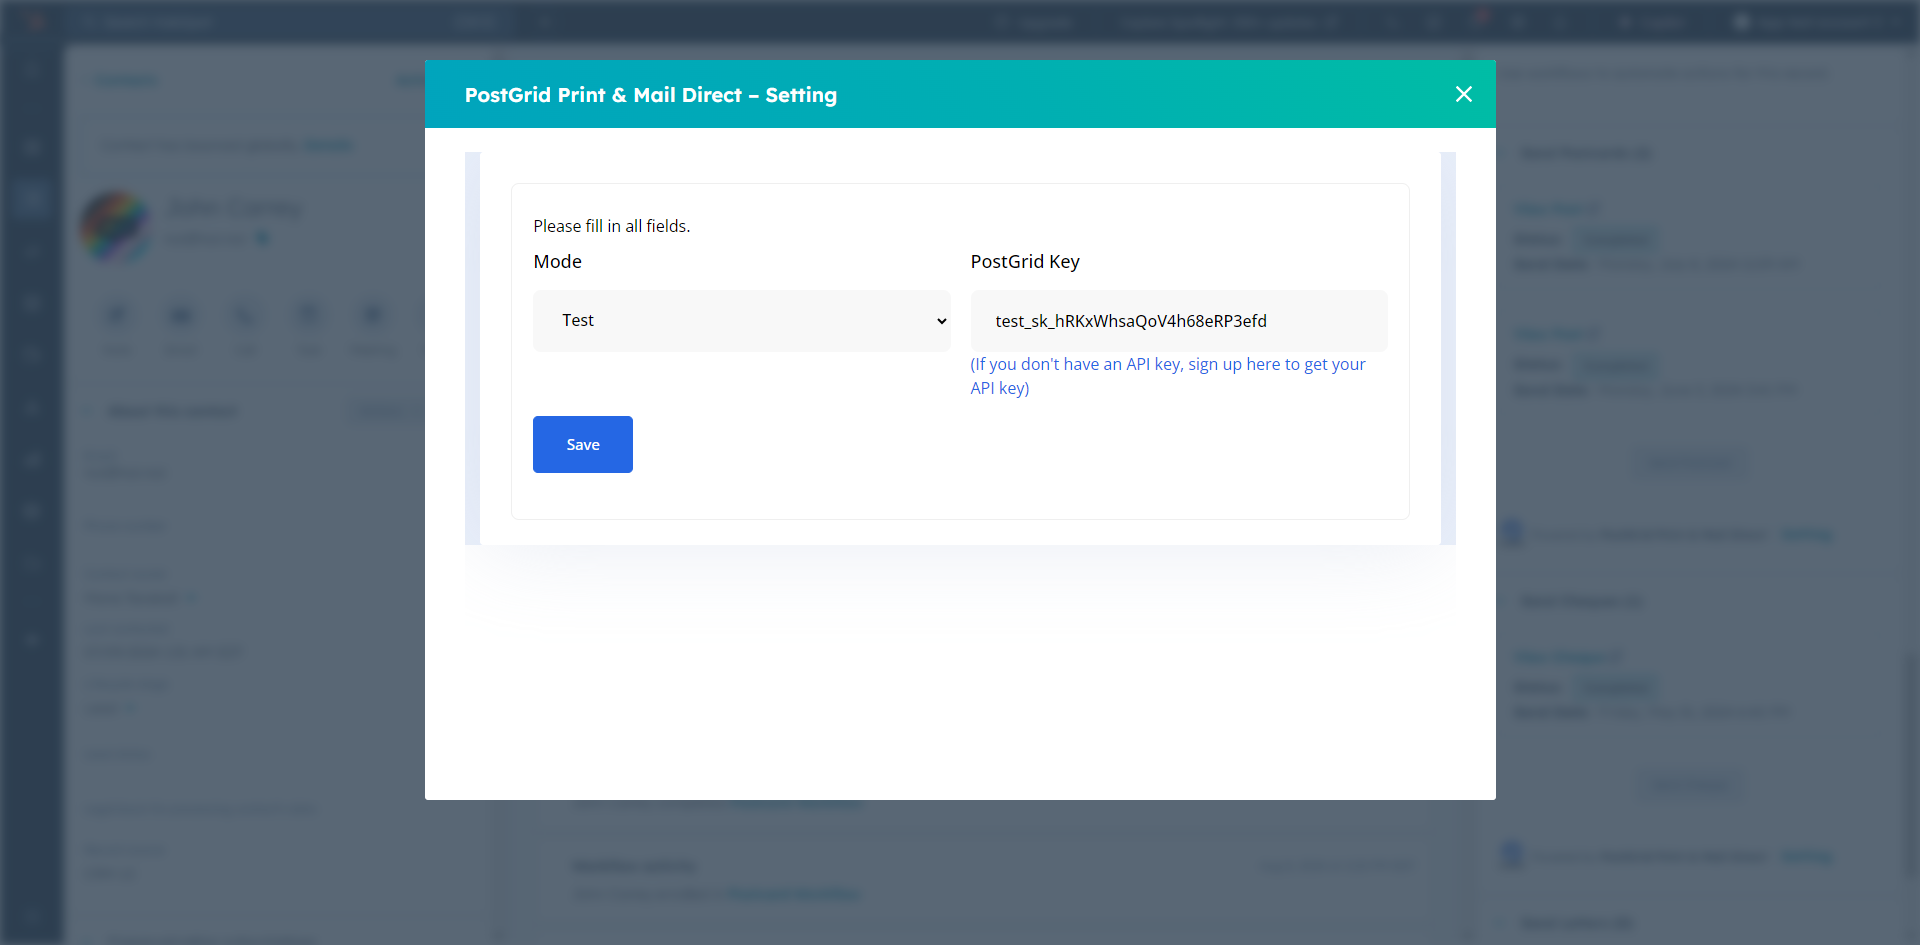
How to change the API key?
To change the API key, click on any contact in your CRM. Next, scroll down on the right section of the screen. When you see the PostGrid element—such as "Send Letters," "Send Postcards," or "Send Cheques"—click on "Setting"
Here's a quick video guide for more help -
Updated 10 months ago