Stripe
Overview
Integrating PostGrid into your Stripe application offers numerous advantages, from validating customer addresses to handling the mailing of invoices. This comprehensive guide will walk you through the process of using the PostGrid Stripe App and utilizing the automatic address verification and invoice mailing features offered by PostGrid.
Setting up the PostGrid Integration in Stripe
This section will walk you through finding and installing the PostGrid app on Stripe, as well as setting up your PostGrid account in stripe.
Installing PostGrid's app on Stripe
To initiate the integration of PostGrid into Stripe, start by visiting the Stripe App Marketplace. Here, you can locate PostGrid through the search bar. Proceed by clicking on the 'Install app' button, then wait for the process to be completed. Upon completion, you will be able to open the PostGrid menu on Stripe:

Setting up your PostGrid account in Stripe
After installing the PostGrid app, you will be required to create an account with PostGrid if you haven't already, you can do so on this page. If you would like to use both the Customer Address Verification and Invoices Mailing features provided by PostGrid, then you must create a separate account for both the 'Print & Mail API' and 'Address Verification API' on the PostGrid sign up page:
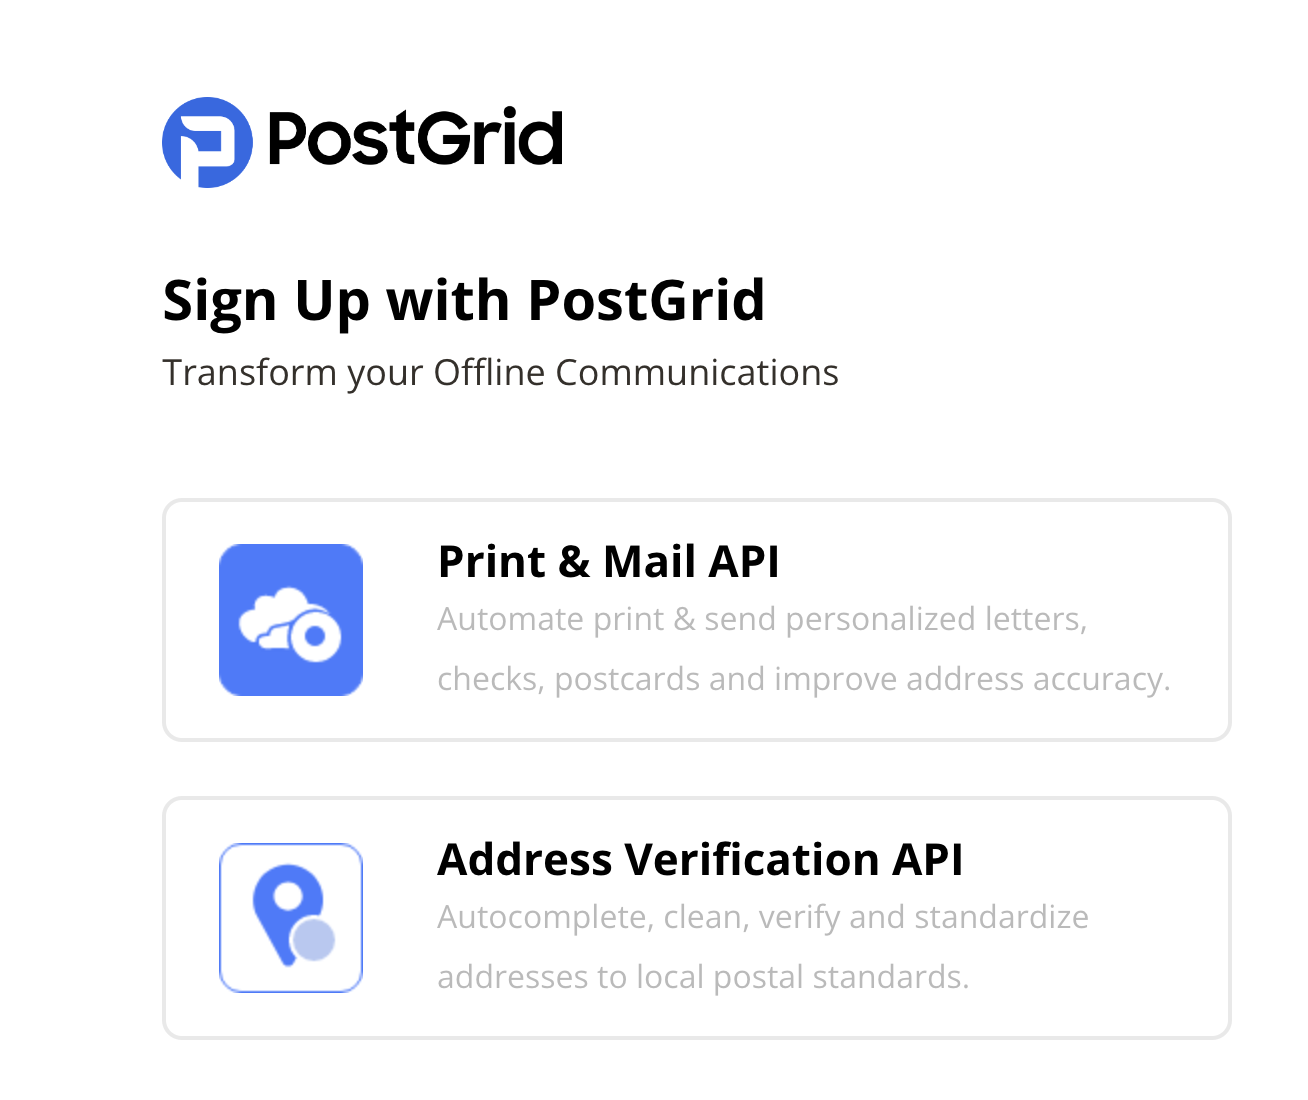
PostGrid's user signup page
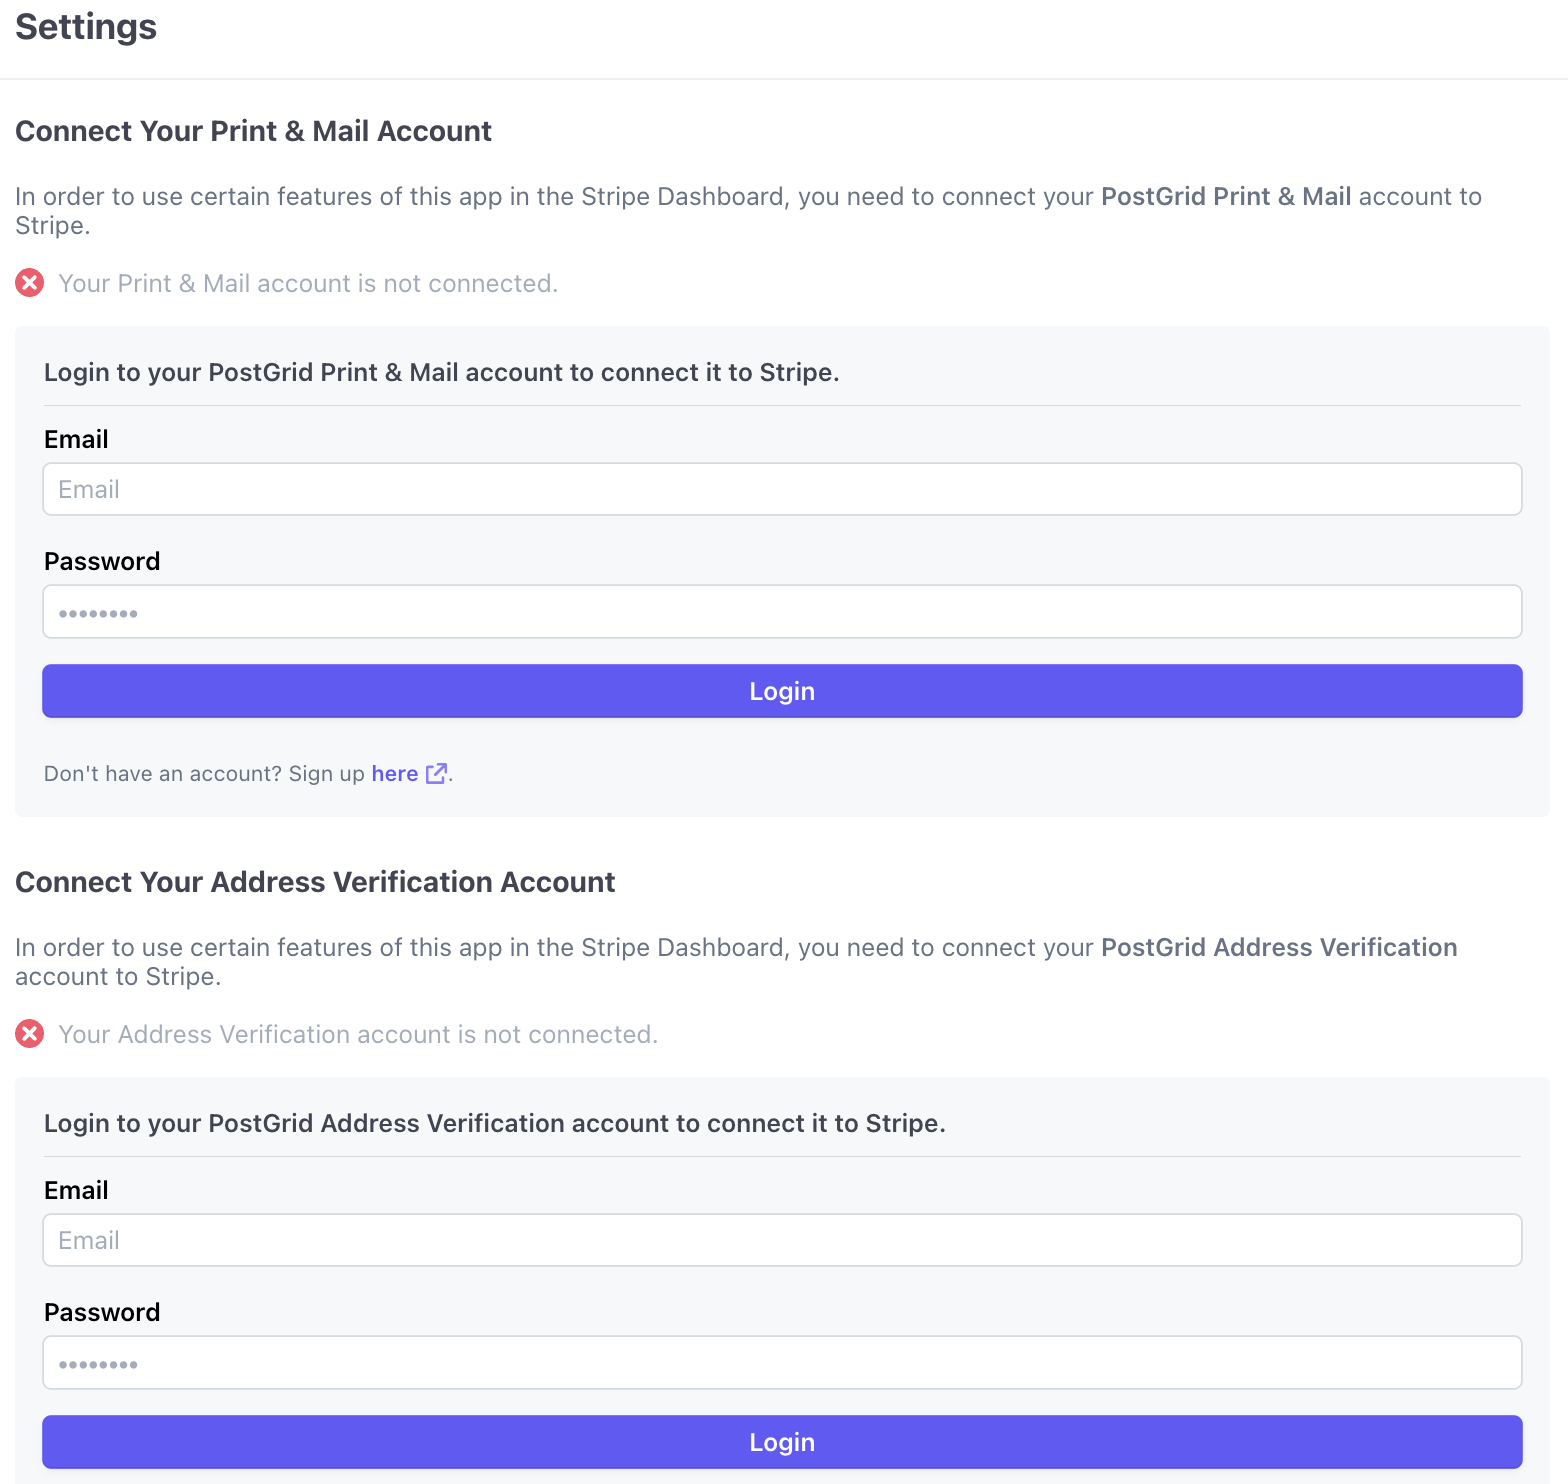
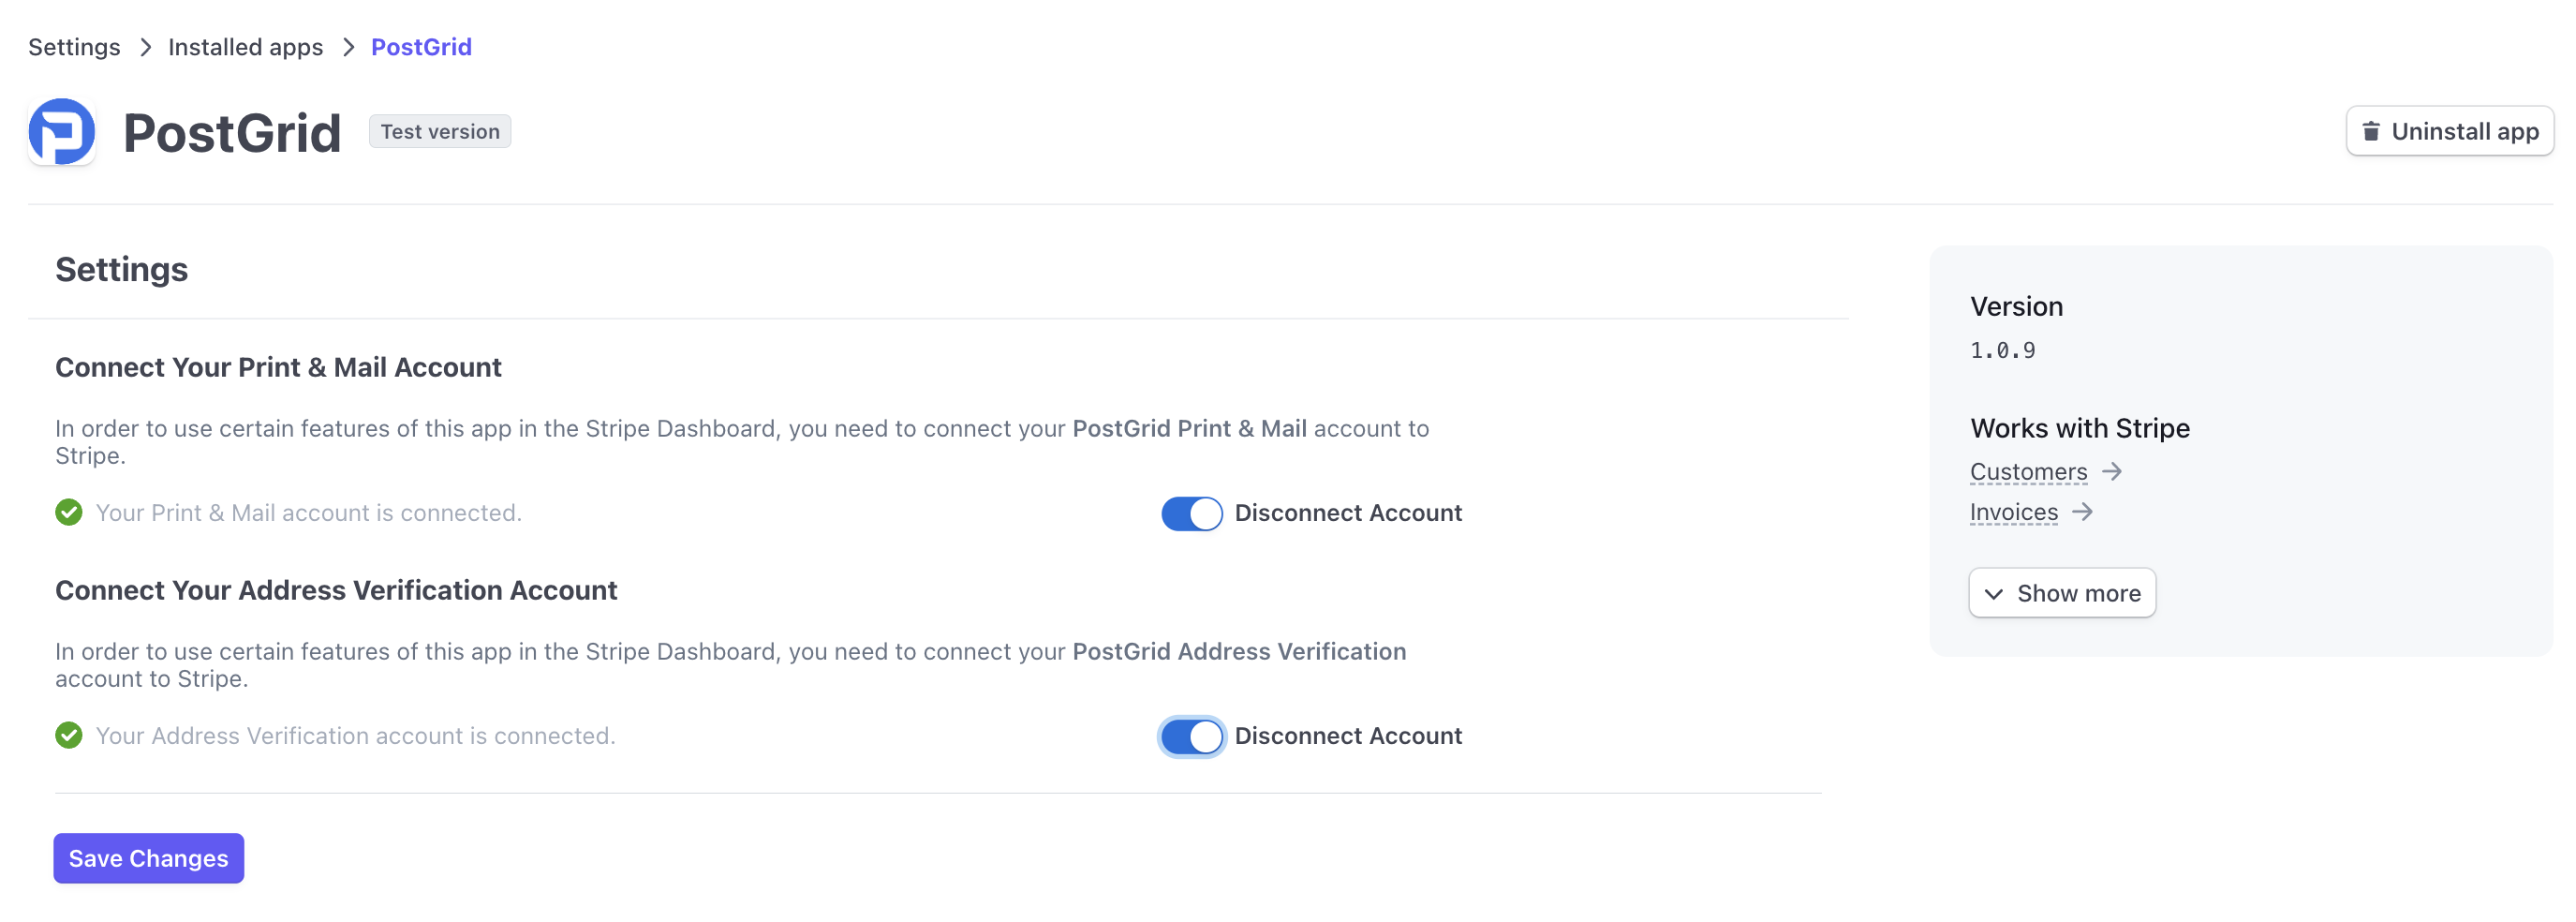
After installing the PostGrid app on Stripe and creating your PostGrid accounts, you must connect your PostGrid accounts to the PostGrid app. To do so, you can navigate to the app settings on the top right corner of PostGrid's menu on Stripe, then click on 'View App Settings' to navigate to the PostGrid App settings.
In the app settings menu, you will be prompted to login to both of your PostGrid accounts, the Print and Mail API account as well as the Address Verification API account. Logging in to your PostGrid account will connect your PostGrid account to the PostGrid application on stripe, giving you access to both the Customer Address Verification feature and the Invoice Mailing feature.
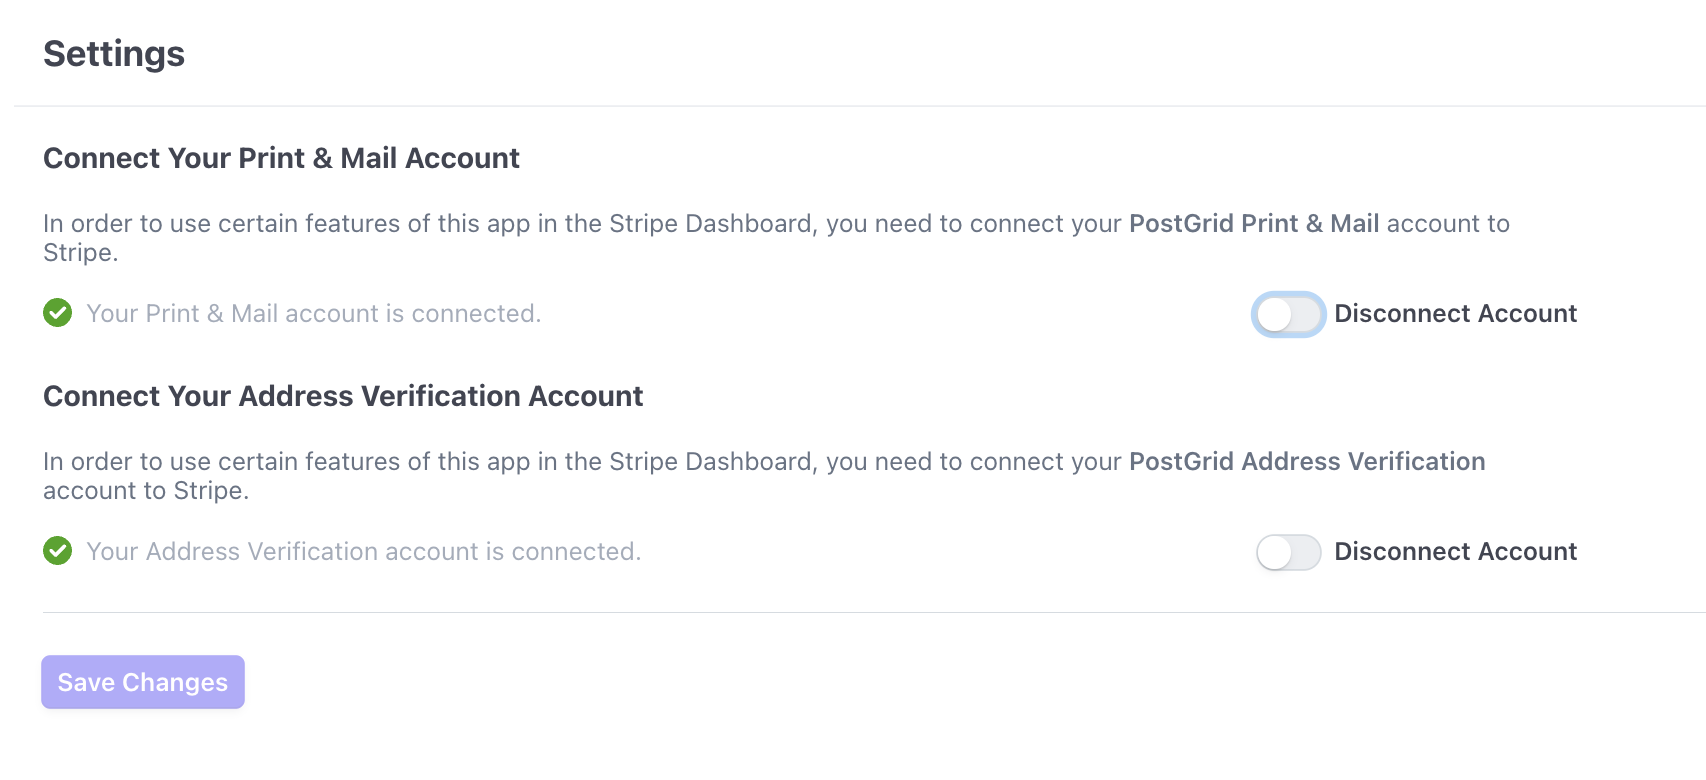
After logging in and connecting both accounts, your app settings page should inform you that your account is connected, and now you can use PostGrid's features in Stripe.
Disconnecting your PostGrid account and Uninstall the PostGrid ap
To Disconnect your PostGrid accounts or Uninstall PostGrid from Stripe you can navigate to the app settings on PostGrid's menu:
In the PostGrid app settings, you can toggle the 'disconnect app' option then click save, and that will disconnect your PostGrid account from the PostGrid app on Stripe. If you wish to delete the PostGrid app, you can click 'uninstall app' on the top right corner of the app settings page.
Using PostGrid in Stripe
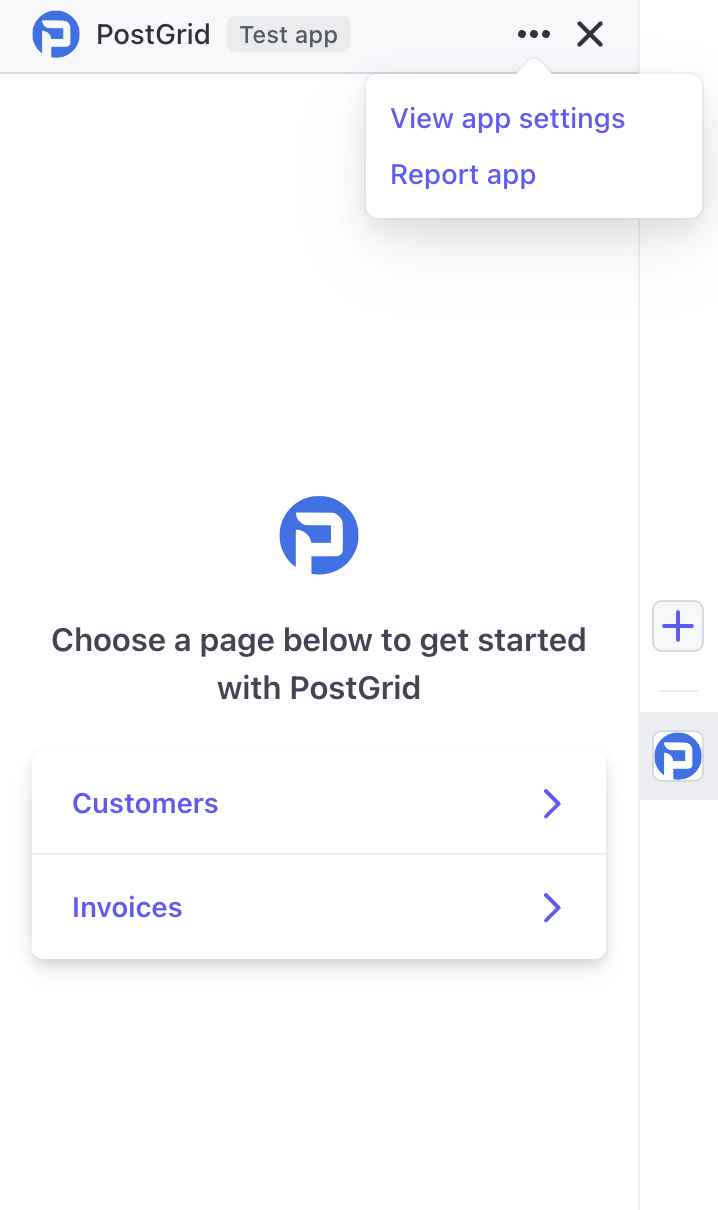
Once the PostGrid application is successfully installed, you will gain access to Stripe's PostGrid features, including Customer Address Verification and Invoice Mailing. You can locate PostGrid amongst your list of installed applications. Clicking on it will reveal PostGrid's main menu.
This guide is divided into three main sections to help you use the Stripe PostGrid integration:
- Navigating The PostGrid App on Stripe
- Utilizing PostGrid's Customers Address Verification feature on Stripe
- Utilizing PostGrid's Invoice Mailing feature on Stripe
Navigating the PostGrid App on Stripe
Upon clicking on PostGrid's application, a pop-up main menu will appear as shown below. This menu offers two navigation options: Customers and Invoices.
The Customers option leverages PostGrid's Address Verification feature, enabling you to verify the mailing and shipping addresses of either a single customer or a batch of customers.
The Invoices option employs PostGrid's Invoice Mailing feature, allowing you to mail invoices to your customers with a single click through PostGrid's software and delivery partner network. This feature lets you concentrate on your core business instead of manually printing and mailing invoices.
The Customers and Invoices options in the PostGrid pop-up menu are synchronized with Stripe's dashboard menu. Thus, any navigation to 'Customers' or 'Billing' on Stripe's dashboard will also reflect in the PostGrid pop-up menu and vice versa.
Customer Address Verification
Accurate customer addresses are crucial for effective shipping and invoicing. PostGrid's address verification feature checks addresses and categorizes them as Corrected, Failed, Failed to Update, and Verified.
Address Verification can be performed on a batch of customers or on an individual basis.
Batch Address Verification
Batch verification of all customer addresses can be accomplished in the following steps:
- Click 'Customers' on PostGrid's main pop-up menu or navigate to the 'Customers' tab on your Stripe dashboard.
- Within the Customers menu on the PostGrid app, you will find two options: 'Clean Customer Addresses' and 'Settings'. The Settings menu allows you to control address verification on your customers, such as enabling auto-address validation when creating a new customer.
- Next, click on 'Clean Customer Addresses' to validate all your customers' addresses as a batch. This action comprises several steps:
- Load Customers Addresses - PostGrid will retrieve your customers' addresses, excluding any customers with missing addresses.
- Pre-Cleaning - PostGrid will perform pre-cleaning, including verifying that no crucial information is missing from your customer addresses, such as a country. If this is the case, it will prompt you to select a default country.
- Clean Addresses - PostGrid will now clean your customers' addresses, making corrections where possible, and categorizing the addresses into Corrected, Failed, Failed to Update, and Verified.
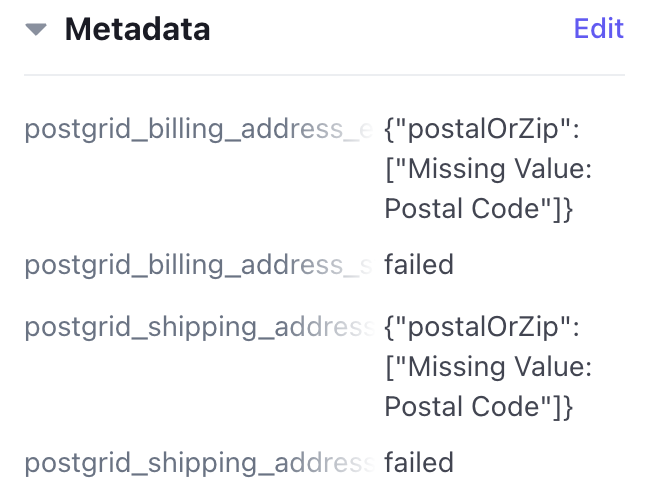
- To see which addresses have been verified or failed, select a customer on the Customers tab and scroll down to the Metadata section.
- Failed Addresses: Under Metadata, PostGrid will provide details on why the address failed to verify, split into billing and shipping address errors and status. The error is an object with a key-value pair describing what part of the address has an error and what the error is.
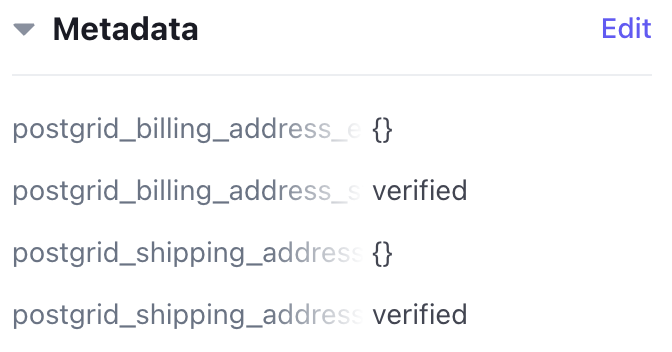
- Verified Addresses: Under Metadata, verified addresses will display an empty object for errors and 'verified' for status:
- Missing Addresses: If no address was provided, then PostGrid would have skipped this customer during verification, hence there will be no Metadata:

Single Customer Address Verification
In addition to batch verification, you can also choose to verify a single customer's address:
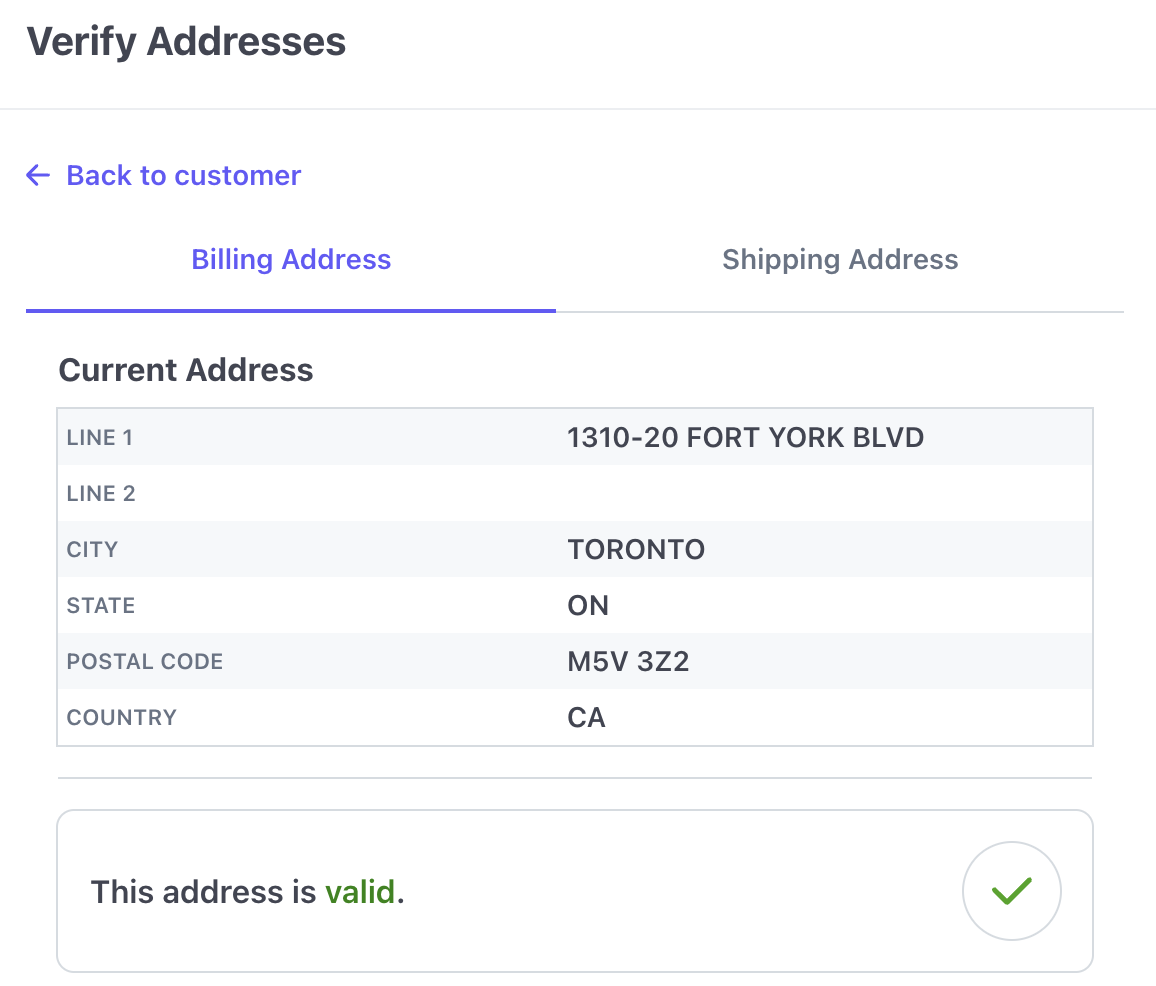
Select the customer directly from the Customers tab in your Stripe dashboard, then open PostGrid's pop-up menu where you will be presented with the option Verify Addresses with a message 'Verify customer's billing & shipping addresses.
Clicking Verify Addresses will run PostGrid's address verification feature on that customer. The address can either be verified, corrected, or fail to verify with the reason given.
Please note that toggling auto-validation in PostGrid's Customers Settings menu will verify and validate addresses without your intervention, auto-validation effectively runs the 'Single Customer Address Verification' feature as the customer is created or updated.
Below are the possible verification results with PostGrid.
- Verified: The address here is valid with no corrections necessary, as indicated in the customer's Metadata section
PostGrid's Customer Address Verification menu
Customer Metadata
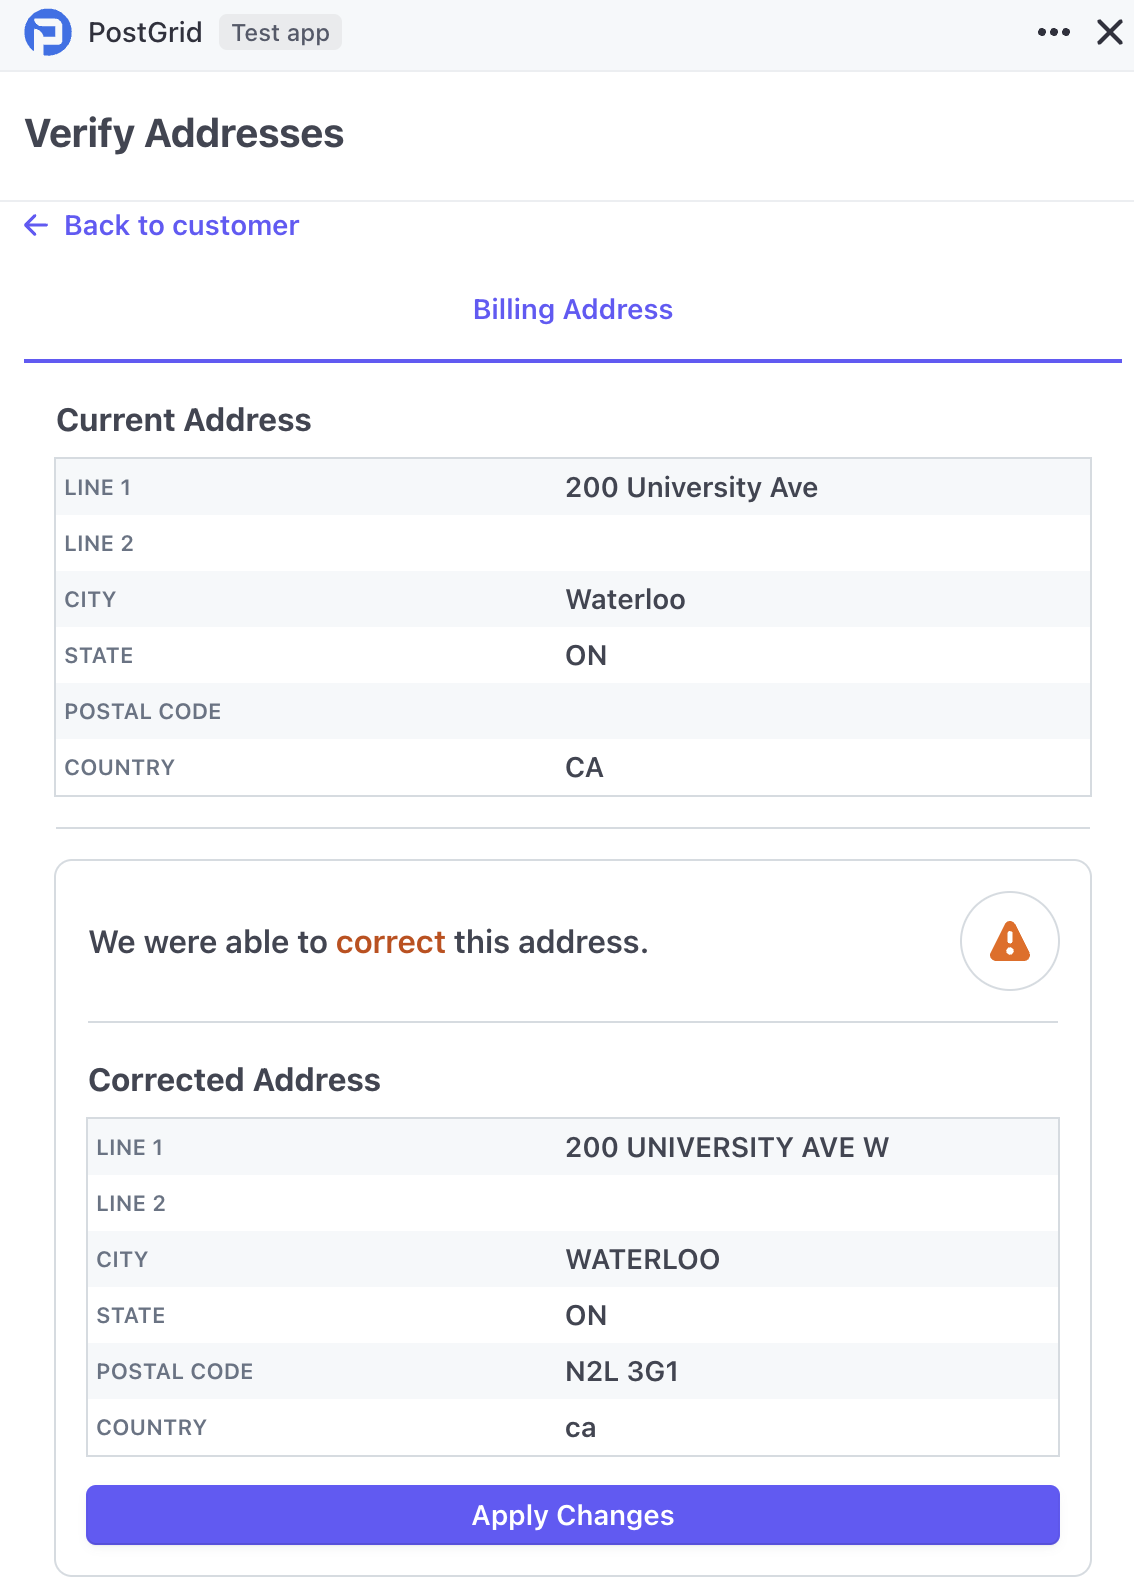
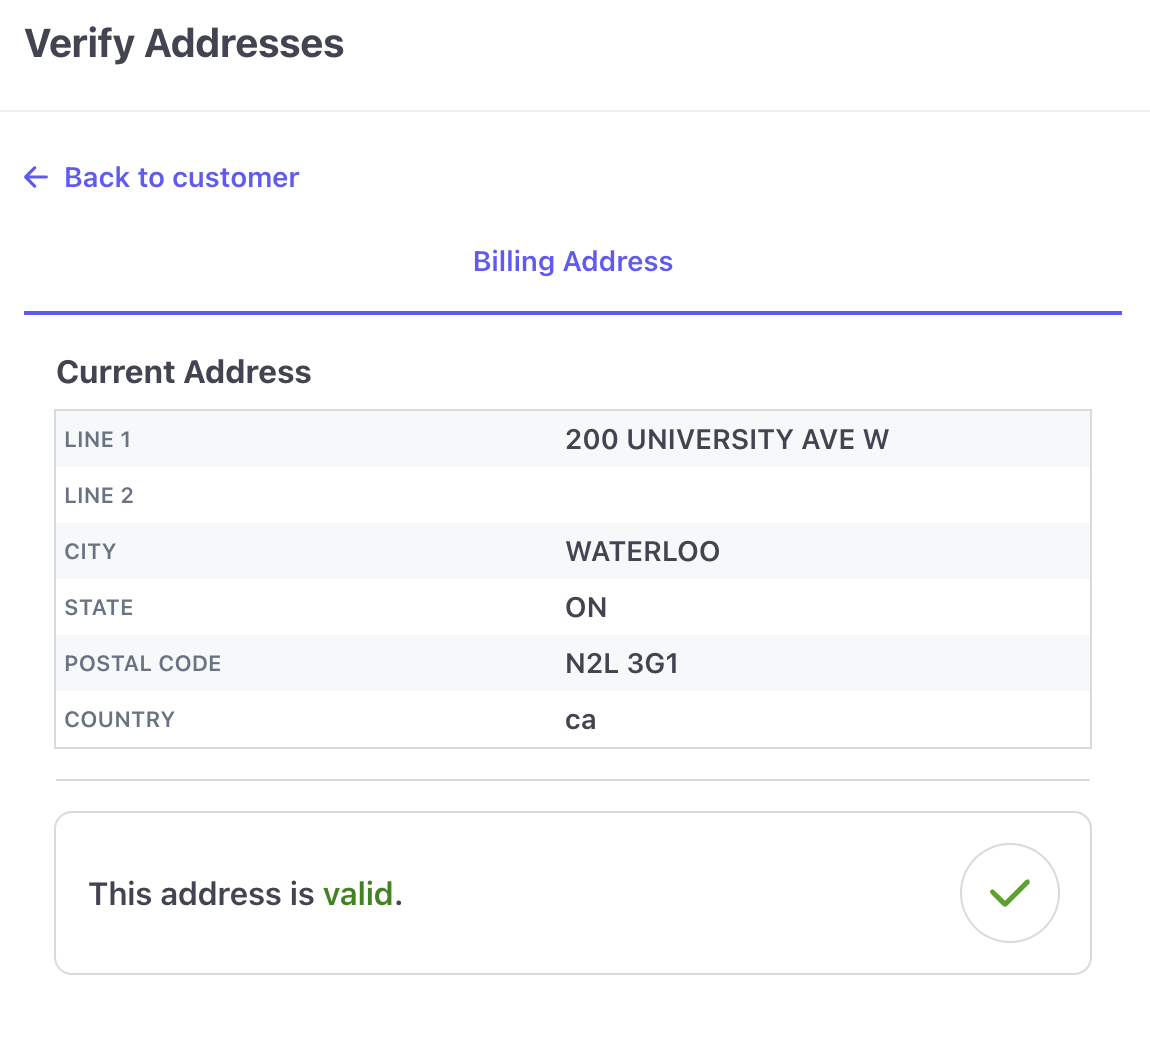
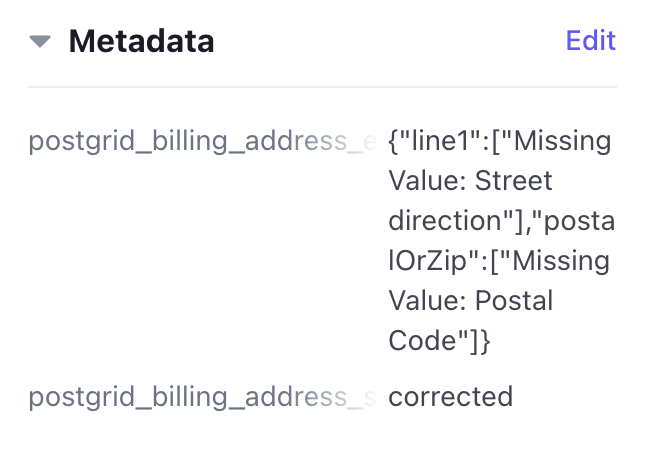
- Corrected: This address had a missing Postal Code, PostGrid was able to find the correct Postal Code and prompt you to accept its address correction. Clicking Apply Changes will fix the customer's address and display a successfully verified address message. Further investigation into the customer's Metadata indicates the errors is fixed.
PostGrid's Customer Address Verification menu
PostGrid's Customer Address Verification menu after changes
Customer Metadata
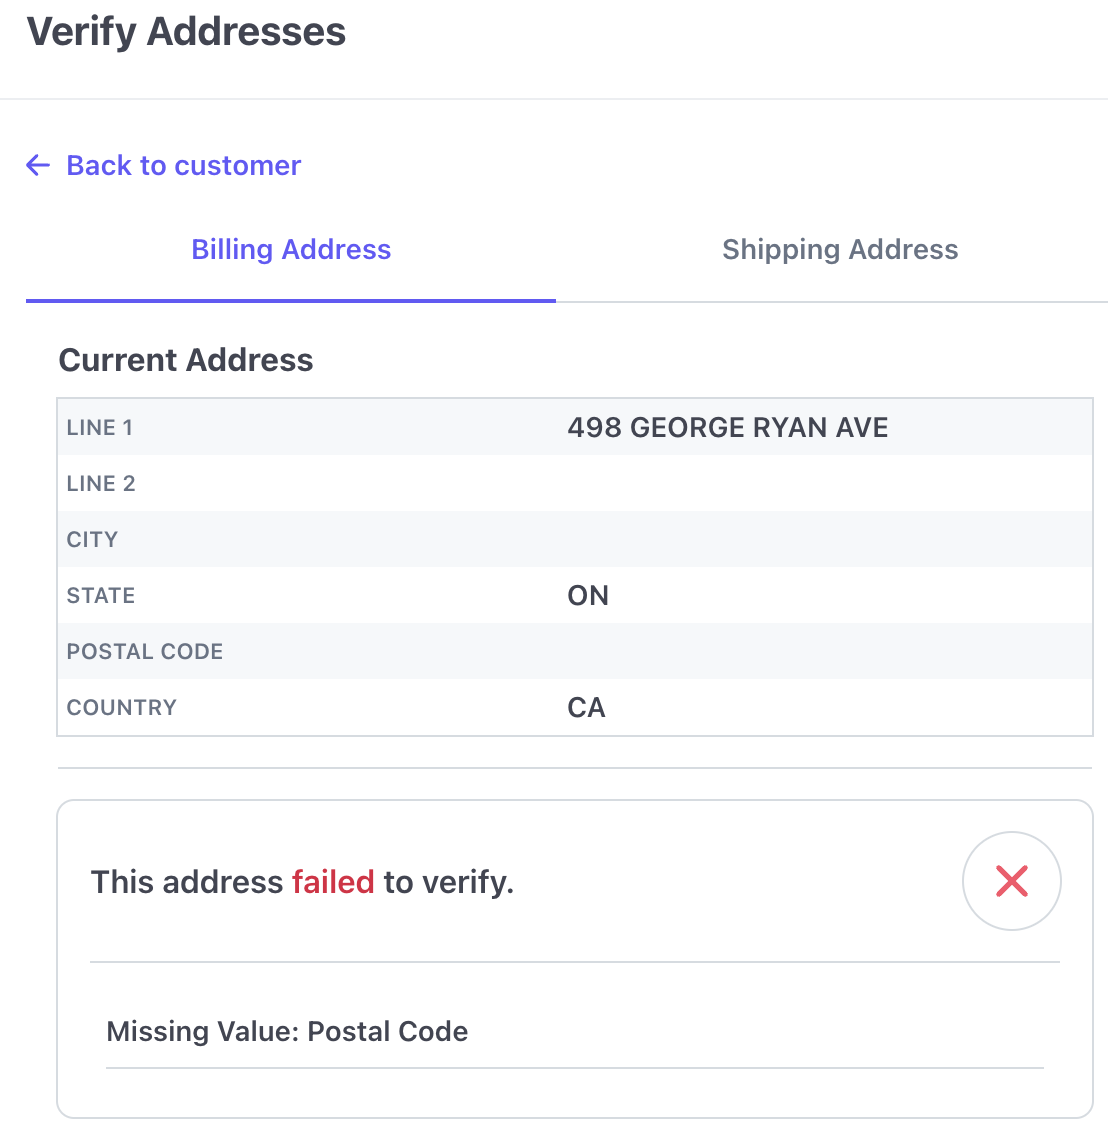
- Failed to Verify: This address had too many inconsistencies and failed to verify, further investigation in the Customer's Metadata indicates the associated reasons.
PostGrid's Customer Address Verification menu
Customer Metadata
Customer Address Auto-validation
PostGrid offers an Address Auto-Validation feature that validates the customer's address as they are created. Similar to batch and single customer address verification, this feature will either verify, correct, fail, or fail to correct an address. You can toggle the Address Auto-Validation feature on the PostGrid's menu in the Customers section, simply click settings and toggle Auto-validation on or off.
Shown below are three examples of address auto-validation as a customer is created. First with an address that is successfully verified, the second where the address gets corrected, and finally an address that fails.
- Creating a contact with an address that successfully verifies
In this example, we have created a customer with a correct billing and shipping address, this address should verify successfully.
- Create a customer with an address of 200 University Ave W in Waterloo, Ontario, postal code N2L 3G1. After entering the information, click Add customer and the address auto-validation will run its validation.
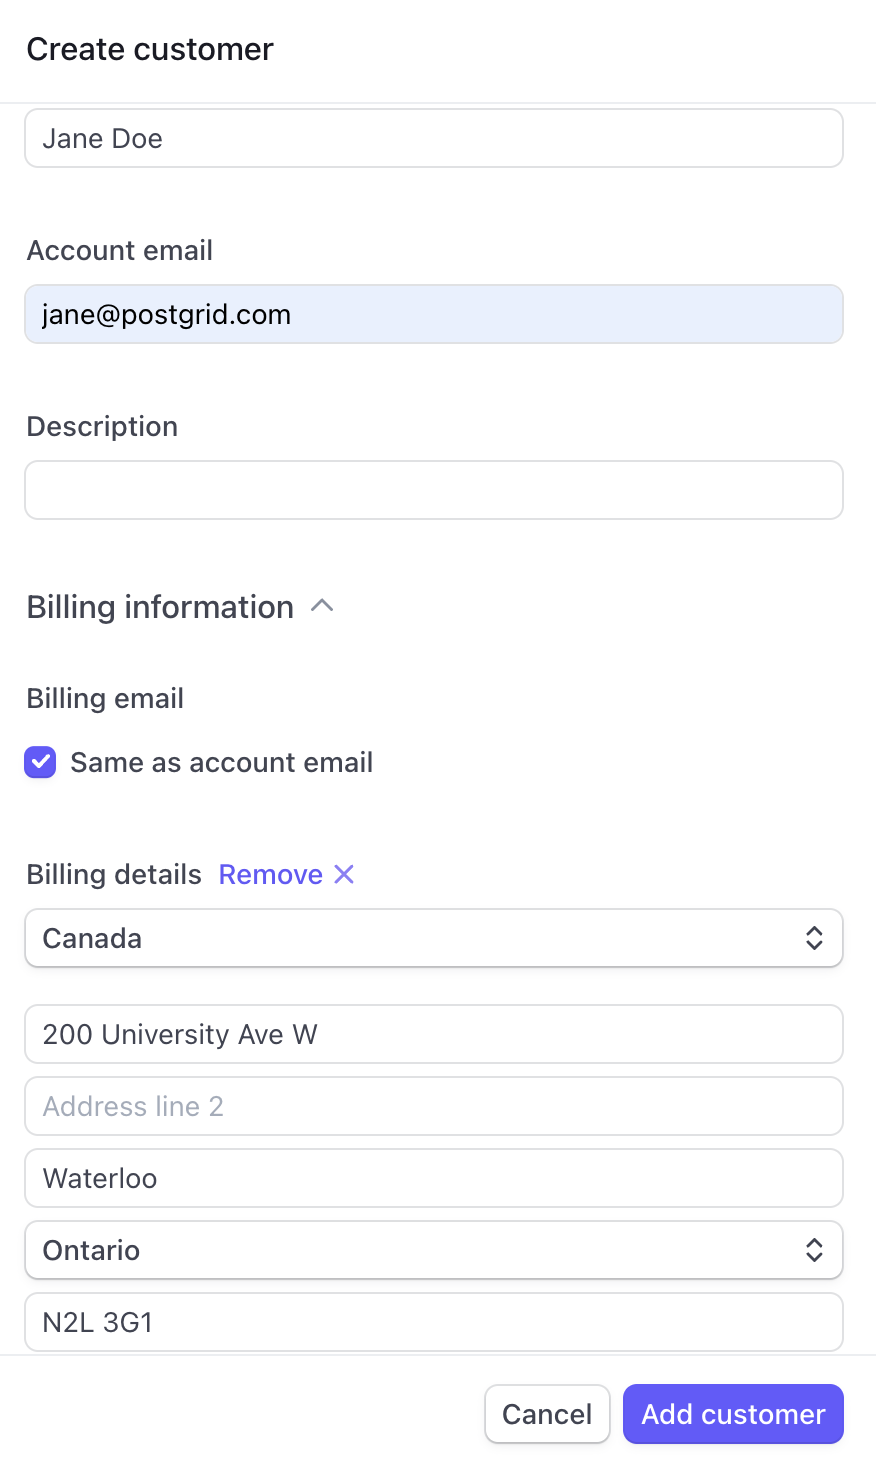
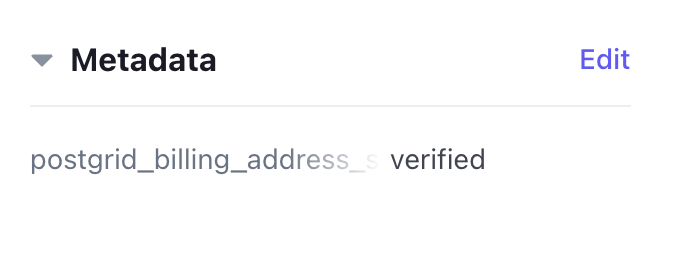
- After adding the customer, navigate to the new customer and open their profile, the address validation results will appear under Metadata section. In this example, we see that the Metadata indicates that the address is verified.
- Creating a contact with an address that gets corrected
In this example, we have created a customer with a billing and shipping address that is missing a city, this address should be corrected using PostGrids address verification feature
- Create a customer with an address of 200 University Ave W in Ontario, with postal code N2L 3G1 - however the city input is missing. After entering the information, click Add customer and the address auto-validation will run its validation.
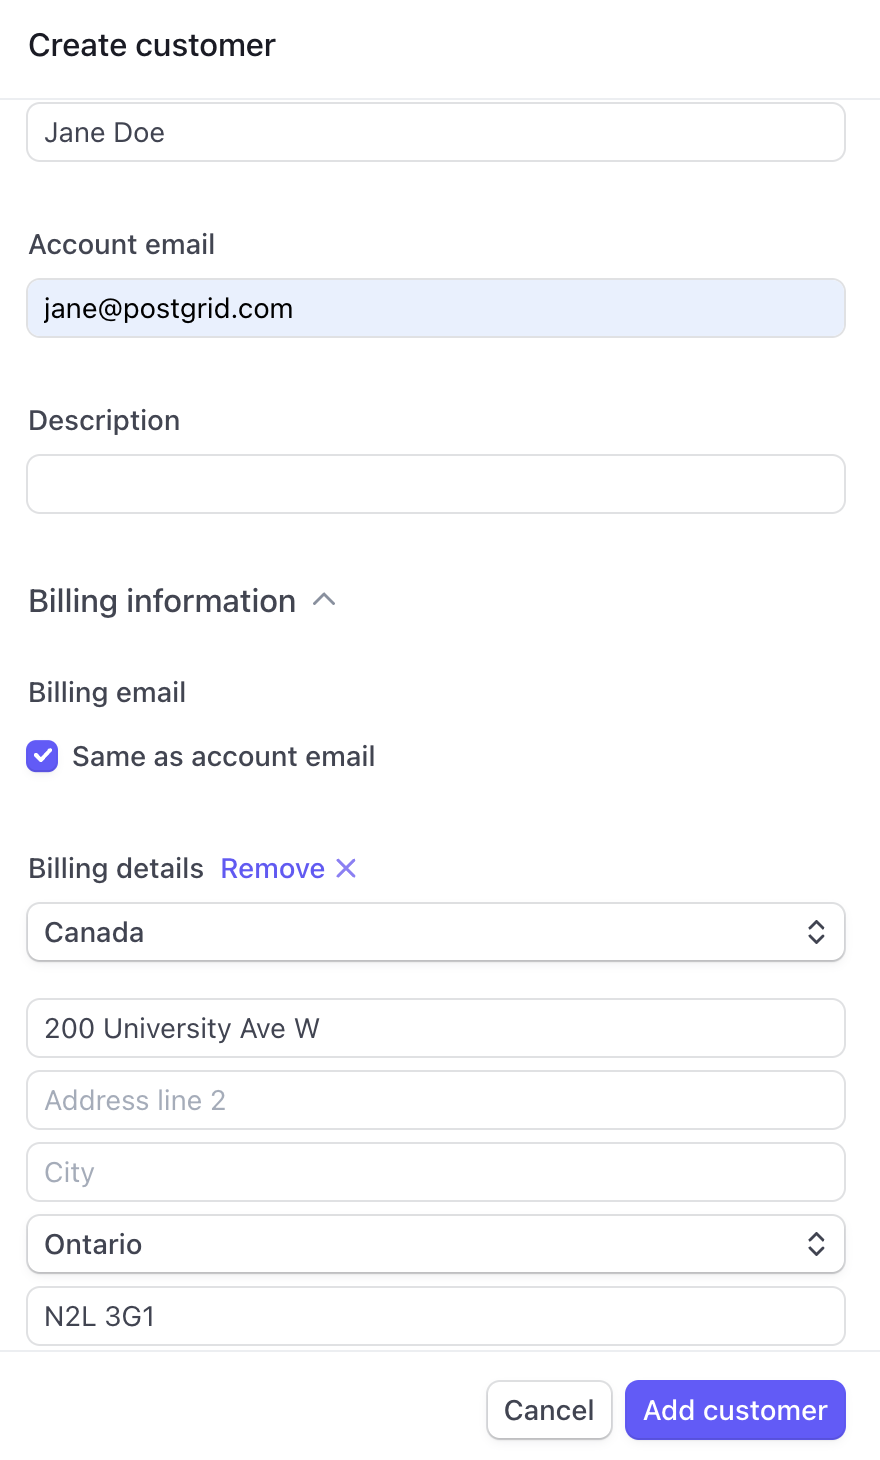
- After adding the customer, navigate to the new customer and open their profile, the address validation results will appear under Metadata section. In this example, we see that the billing address has been corrected along with the the error that has been corrected, in this case PostGrid has found the missing city and has completed the correction with no user intervention.

- Creating a contact with an address that fails to correct
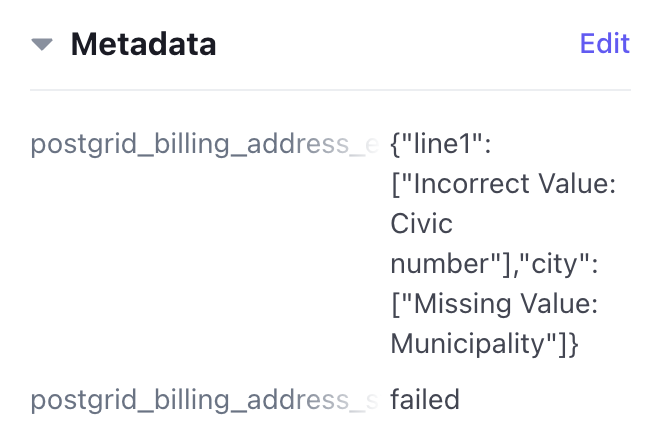
In this example, we have created a customer where the billing and shipping address has an incorrect postal code and missing city, this address should fail to verify and PostGrid will point out the missing city and incorrect postal code error.
- Create a customer with an address of 200 University Ave W in Ontario, with an incorrect postal code of N2L 3E5 and a missing City input. After entering the information, click Add customer and the address auto-validation will run its validation.
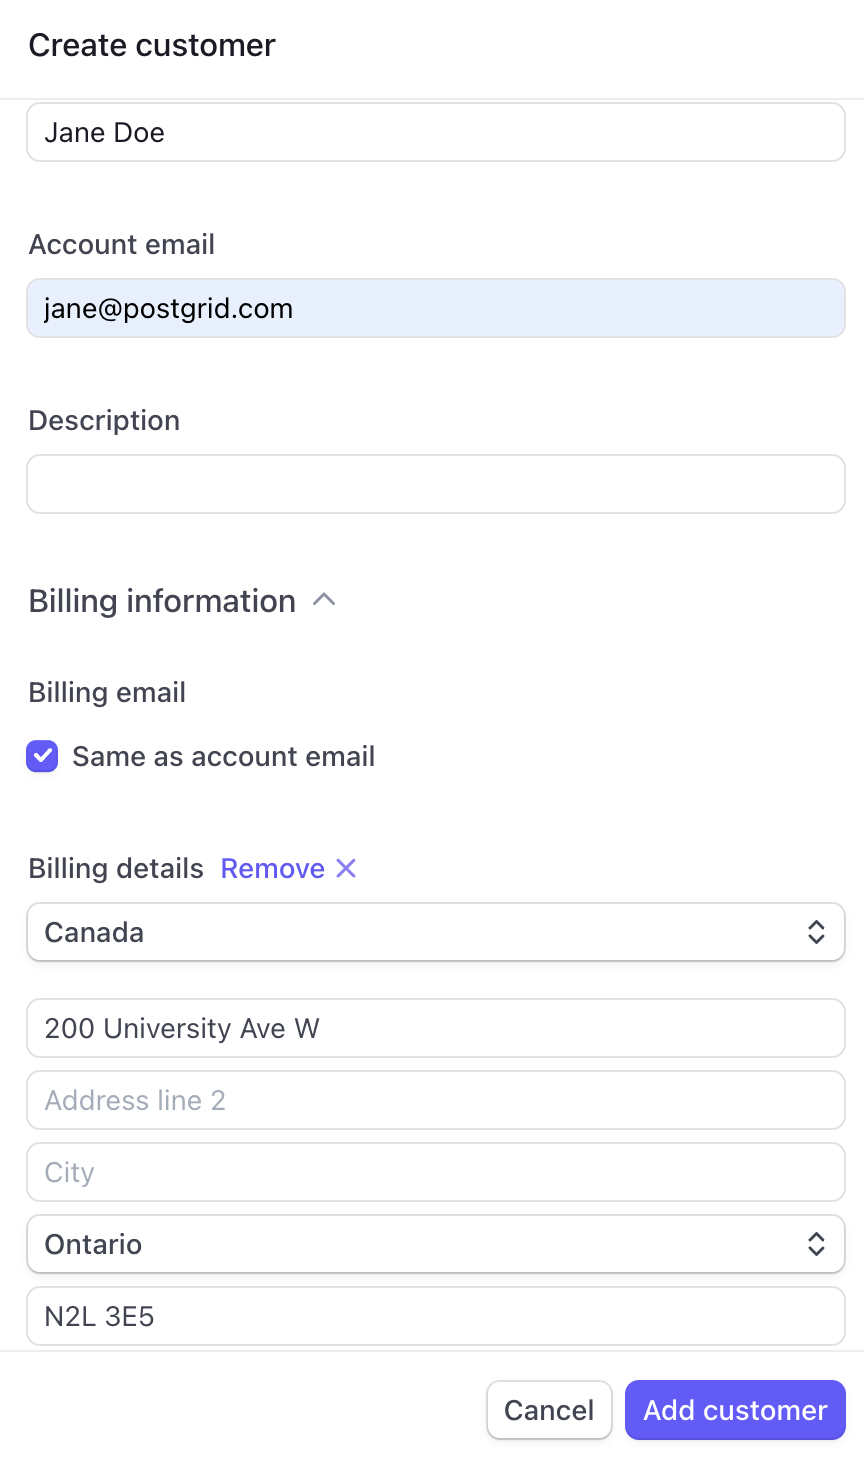
- After adding the customer, navigate to the new customer and open their profile, the address validation results will appear under Metadata section. In this example, we see that the billing address has failed along with the the error indicating an incorrect civic number and a missing municipality or 'city' value
Customer Address Verification Summary
In order to verify addresses using the Stripe's PostGrid application, navigate to the Customers tab on the Stripe dashboard or select the Customers option from PostGrid's main pop-up menu. Both options will lead you to the Customers tab on Stripe's dashboard.
From this location, you have the choice to either verify all of your customers' addresses in a batch or select an individual customer to verify their specific address.
Batch verification will provide you with the number of customer addresses that have been corrected, failed, failed to update, and verified. However, you will need to click on a specific customer to see the reason for a verification failure under the Metadata section.
Single Customer Address verification can be used to retrieve more information about the results of an address verification, you will receive one of three messages: either the address is valid, corrected, or failed to verify, with an explanation of issues. Please note that if Address Auto-validation is toggled on, PostGrid will verify and correct each customer address as they are created.
Address Auto-validation will validate each customer's address as they are being creating. This will validate and correct any address inconsistencies or fail to verify and provide you with the errors that need correcting.
Invoice Mailing
The second feature that PostGrid offers within the Stripe platform is the capability to mail an invoice to a customer with a validated address. To execute this, follow the steps below:
- Navigate to the Billing section, then to Invoices on the Stripe dashboard, or click on the Invoices option in PostGrid's main pop-up menu.
- Choose an invoice that you would like to mail from your list of invoices.
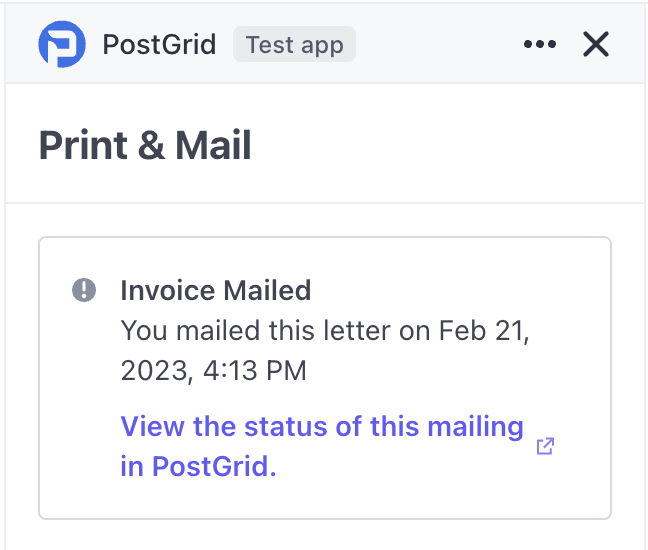
- PostGrid will open the selected invoice in its pop-up menu. If the invoice has already been mailed, you will see an 'Invoice Mailed' message:
- If the invoice hasn't been mailed yet, you can click on the Mail Invoice option within the PostGrid menu.
- Next, confirm the recipient's address and click next.
- Enter the sender address
- Choose your mailing options, such as whether to print in color and whether to use express shipping, then click send to mail the invoice.
- You can track your mailed invoice on the PostGrid dashboard.
Summary
The PostGrid Stripe App allows you to leverage its address verification and invoice mailing and printing features.
Select Customers to verify all your customers' addresses in a single batch or alternatively verify an individual customer address. Select Invoices to mail an invoice to a customer or track an invoice that has been mailed using the PostGrid dashboard on postgrid.com.
Updated 11 months ago